Vinyl Pool Steel Wall Repair And Step Replacement

TonyV

0
May 21, 2009
13
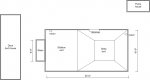
Hello, I bought a house with an inground pool 5 years ago, just North of Boston. The pool was built in the late '70's. 16 X 32 rectangle steel wall construction with vinyl liner and fiberglass (I think) steps. The liner is the beaded type with aluminum combination bead receiver and bull nose coping. I actually have all the original documentation from the pool. It was manufactured by Weatherking.

4 years ago, when I went to open the pool, the shallow end only had a couple of inches of water - it looked like the liner leaked at some pinholes in or near the seam between the side wall part and the floor. I had a truck of water delivered to fill the pool and I managed to patch the holes with underwater patches. It's held up well, and I've had to patch a couple more holes over the past few seasons, but the pool never lost very much water over the winters.

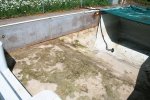
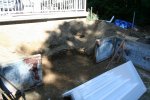
This year, the water drained out again over the winter, leaving only a few inches in the shallow end. I am planning on replacing the liner myself, with help from friends and someone who has done liner replacements himself.

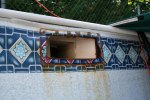
I had always noticed a little rust near the skimmer. When I removed the face plate from the skimmer (Hayward wide-mouth) to prepare to remove the old liner, it looks like the steel wall has been in direct contact with the pool water, because there is a lot of rust. There was a gasket between the face plate and the liner, but it does not cover the exposed edges of the steel wall. The water that flows into the skimmer has been in direct contact with the steel wall. There is some rust damage and part of the steel is quite decayed. I assume this was not installed properly. I want to repair the steel wall before replacing the skimmer and liner. I was thinking I could cut out a section of the steel around the skimmer opening and put a new piece of material in, securing it with counter-sunk stainless steel self-tapping screws or bolts.

My questions are:

- Do skimmers have a way of sealing the edge of the steel wall so that water does not come in contact with it?
- Should I use a piece of steel to repair the wall, or is there a water-friendly material that I should use, such as some kind of strong plastic?

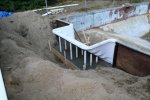
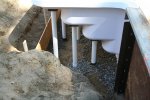
My second issue is regarding the steps. The steps protrude outside the perimeter of the pool rectangle (as opposed to projecting into the pool). They are white, are bull nosed at the top (to meet up with the coping) and I believe are made out of fiberglass. They appear to be the original steps and have begun to crack and fade. Since I am replacing the liner, I thought this would be a good time to replace the steps. From what I can tell, it looks like the only mechanical connection is the screws that hold the liner in place. There is a faceplate strip along both sides the bottom edge of the steps that screws through the strip, through the liner and steps and thread into the steel.

My questions are:

- Are these steps manufactured to some standard dimensions so that I can simply drop a new set into place and the support structure underneath with be acceptable?
- Does anyone know of a good source to buy a set of steps as a homeowner as opposed to a pool contractor?

Thanks for any advice you have.

- Tony
 
Tony, welcome to TFP!!

I've done what you're talking about a couple dozen times :)

With either the skimmer replacement or the stais, you'll need to bust out a section of deck surrounding them :(


Because of the economy, the company I work for is doing more 'rehabs' than new pool builds - some pics would help :wink:

The stairs should be a standard size (6" or 8') but... getting a new step in there easily depends on whether the original PB installed the pool 'square' :cry: - if they didn't, there will be a lot of work to get the stairs in :rant:

You also need to dig to the area down to the bottom of the panels, break up the 'footing' for ~ 2' past the stairs - they are bolted all down the steel panels that they attach to and you need room to make the replacement.

It might be best to let a pool company do this but, if you want to DIY, I can tell you how and what to do/ watch out for 8)
 
Thanks for the replies waste and silcozot. Great pictures silcozot! What an amazing transformation from hole in the ground to backyard paradise.

waste: Thanks for the info. I wasn't sure how much securing was done under the deck. As it turns out, I talked to local pool company and they are coming out on Monday to check out my situation and give me an estimate for the steps - both to replace them for me, and also to find a suitable replacement for me to install.
When I was at their store, they showed me a skimmer repair panel that is made for my situation - when the steel panel is deteriorated around the skimmer. It is pre-cut for a wide-mouth skimmer and screws into place over the existing steel. I didn't peel back the liner enough to see how much of the panel is deteriorated, so I am going to wait until I know how much damage there is.

Depending on the price that they quote me, I may end up attempting to do this myself. I have a friend in the construction business that owns his own bobcat mini excavator, etc. and he has worked on pools before.

Now I'm just trying to decide how far I want to take this: If I'm replacing the liner, and possibly the stairs, I may want to replace the bead receiver/coping since it is old and faded. I've heard the painting it does not work well and the only way to refresh it is to send if out to have it powder coated. If I were to replace the bead receiver/coping with just bead receiver to eventually put in a paver deck, I could just use coping stones, right?

I will try to upload some pictures later today.

Thanks again,
Tony
 
Tony, I haven't seen the precut panels you spoke of, but it's a good idea :thumleft: What we'll do if the panel is too far deteriorated, is cut a steel patch for that area and move the skimmer over a few feet (cutting a new opening in a stable part of the wall)

Please let us know what the pool co has to say and we'll review your options :-D
 
Casey wrote: Did you DIY?[/quote]

Yes, my Bobcat and I spent all our free time last year, without bob I would not have tried!

the only other help I had was with the concrete 14 or so yards!

must say we are happy happy with the results, can't get my wife out of the pool! :p
 
Thanks for the info, waste.

The pool company owner came out yesterday morning - he does all of the site visits and estimates.

I had asked about the step replacement. I wanted to see how much he wanted to replace them, or how much he could sell me a new set for, and I would do all the work and replace them myself. He thinks replacing the stairs is too much work and too costly - and new steps would suffer similar wear from sun, chemicals, etc. Instead, his recommendation is to install a new bead receiver on top of the existing aluminum coping (after re-lagging the coping to the steel underneath) and continuing the new bead receiver onto the top of the steps. The new bead receiver would then have an edge to take a cantilever edge concrete pour - right over top of the aluminum coping and the top edge of the fiberglass steps. A new liner would be fabricated and installed right over the fiberglass steps.

I questioned the durability of pouring concrete over these other materials, as they seem like they may be subject to movement, but he assured me they have done this type of work before. They work with one mason company (and have for the past 30+ years - they are both family-owned businesses) for all of the pool decks they install.

The company would also repair the steel that is rusted out and install a new skimmer. He said that the new skimmers attach to the inside of the steel wall, so that the gasket is on either side of the liner, not on one side of the steel and on one side of the liner - thereby keeping water away from the steel. I can't picture how that would work, but maybe there is a way to do that.

I asked if there was some way I could do some of the labor to save on the cost - and I would have completely understood if he said he didn't want to run a job that way. He said that if he's replacing the line, he wants his crew to prep the pool - and I understand that completely. He said when he plans a job with a new deck being installed, he replaces all the plumbing, just to ensure it won't need to be dug up to be repaired. He said it would be fine if I ran the new plumbing myself, so that is at least a little bit a can save on.

Also, he said the job could be done in two parts - all of the pool work now, and wait on the pour of the concrete deck until either the fall or next spring. The only issues I see there is having the new bead receiver up so high and having to step over it to get in and out of the pool, and the loop-loc safety cover would need to rest against the new bead receiver.

I should have an estimate in the next day or so. I have a bad feeling it's going to be a lot more than I originally planned for.
But, when I consider the cost of my buying new steps, renting equipment to demo the concrete deck around the steps and digging down, demoing the concrete footer at the base of the stairs, and then re-installing the whole thing and renting a concrete mixer, etc.... I wonder how much that could end of being. I had planned to do something with the pool deck, but that was going to be several years down the line when I can put aside enough money for it...


I have some pics I will post a little later this evening or tomorrow morning.

Thanks for your time and interest in my story... I will let you know when I hear about the estimate...

-Tony
 
<<Bumped>>

I got the estimate from the pool company yesterday. I guess I shouldn't be, but I am surprised at the cost.
If the cost of just doing the work on the pool also covered the new deck pour, I'd be happy.
I don't blame them at all, it is a large amount of labor and pools are kind of a luxury item, so their price is probably fair.
But, me being a huge DIYer, I think I am going to tackle this myself with help from some friends, and a friend of my dad who built his own pool in himself (he bought all the materials: steel, liner, vermiculite, etc and had the hole dug and did everything himself).
I'd use the pool company plan as a guide - that is if folks on this forum agree that it is a good plan.

I guess I would not replace the fiberglass stairs jsut as the pool company suggested, and instead install the liner over the stairs.
I still question the installation of the new bead receiver, or extrusion as he called it, onto the aluminum coping. This puts the liner higher up by about 3-4 inches. However, the top edge of the stairs is very close to the top edge of the coping, so that would allow all of the new bead recevier to line up nicely along the edge.

Any advice would be greatly appreciated.

Thanks,
Tony
 

Enjoying this content?

Support TFP with a donation.

Give Support
Here are a couple of pictures of the steps, also showing the coping, and the skimmer.

[attachment=1:ykn926su]steps2.JPG[/attachment:ykn926su][attachment=0:ykn926su]skimmer2.JPG[/attachment:ykn926su]
 

Attachments

  • steps2.JPG
    steps2.JPG
    183.7 KB · Views: 1,223
  • skimmer2.JPG
    skimmer2.JPG
    197.6 KB · Views: 1,173
Hey Tony, sorry I wasn't on line last night :oops: I didn't get home til after 8:00 and the wife told me in no uncertain terms that she expected me to spend some time with her :whip:

My 'knee jerk' reaction to putting receiver ON existing coping and linering over pre-fab stairs is - don't do it! (However, part of this may just be because I've never seen nor heard of doing them before) You're planning on a new deck anyway, so jackhammer out the old deck and rip out the old coping :hammer: 
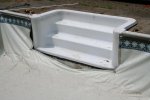
The stairs should either be replaced or resurfaced (there are companies that can do that :wink: ) - if you keep the stairs, you'll need new gaskets and faceplates. I strongly doubt that the liner manufacturer could produce step liners for those curves and the protrusion into the pool that would go in without wrinkles or premature seam failure! Also, his fear of the new steps are unfounded, provided you plan on going BBB and keeping on top of your pool chemistry :goodjob: You've already mentioned the issue with the safety cover...

As for replacing the plumbing as a matter of course - that's a nice idea, but I would just pressure test the lines and only replace any that were bad. Usually when we rehab a pool the way you're talking about, we will redo all the plumbing, but that's only because we reconfigure the entire pool plumbing (going from 1 skimmer and 2 returns to 2 skimmers, 2 low suctions and ~ 8 returns, high and low). {speaking of which, Casey I am sooo sorry not to get back to you yet on your proposed plumbing :hammer: - I just haven't had any time to break out the Crayolas and take a pic of the "art"}

It's your pool, you can handle this any way you want to and I'll still be here to offer tips and tricks on doing the work yourself, if that's the way you want to go :thumleft: (I can not help you with pouring a cantilever deck - I've only done 1 and one of the forms failed, turning it into a nightmare :rant: ) It helps that you've got a dude who did his own pool, and you sound very capable of using the basic tools that are required and said you had the manpower to help - with a few tips from me and others here 8)
 
Thanks again waste.
I have to agree with your assessment. I don’t like covering things up – I’d rather replace what needs to be replaced and make everything as best as it can be.

From what I have read, I think the best thing is for me to do the following, in this approximate order:

1. Remove foam wall protector covering
2. Sand down rust, treat with rust inhibitor, etc
3. Excavate old bull nose steps and install new cantilever steps
4. Install piece of steel over old skimmer cut-out
5. Cut a new hole for skimmer(s) and install new skimmer(s)
6. Install new plumbing
7. Remove old aluminum coping/bead receiver
8. Install new bead receiver directly onto top of steel walls
9. Repair vermiculite
10. Install new foam on walls
11. Install new foam on shallow-end floor
12. Install new liner
13. Fill pool and get filter started, etc.
14. Pour new deck

Last weekend, I removed the liner, and dug out the skimmer.

The vermiculite has some soft spots, and there is about 18-24 inches of ground water in the deep end. I have read that it is common to dig out a pit in the bottom of the hopper, install a foot valve with pipe running up under the vermiculite, behind a wall panel and up to a pump. This can be used to drain the hopper for vermiculite installation and to keep the water out while the liner is installed.

Here is a diagram of the pool, showing the orientation and the skimmer and return locations.

[attachment=1:254adyu1]pool diagram.jpg[/attachment:254adyu1]

I was thinking it might make sense to replace and move the existing skimmer (due to rusted steel wall), add a skimmer to the other long edge of the pool, add an additional suction line (there is no main drain in this pool) and add a return or two. What would be a good configuration for plumbing? What size pipe: 1.5 inch? 2 inch? All individual runs or couple some together?

Vermiculite: There are lots of roots in the shallow end, a couple of voids and some bumps around the side slopes into the hopper. What is the best way to address this? Does it make sense to scrape it down ½ inch or so and do a new thin coating over the entire surface, or just fill the voids?

[attachment=0:254adyu1]IMG_3751.JPG[/attachment:254adyu1]

New steps: What is a good source/brand ? I found these Sweetwater steps online: http://www.poolwarehouse.com/inground-pool-step.html
I was thinking of the model HS308 – eight foot wide cantilever steps.

Cantilever bead receiver: what is the best material: plastic or aluminum? I found these two:

http://www.poolwarehouse.com/swimmingpoolkitcoping.html (cantilever)

http://linertrack.com/2liner-trac.aspx

Thanks again for all the great help that is offered on this great site.

-Tony V.
 

Attachments

  • pool diagram.jpg
    pool diagram.jpg
    35.3 KB · Views: 1,039
  • IMG_3751.JPG
    IMG_3751.JPG
    226.5 KB · Views: 1,065
Tony, that's a lot of work and a lot of questions :mrgreen:

Let me start with the question I can't answer at this point - "what cantilever receiver to use?" Are you going to pour the deck yourself? If not, talk to whoever is going to pour it as to what they want to work with (* there is a style of receiver available that has 2 tracks 1 for the liner and the other for the cantilever form ) When we do concrete cantilever decks, we build the pool and then wait until the ground has settled and the deck is poured before dropping the liner (deck guys are VERY! messy and stuff always ends up in the pool, also sometimes they need to put up scaffolding in the pool to do the cantilever - which is a little hard in a pool full of water :wink: )

The rest of your plan sounds good :goodjob:, but I can give a 'tweak' to some of the things you plan. I just posted some pics here on plumbing layout.

I'll catch up with you on the vermiculite, water problem and other stuff later 8)

Let me know about what's going on with what I've posted here and well address the rest :goodjob:
 
Thanks again waste.

Ok, I understand the plumbing layout, thanks.
I've been reseaching some prices of items I'll need. Can you tell me if this sounds right?

This liner track (2 tracks, one for cantilever form) appears to be $205.50 per 8 foot length. For my 16 X 32 pool, I'd need 11 or 12 lenghts, that adds up to about $2,300.00. Seems kinda steep?
http://linertrack.com/1916doubleliner-trac.aspx

I got a price for the 8 foot wide Sweetwater steps (http://www.hydrapools.com/images/steps/hs308.jpg) of $1,399.00, including shipping. Does that sound reasonable?

Two more questions:

Lights: how many for this size pool? What kind of niche, PVC or stainless steel? What is a good light?
Diving board: I currently have a diving board. Are there specific requirements that have changed for having a diving board?

I'm also looking forward to hearing about what I should do about the vermiculite, and ground water.

Geez, I got a lot of work ahead...

Thanks,
Tony
 
Ok, I've been away for a while. I was busy with traveling for work and most of our summer here in New England was a wash out anyway.
So on my pool rehab, I removed the concrete deck last Thursday, and excavated the old steps on Friday. Everything was going fine.
Today, a friend helped me lower the new stairs into the pool. Just to see, we tried to put the new steps into place, and just as waste had warned, the pool is not square and the step opening is about 1 inch too small. Now what? Should I cut back the un-square side of the shallow end wall by 1 inch to accomodate the lack of squareness and attach a new U channel piece of aluminum to support the wall.

A few other items that will be coming up soon:

Vermiculite: A lot of the pool bottom has divots, small holes, soft spots, etc. Should I remove all of the vermiculite and replace it with new, or try to repair what is there now? There seems to be parts that are still damp, even after many days of sun exposure. And, there is still about 6 inches of ground water in the deep end hopper.

Concrete deck pour: I was planning on a cantilever deck pour, but not until next spring to let the ground settle over the winter. The bead reciever I have only has 1 track, not 2 like I have seen. Can cantilever forms be attached to a 1 track bead receiver with a liner installed ?

Thanks, any advice is greatly appreciated.
Tony
 
Hey Tony, good to see you back :wave:

You've got a good bit of work ahead of you :roll: :(

Starting with the stairs, measure top and bottom of the opening, there's a chance you can 'finagle' the steps in. What we did, once we only had the problem at the top of the opening, was to use 2 sledge hammers to 'crimp' the panel a little (use 1 sledge as a 'beater' to protect the panel and beat the sh*t out of it with the other, until the steps would fit.) The steps have to go in PERFECTLY straight if you do this, there just isn't any room for slop! As they crimped a little, we used a grinder to take off the ~ 1/ 16" needed to make enough room for them. Beat and measure, again and again, until the steps will fit the opening.

Alternately, you can remove one of the side panels (looks like you've got 4' panels on either side of the stair) and buy a series of smaller panels to fill in - like a 3' panel a 6" panel and a 5" panel- which would give you the inch you need. You'd need "A" braces to straighten them properly, but if you're an inch shy top to bottom, this would be easier.

The stairs are a big problem, but can be dealt with if you have the manpower - unfortunately, the cantilever deck is something only the masons can tell you what to do about. I'm not sure if they can pour one with the liner in place if you don't have the double receiver :? A possible solution would be to drain the pool a couple of feet and remove the liner from the bead so they could use that for their forms (use duct tape to keep the liner from falling in the water - but it will anyway :evil: )

Is the entire floor trashed? If there are dips and humps only in the shallow end, a surface coat would do (just remember to order the liner a little shallower than the present depth). The soft spots need to be replaced, all the cement has washed out of the vermiculite and it will never be solid again :cry: You also need to deal with the ground water - I can tell you a couple ways of doing it - by any chance is your pool at the bottom of a hill?

I'll let this percolate for you - as I said before, I WILL be here to help you with your project! :cheers:
 
Hi Waste. Thanks again for all your great information.
To fix the step issue, I was able to dig out one of the 4 foot sections, unbolt it from the corner, and drill new holes in the corner angle steel. This allowed me to shift it by 1 inch and make the step opening exacting 8 feet.

Next I will install the steps and pour a concrete collar around the steps and the entire shallow end side, since I have it all excavated anyway.

I'm very glad to hear that I don't need to remove the entire pool floor. A lot of it is quite solid, but there are definitely a lot of soft spots..

I am planning to pour the deck before working on the pool floor, so hopefully that will make that process much easier.

Ground water: the pool is not at the bottom of a hill. I read somewhere on a pool installation web site that one way to deal with the ground water is to dig a hole in the hopper, carve a trench up the hopper wall, under the steel panel and install piping and a foot valve. Connect the pipe to a pump, and you can drain the ground water easily now and in the future, if the liner needs to be replaced again.
Does this sound like a good plan?

I will also be posting my plan for plumbing soon for your expert advice.

Thanks!
Tony
 
Tony, very glad to hear you found the 1" you needed :goodjob:

The ground water control you speak of is what I've always referred to as a 'well point' :cool: , just be sure to have lots of gravel where the pipe is under the floor and use some 'weed block' cloth mesh to keep all but the smallest debris out of the pipe. If you don't want this line running under the liner, you can dig a hole, outside the deck area, ~ 1 -2' lower than the bottom of the pool, line the bottom 1' with gravel and then put the pipe in (remember the weed block mesh) and fill the hole in with gravel to ~ 1' below the ground level and fill the rest with loam and replant the grass.

It sounds like the project is progressing nicely :cool: If you need more from me/ us on what and how to do the rest - we'll be here for you :-D
 
Okay, update:
I have the new steps installed, and after a lot of tweaking to get everything to line up properly, it looks pretty good. I bolted a heavy duty U-channel piece of aluminum inside the walls adjacent to the steps to help support the steel panels that have some rust decay. The panels themselves are fine, exept for a line of decay right where the old level of backfill stopped and rain must have pooled, etc.
Last Sunday I poured a bound beam around the step supports and the shallow end walls. Strangely, there was no bound before installed before...

The installation seemed to have come out great. Everything is level, straight, and square.
Now that the concrete has had a few days to cure, I want to back fill the area that I excavated to replace the steps. The instructions for the stairs says to use non-compactable material (i.e. no dirt, earth, clay, etc.). The company that sold me the steps says that they fill the entire area under the steps with solid concrete. I don't think that is entirely necessary, as the old steps were only back filled with earth. Please see the pictures below. I have some left over 3/4 " crush stone that may work well for this. Do you think the crushed stone is good to back fill the area?

Next, I will post my plumbing questions...

Thanks againt to waste for all his input, and everyone else commenting and showing interest in my project.
 

Attachments

  • pool-steps03.JPG
    pool-steps03.JPG
    279.9 KB · Views: 501
  • pool-steps02.JPG
    pool-steps02.JPG
    281.7 KB · Views: 491
  • pool-steps01.JPG
    pool-steps01.JPG
    318.8 KB · Views: 492

Enjoying this content?

Support TFP with a donation.

Give Support
Thread Status
Hello , This thread has been inactive for over 60 days. New postings here are unlikely to be seen or responded to by other members. For better visibility, consider Starting A New Thread.