COMPLETED: DIY Travertine Pool / Patio / Waterfall Remodel in AZ

Re: DIY Pool / Patio Remodel in sunny Arizona (lots of photos)

Completing the Cap and Border Tiles / Cutting Tiles for a Curved Border

At this point we had completed installation of 95% of the travertine Cap Tiles on the walls and the 6”x6” travertine tiles on the pool deck border. We wanted to get experience cutting the tiles to fit on the curved borders before tackling the pool coping…and as you will see, we got a LOT of experience. My wife marked all the tiles and I cut them. All the footings had already been poured with a few little exceptions.

Cutting travertine tiles (or any tiles for that matter) to fit on a curved border was a total mystery to me for months. I had absolutely no clue how to do it, and unfortunately I didn’t know anyone who did. Searching the web occasionally yielded absolutely nothing for months (during the fall and winter previous to this 2nd phase of the project). Finally, I found a diagram on the internet that solved it for me. I don’t know where that diagram is anymore except here is a similar one:

https://torontolandscaping.wordpress.com/2011/03/18/cutting-pavers-for-a-curved-soldier-course/

Looking at the above diagram, the correct term I needed to search for all those months was apparently: Taper Joint. There might be more info and/or videos on that term, don’t know cause I don’t need it anymore and I know how to do it. But , DON’T attempt to measure anything (that’s a recipe for disaster) as the above link suggests. The key is to create and use multiple varied-width “rulers” to draw both parallel lines on the two side-by-side pavers. You simply place the ruler that is as wide (or wider, but that wastes material) as Measurement A in the diagram and center it on the gap before drawing your two cut lines. And you can only work and place ONE paver joint (two pavers) at a time…it’s completely wasted work to place future uncut pavers in place.

I am not going to go into further details at this point…but it is EXTREMELY EASY once the process is understood and if you can make straight cuts with a paver saw. Also, once the process is understood, you will realize that there is a big advantage to starting in the middle and working both ways rather than just working it from one side. Possibly a future thread if there is any interest.

Another key, especially for the wall Cap Tiles, is that there is sufficient overhang to account for any stone veneer that you are planning to add to the wall. In our case, the veneer we had chosen varied in thickness from ½” - 1 ½”. Also, the thickness of the mortar to mount the veneer must be taken into account (1/2” – “1 ??)

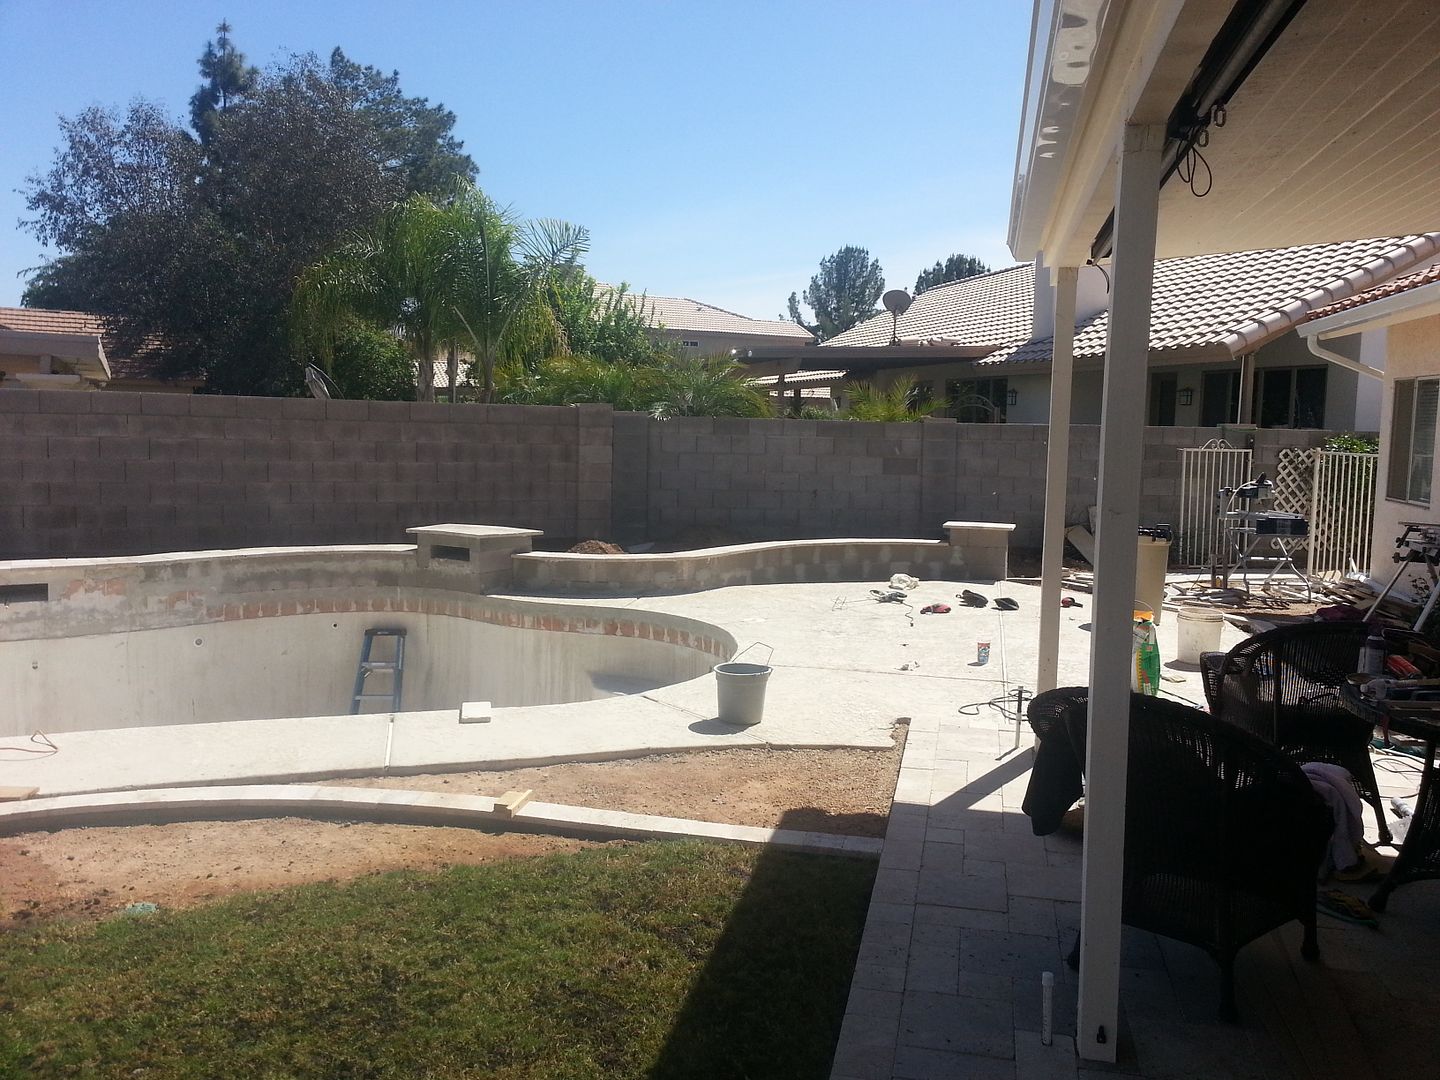
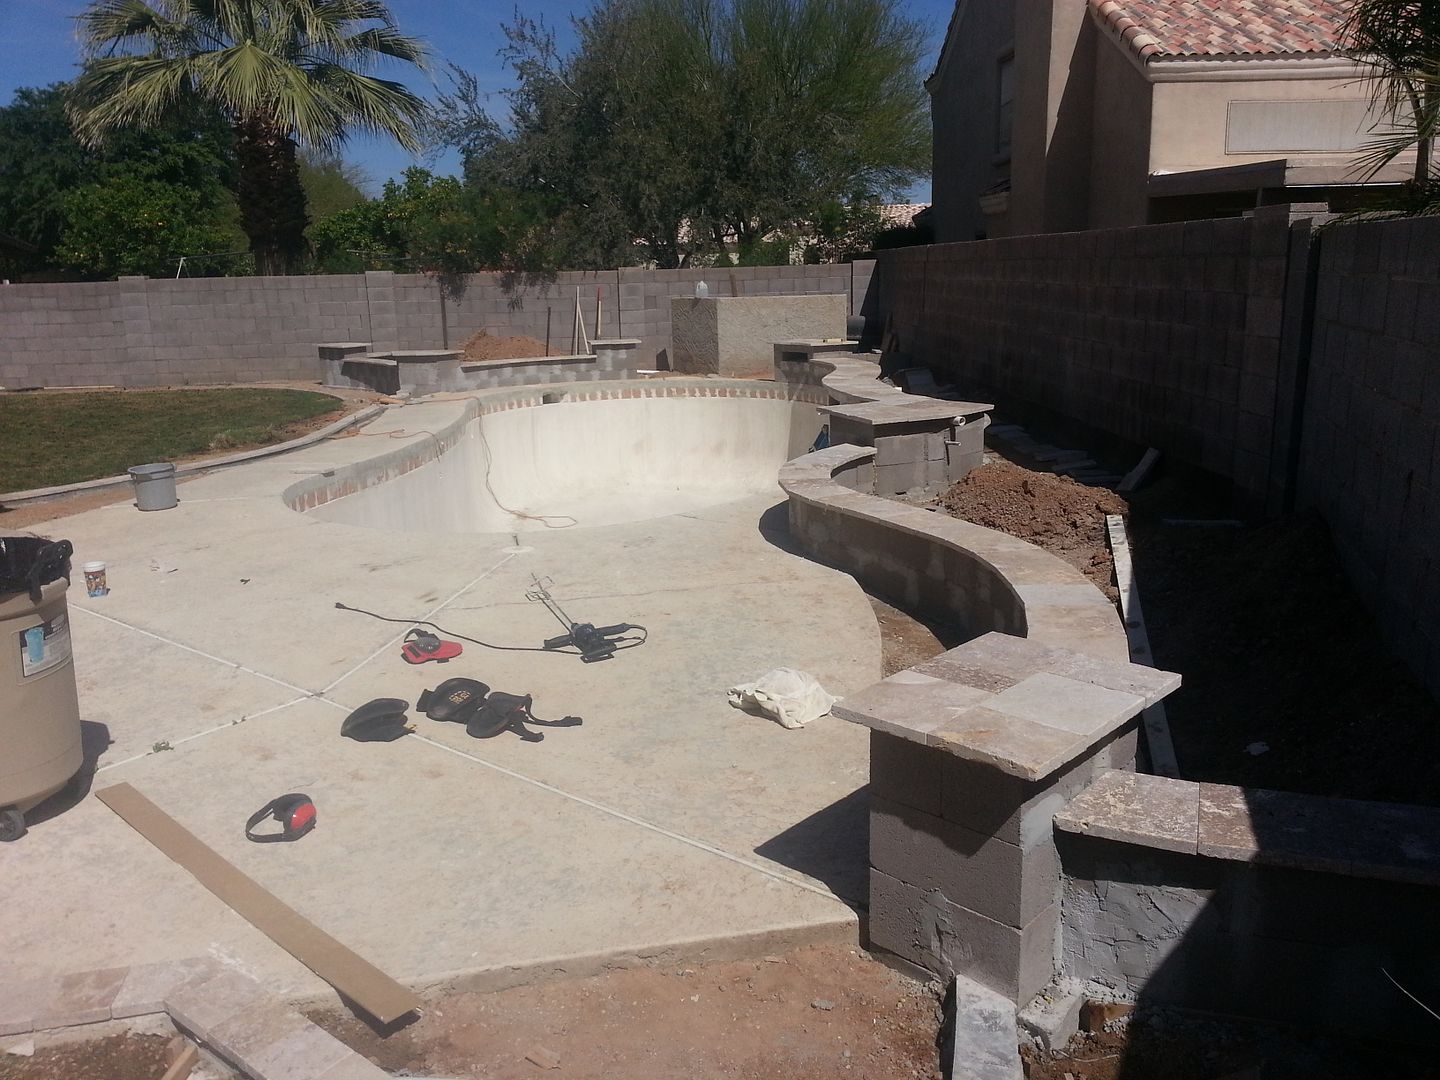
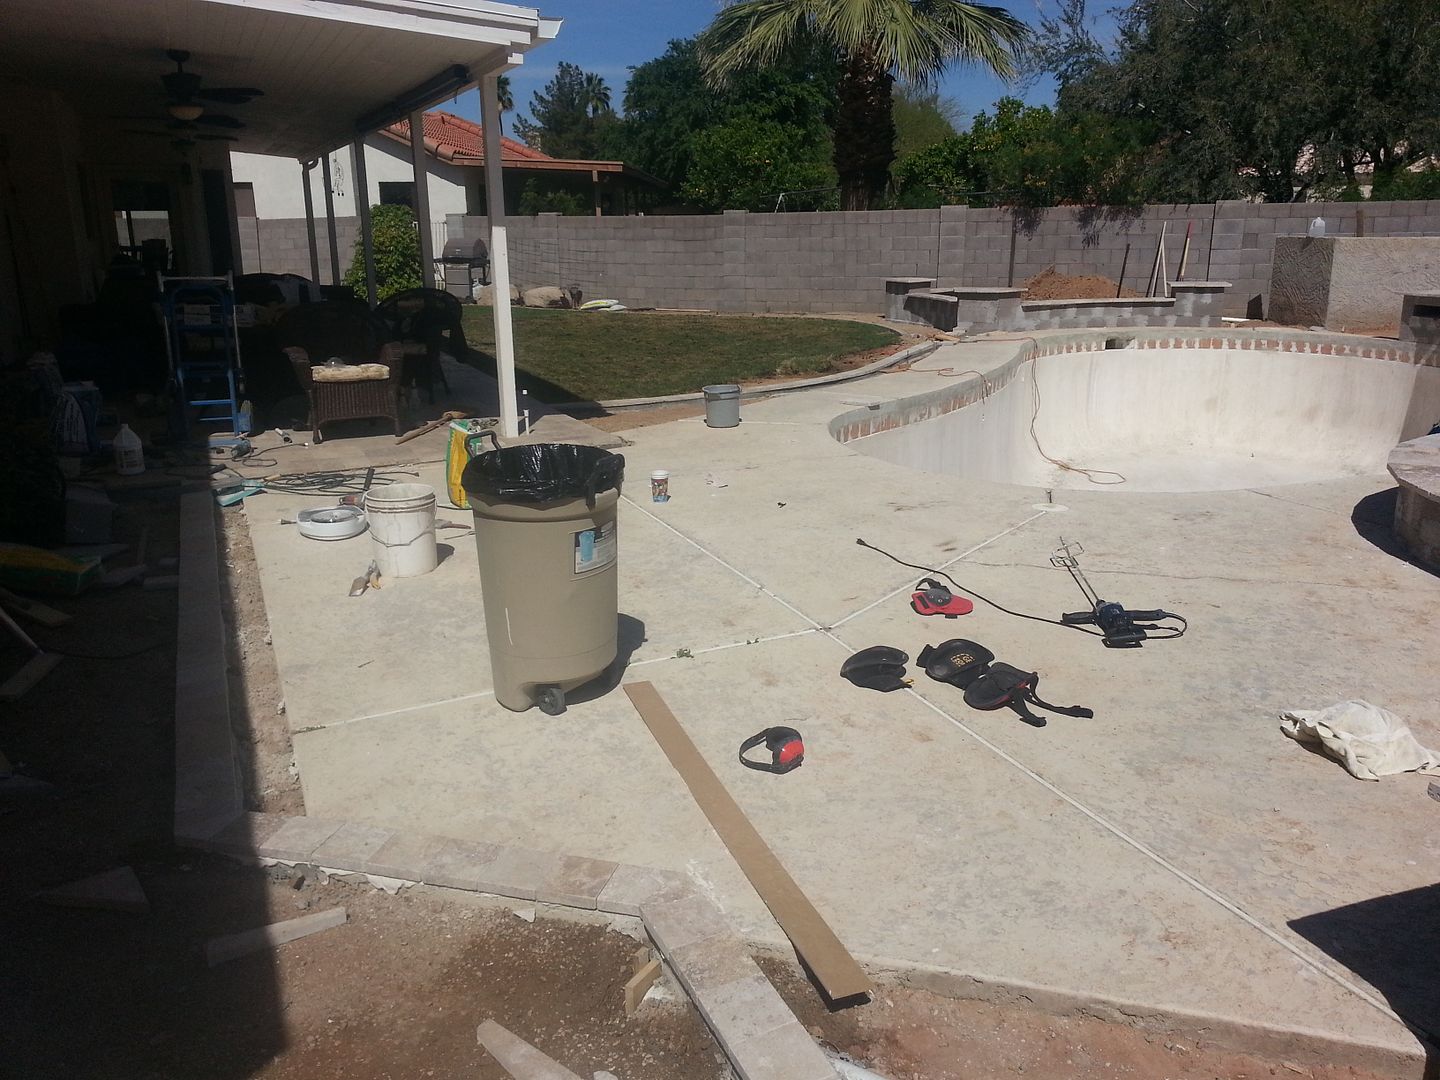
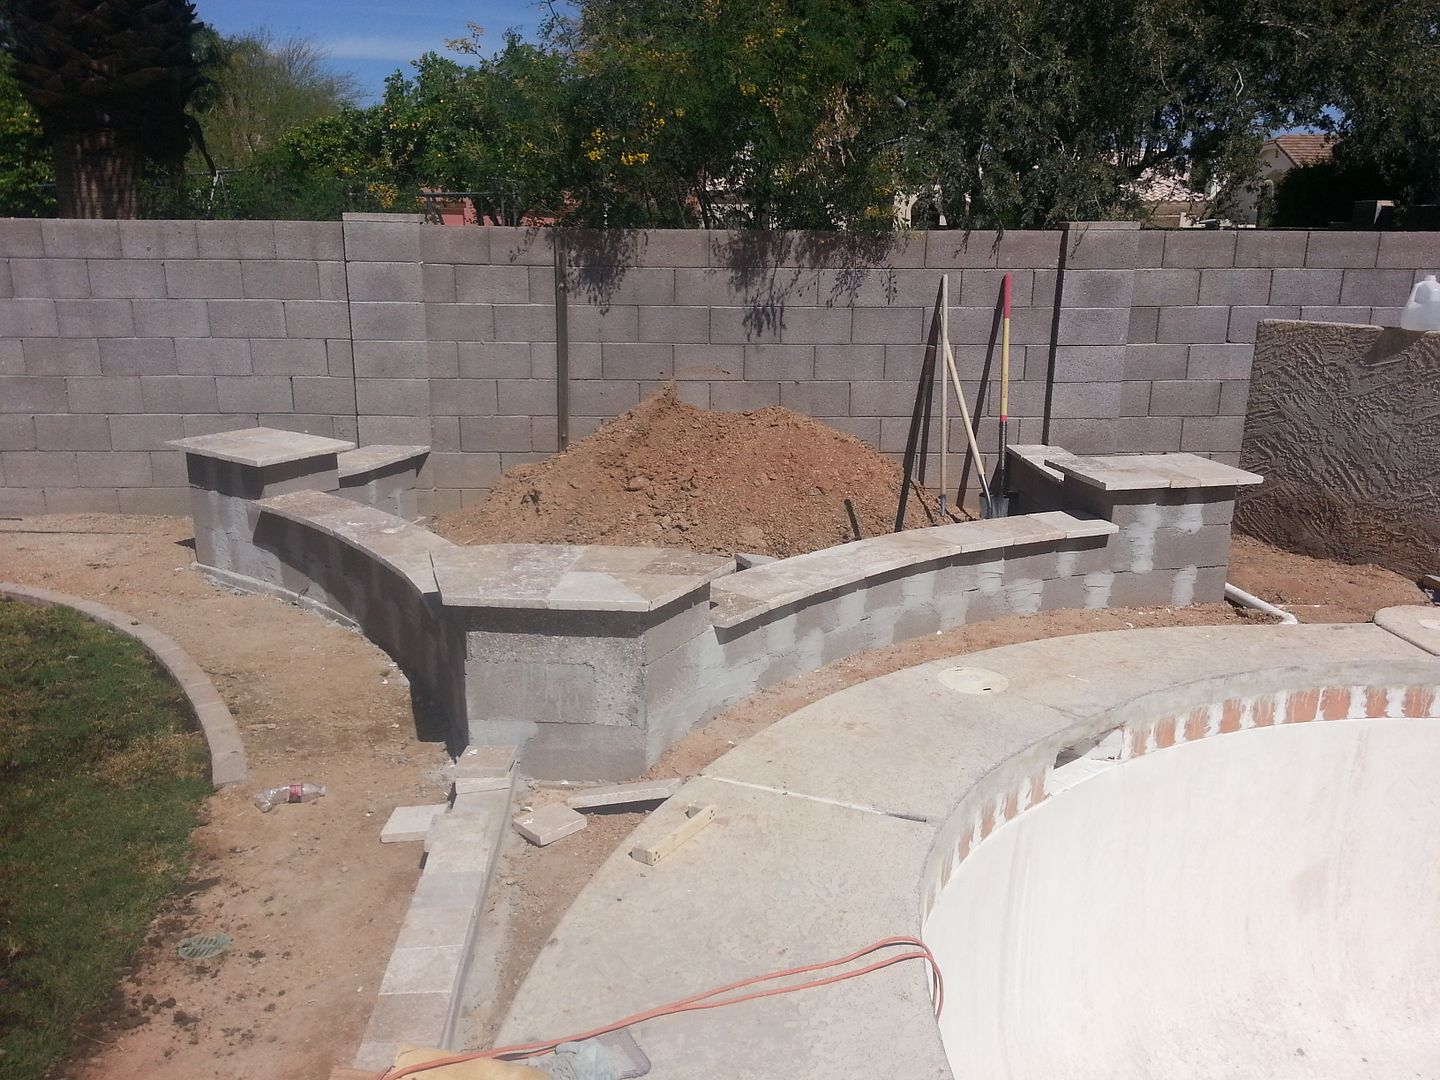
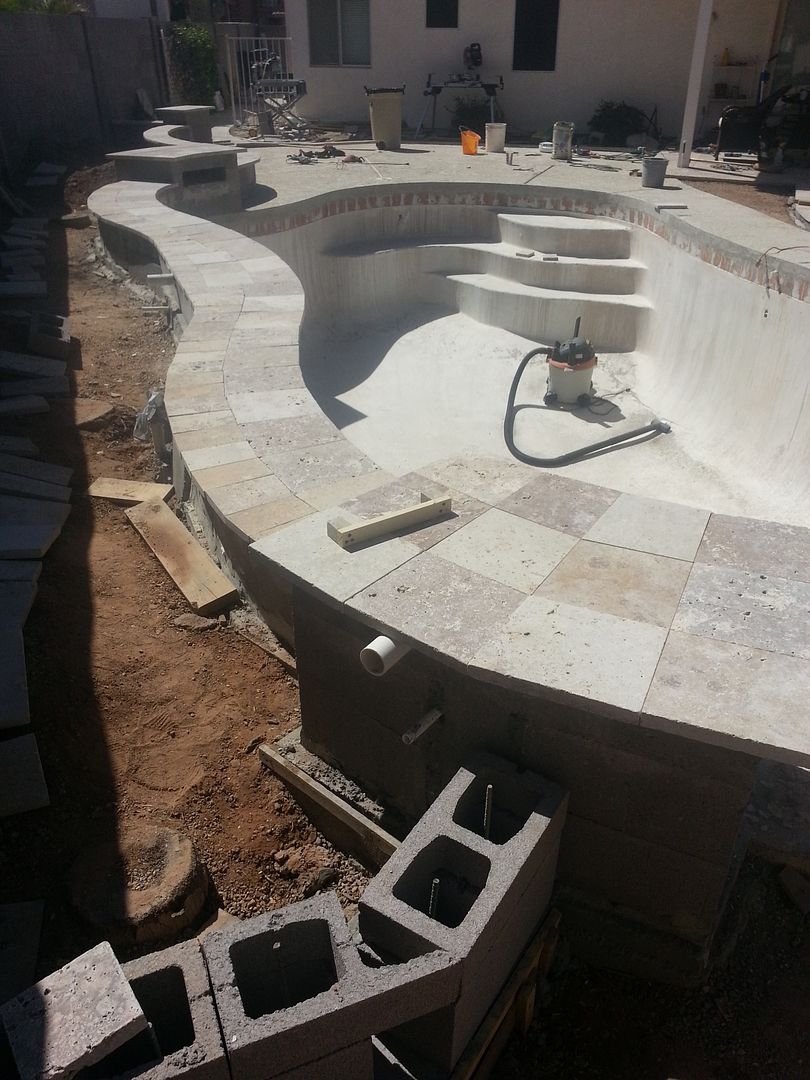
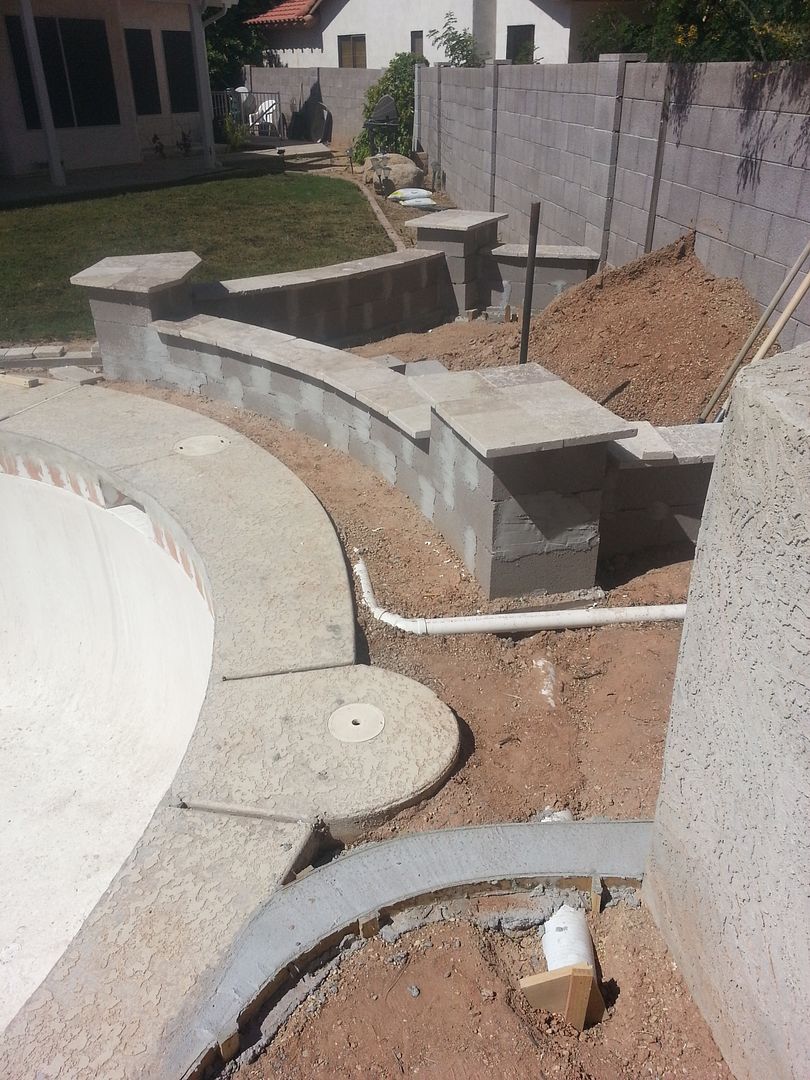
Here are three views of the pool area with the Cap and border tiles mostly in place.


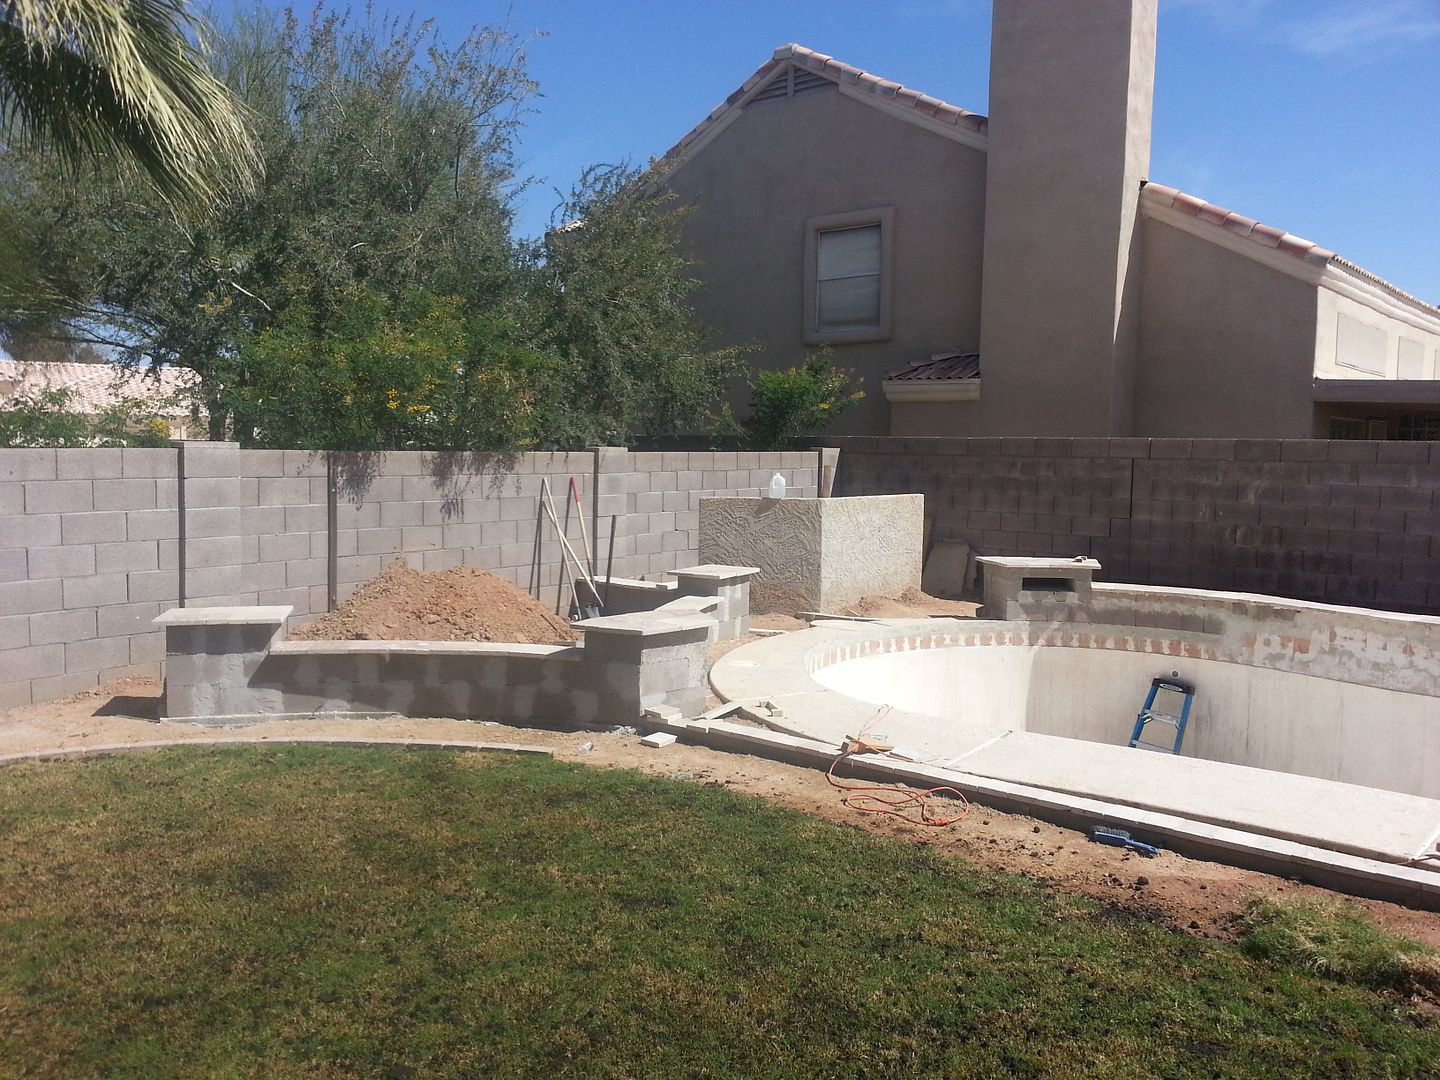
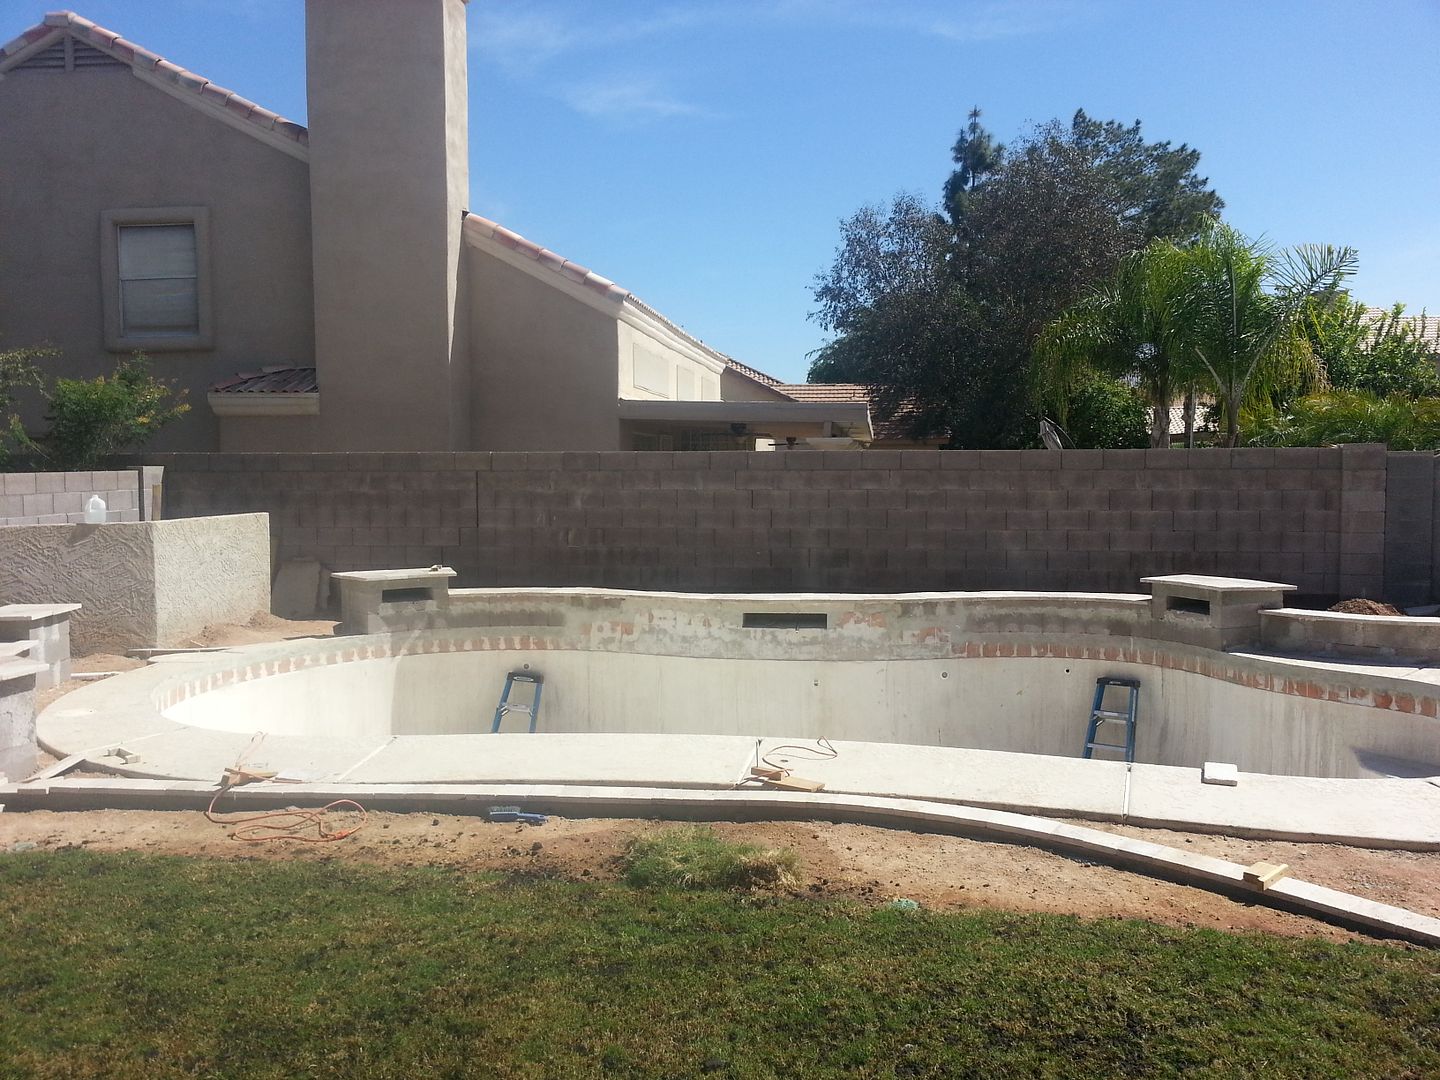
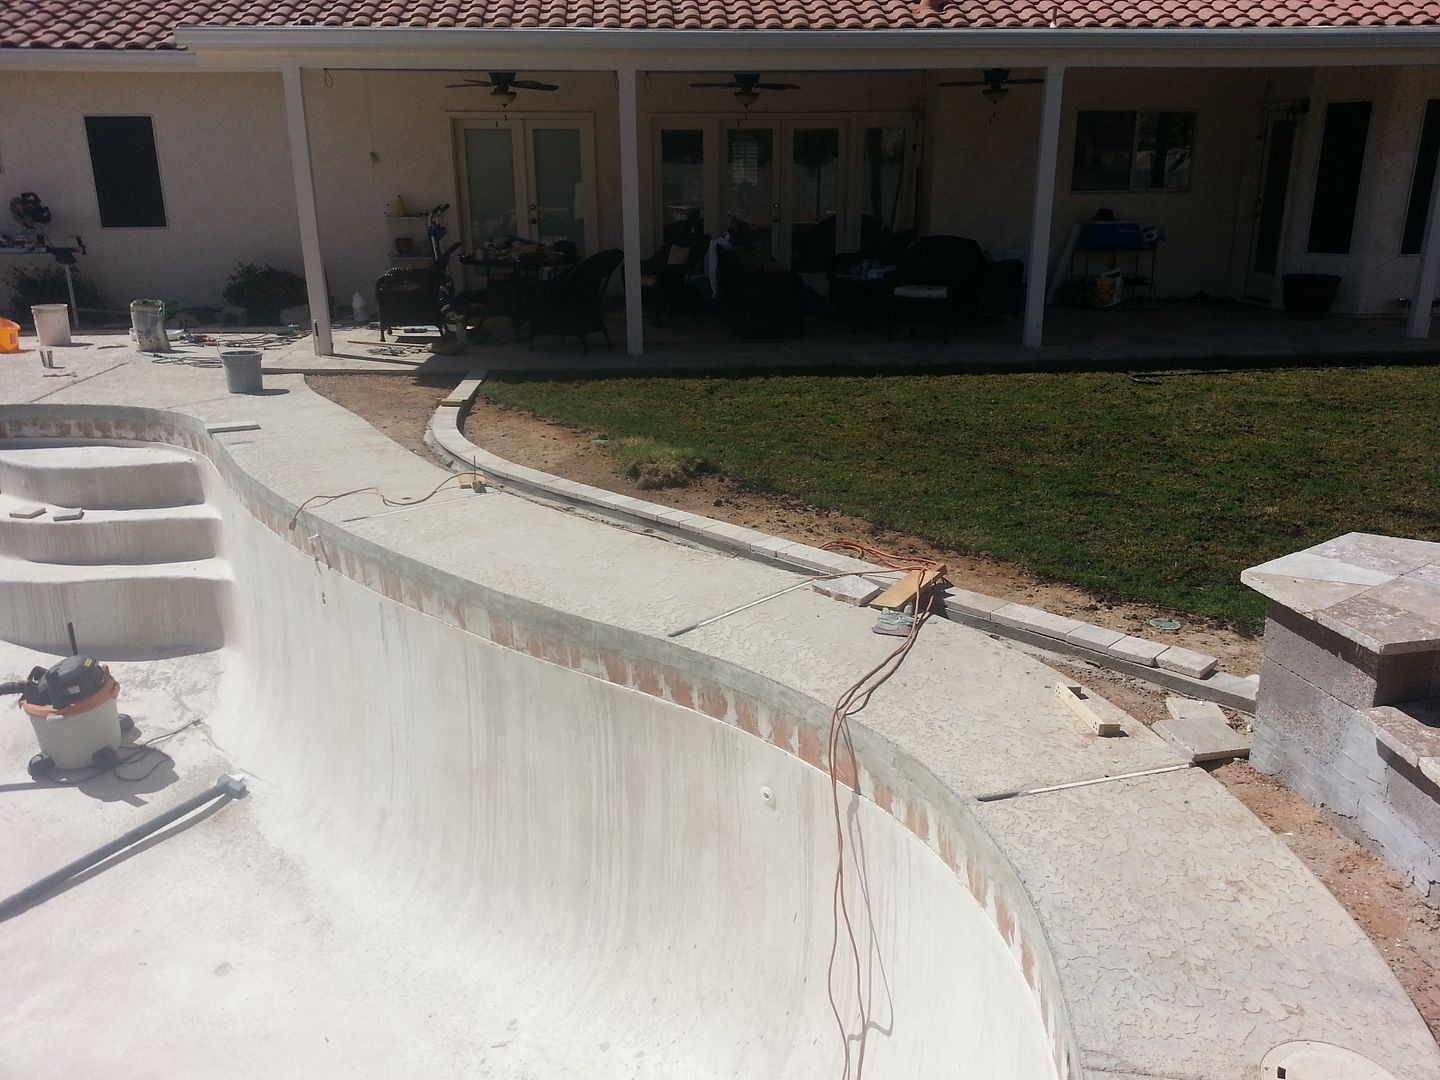
A view that shows the Pool Decking border abutting against the sidewalk, not quite finished as you can see.


Along the length of our back wall


Towards the patio and showing the “drainage areas” for water that gets under the travertine patio deck.


The trapezoidal planter area…drainage areas everywhere I felt I needed them.


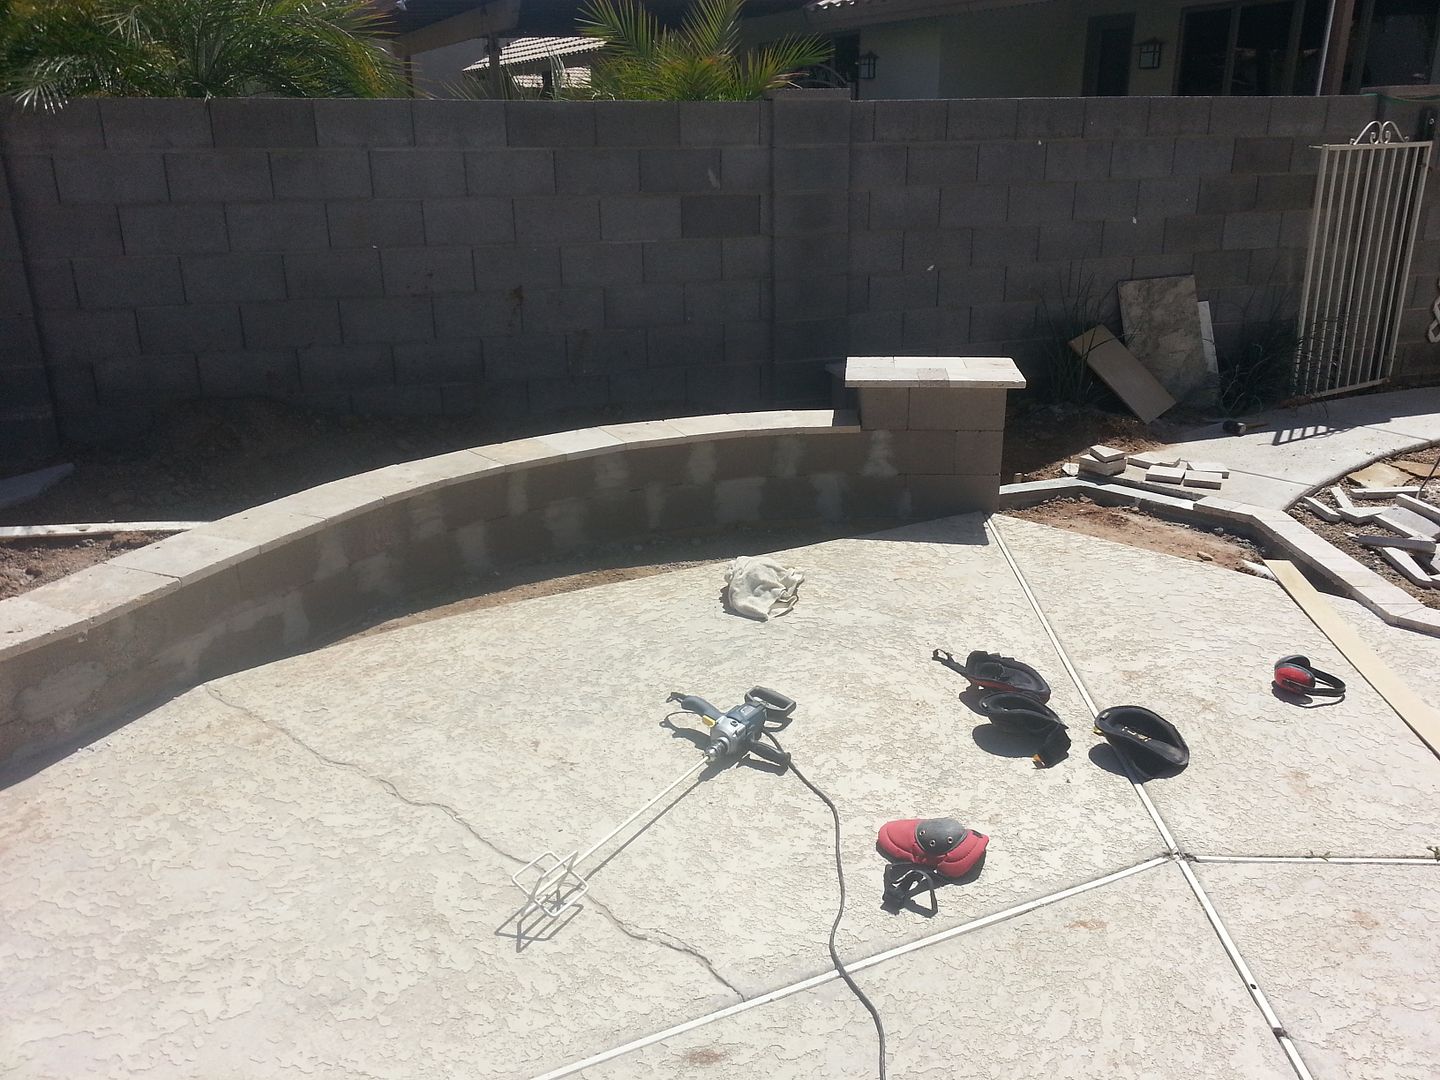
The grass border area, still in progress


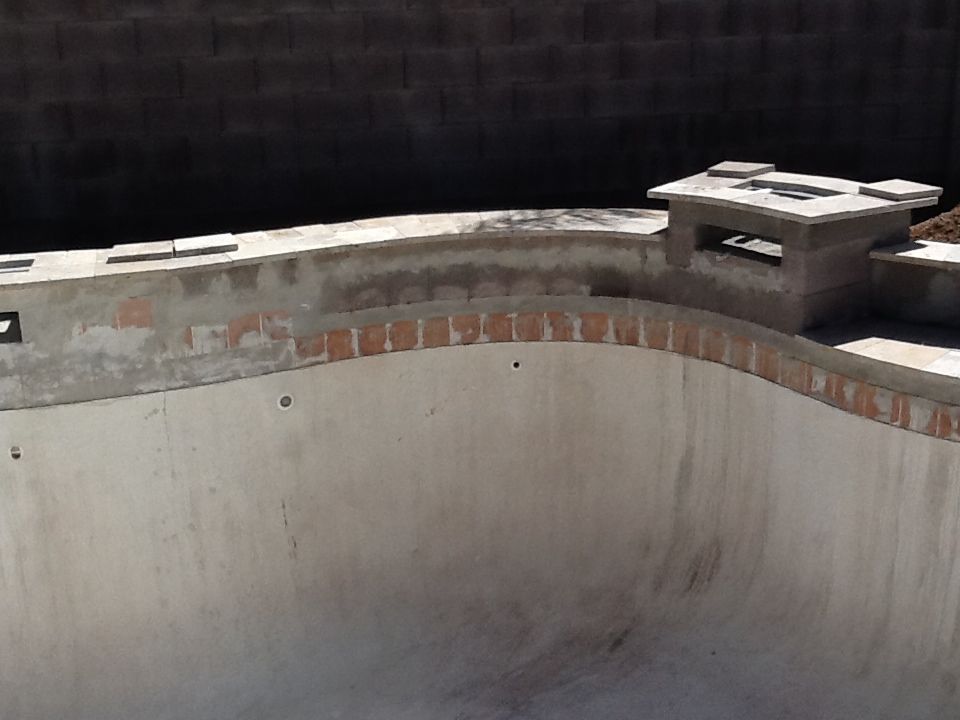
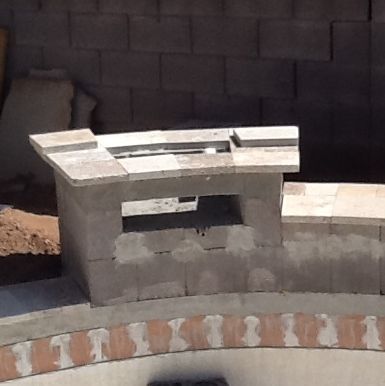
A view from behind the wall. The top of the nearest waterfall shows the tile pattern necessary so that I could still open the top…all outside tiles are thinset into place…the middle two can be removed to access the waterfall inner chamber. At the bottom, a new wall we decided to put it (the story of this remodel, constantly adding in additional work items).


One more view of the trapezoidal planter area, the backwash pipe going to the lawn, and yet another new unfinished border to totally enclose the pool deck. We jettisoned the hole for the basketball hoop…we hadn’t used it in the 20 years so far so we figured we never would. It will be tiled over.


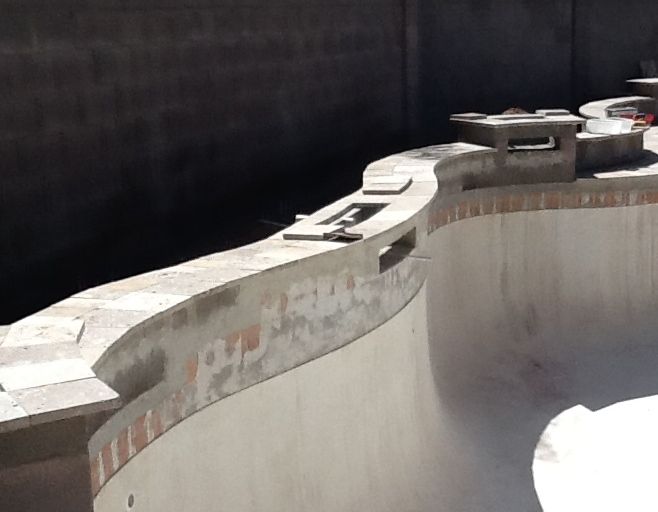
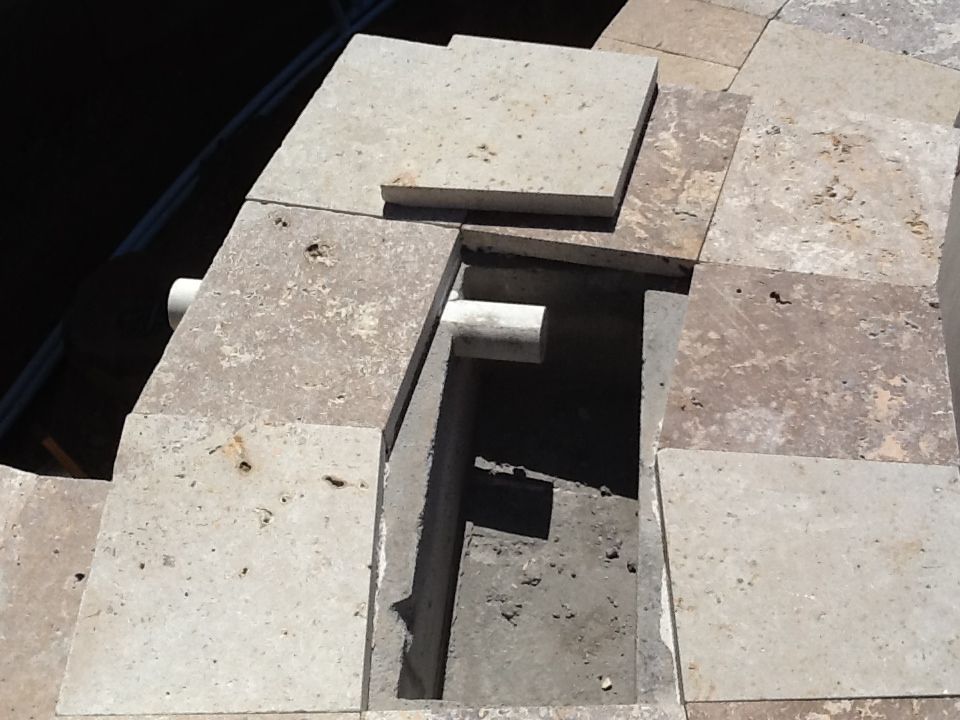
Some views of how the waterfall chambers will be accessed to put in the actual plumbing for the waterfalls. I mostly implemented it this way to push the decisions and plumbing work to a later point in time. I don’t know if this is how this is normally done. Once again, we had hard time finding information on the web that looked like it applied to our situation. Searches on the web for " building a pool waterfall " yielded little of value at the time...which was 2+ years ago.


Re: DIY Pool / Patio Remodel in sunny Arizona (lots of photos)

How in the world do you know how to do all of that? Quite a few tfp members also know how to do highly skilled projects - always boggles my mind! I love the pillar look you're using throughout the project. Now I'm curious, the space/ground you're leaving open between the travertine perimeter and the deck/patio.... Will that still be covered with travertine but without the travertine base to allow forfor water to seep down? Or, will it be left completely open and covered with something like decorative rocks or grass? I'm just trying to get that clear in my mind.

- - - Updated - - -

I hit send about the time your post above popped up on my screen. It may answer my question.
 
Re: DIY Pool / Patio Remodel in sunny Arizona (lots of photos)

Nursenini...thanks...both my wife and I are ex-engineers...but all this work was absolutely new to us. I probably "thought" about this project more that I actually worked on it...that drove my wife a bit crazy at times because I would have things worked out in my head, and according to her, I would expect her to read my mind...which is true, haha. But we enjoyed it and have continued to work together on other DIY projects including a complete kitchen remodel.

I'll try to give a summary at the end of effort as I best as I can remember.

- - - Updated - - -

Suz, the space between the patio and the perimeter will be filled with sand and then overlaid with the floating travertine pavers. Floating means that the tiles are not cemented into place...they simply sit on top of the sand and are locked in place by surrounding tiles or borders or walls...kinda like puzzle pieces. It is recommended that at least 1/4" of sand be underneath all floating tiles. This means that my existing pool deck will be covered by ~1/4" of sand before laying the travertine tiles in place within the borders we have created.

The fact that these "drainage" areas will be filled with sand easily allows the water to seep down into the ground and not sit on the existing deck or against the new travertine borders that are thinset into place.
 
Re: DIY Pool / Patio Remodel in sunny Arizona (lots of photos)

Pool Coping

The moment of truth had arrived. We were ready to do the pool coping. This and the tiling were the two aspects of the project my wife and I were both worried about screwing up and/or not being able to do. After having done all the wall caps and borders, we were now comfortable with the cuts necessary for the coping.

For our coping we chose to use 6”x12” travertine tiles placed in a soldier pattern. All of our travetine (including the coping) had a fairly rough finish…not only was it cheaper, but we liked the look. The coping would be no different. We decided against bullnose because we preferred the rougher look of the cut travertine.

A few things about the coping. Because we were floating the rest of our tile (requires ¼” of sand underneath it), the coping tiles had to be set high with thinset, at minimum ¼”, preferably about 3/8”. This is so that the floating travertine placed next to it (over a bed of sand) will be the same height as the coping. Our coping travertine is the same thickness as the floating travertine (in fact, we just ordered extra 6”x12” pieces of travertine to use as the coping). Those projects that may use a specialized coping (which may differ in thickness) might have to take height differences into account.

We went to a pool show about a month before we laid this coping (actually before we had cut any of the curves) and I finally met someone who installed travertine copings around pools. His main advice was to take it one tile at a time and make sure there is good fit. He also recommended grouting between adjacent tiles, and I didn’t question him about it because we hadn’t started ours yet. There must be a reason for this, but for the life of me I couldn’t figure it out and I didn’t want to deal with grout between tiles. Based on the cuts we had made for borders and walls, we knew we could make the pool coping joints really tight…no sand is going to make their way through them. We hadn’t used grout anywhere on the project, so…we didn’t t take this advice. But for others…it might depend on how tight you can make the joints…OR there might be another reason ??

Finally, we had to make a decision about how much overhang we wanted on the coping. We had to consider the thickness of the decorative tile and grout into that equation. This needs to be consistent for a clean look. Make a little jig that can be quickly placed under the travertine (line up the travertine with the edge of this jig) when placing and marking the tiles for their Taper Cuts (new term for me…see the last major post).

These pictures show the complete coping. In this photo is the water auto filler…I knew it was going to be a bear to cut out when I laid the travertine over it…same thing for the skimmer. That is one of the reasons I jettisoned the unused basketball hoop hole.


Re: DIY Pool / Patio Remodel in sunny Arizona (lots of photos)

Pool Decking

We were finally ready to lay the actual pool deck between the pool coping and the borders/walls. We weren’t really taking time to take some nice pictures…here are some poor quality ones that are probably from someone’s phone. There were hundreds and hundreds of paver cuts in this section due to the curved pool coping AND curved outside boundaries. It took us a couple weeks (along with some visitors we had during the time).

Remember, all these interior travertine pavers were set on a bed of sand...usually about 1/4" thick. The photos:


In this last photo you can see pool auto filler uncovered. Work to be done. We started getting excited about this point (we could see the finish) and we jumped the gun on grabbing some palms that we wanted to use in landscaping (at Costco of course…they may not be there next time we visited). We watered these before for a good month and half before being able to plant them. We had barely started the watering system at this point and there was still too much work going on around the pool to put them in.

 
Re: DIY Pool / Patio Remodel in sunny Arizona (lots of photos)

What a awesome project. It's a real treat to see it all happen so quickly. I realize that you completed the project and appreciate you sharing/documenting what you have accomplished.
 
Re: DIY Pool / Patio Remodel in sunny Arizona (lots of photos)

Hey Wasp...thanks. I've been meaning to do this for a couple years but never got around to it until now. Hopefully it will make someone else's project easier...or perhaps dissuade them entirely.

- - - Updated - - -

Pool and Decorative Tile

We went to a number of pool stores and looked online in order to find some pool tile that we liked. We like the earth tones and shied away from the brighter blues that are popular these days. We also wanted something that blended well with our travertine deck.

We finally decided on a nice 6”x6” tile and decorative tiles from ………..Home Depot. There are some that might tell you that pool tile is so specialized that you have to buy it from a pool tile manufacturer. In reality, there are some high quality porcelain tiles that meet all the requirements for imperviousness to water…sold at local big box stores. The tile we picked out beat the specifications for most "pool tiles". Obviously there is not much selection...AND they are NOT called "pool tiles".

We picked out tiles from a Marazzi Montagna collection that has since been discontinued. We bought enough to repair any future issues with the pool, partly because it was SO CHEAP! The 6”x6” tiles at the time were about $0.65 each (we needed 160, I think we bought about 200). The 2”x12” decorative glass strips were less than $5 each (we needed about 60, I think we bought 66). The decorative 12”x12” 2 inch tile mesh were $9 each (we needed 10, I think we bought about 12). In addition, I bought some larger matching tiles for the skimmer area and for the interior of the waterfalls. The total was about $600.

We used FlexBond White Crack Prevention Mortar for setting in the pool tiles. Truthfully, I was a bit unsure about this choice but decided to go ahead when a friend-of-a-friend, who has a tile installation company, said he uses it all the time for industrial fountains (he doesn’t do pools). Also, the question and answer for this product says YES it can be used in pools but should cure for 14 days (we had plenty of time). I always am a bit nervous trusting answers on such forums but the author/answer was from the Home Depot Custom Products Division.

------From the Home Depot Site for this product---------
50 lb. FlexBond Fortified Thin-Set Mortar can I use this to set tiles in my pool?
Asked by
Stephen
April 11, 2013
The tiles will be below the water line but the water has been lowered below the tiles for attachment.. Can I use this product to attach the tiles to the wall?
Can I also use it as a grout between the tiles/ If not, could you recommend a grout?

Answer: Yes, Flexbond can be used in a pool but the tile will need a full 14 day cure before they are submerged in water. Thank You
--------------------

I don’t have any pictures of the tile work in progress…only a couple completed pictures, more after the wall stone veneer is complete.

Also, we decided to use an EPOXY grout between the tiles. It is impervious to moisture and extremely strong. The cons are that it is expensive and difficult to work with…probably not a good choice for our first time grouting but I think we succeeded. We mixed it only one mini-kit at a time. We used :


93-S-225CQ-NS-00Laticrete SpectraLOCK PRO Premium Epoxy Grout Mini Unit Part A & B3$24.99$74.97
93-1200P-Mini-CLaticrete SpectraLOCK PRO Epoxy Grout Mini Unit Color Powder Part C
[Mini Unit Color:23 Antique White]
3$5.99$17.97
93-6200Laticrete Latasil Silicone Caulk Sealant - High Performance Caulk with Microban
[Color Chart ( click on ? ):23 Antique White]
1$14.99$14.99
DSC-75% off Coupon1-$5.40-$5.40
Subtotal:$102.53
Tax:$0.00
Shipping Cost:$0.00
Grand Total:$102.53


These 3 mini-kits were sufficient to grout all the tile and the small gap between the decorative tile and the travertine coping. However, after finishing the stone veneer on the pool’s back wall, we filled the gap between the veneer and the tile with 3 more mini-kits (we left a fairly large ¼”+ gap, not sure why now, but at the time it didn’t seem unreasonable, haha). So grout cost almost $200 total…much more than traditional grout.

Here is a picture of the 6”x6” tile and decorative 12”x2” glass strip. This is one of our “extra” strips…it is enclosed in plastic. Not shown is the the 12”x12” mosaic of 2” tiles, each of which we cut into 6 strips to fit on top of the decorative strip. The un-shown mosaic tile strips actually had to be cut to only 1 ½” high (from 2”) in order to fit between the decorative strip and the bottom of the travertine tile.


First glimpse of the new tile…you can see me working on the stone veneer in the background.


And another view. Some might think it is a bit boring…but we are extremely happy with it. When the travertine pool decking gets wet…it exactly matches the pool tile. We are still undecided whether or not to treat the deck to give it a wet look ALL the time…we haven’t done it yet. The problem is, you generally need to re-treat it every couple years to keep that look up and we are not sure if we want to deal with that.

 
Re: DIY Pool / Patio Remodel in sunny Arizona (lots of photos)

Kim, thanks and yep...Home Depot. As I said before...I really do think hard about things, occasionally to a detriment.

Installing the Stone Veneer

We chose a stone veneer from (guess where) Home Depot, not only because it was relatively cheap, but because we liked it the best we looked at from many different sources including a couple local stone shops. It is also a grout-less version that is easily stacked as it is set-in-place with mortar. The veneer comes in strips…all 4” high and with 3 lengths: 12”, 20”, 24”. We had picked this veneer out early and the wall was actually designed to the right height to fit 4 strips (pillars needed 5 strips)…with a slight cut to the top one.

We chose the Veneerstone Imperial Stack Stone. We selected, I believe, the Vorago color. At the time, this veneer was about $5/sq foot and was ordered through their special order desk. We got a full 100 ft sq box (even though it was more that we needed…future projects?) and also ordered 4 boxes of the associated corners (at the time about $75 box). I ordered extra of that (at least I thought I did) so that we could get the free shipping and delivery which at the time required an $800 order. In any case, by the end of the veneering, we had used all but one corner piece so we were very lucky there.

We used the Sakrete Stone Veneer Mortar (Home Depot, it is very close to us) to mount the veneer on the sides of the walls.

Installing Stone Veneer Horizontally on a Curved Surface

I couldn’t count how many different versions of “installing stone veneer horizontally on curved surface” web searches I performed to get an idea how to do it with little success. We worried about mounting the long 20” and 24” long pieces horizontally on our curved wall due to the gaps that would be create in trying to meld a straight piece of veneer to a curved wall. It is definitely a valid concern. We found that a few methods helped us out here, some of which might only be applicable to our chosen veneer.

First of all, on the sharpest curves portions (especially the outside curves), don’t use the longer pieces. On the flip side…try to use the longest pieces everywhere you CAN use them, because shorter pieces can be used anywhere. For us, this was true of our 12” pieces; it may not be true for other veneers.

The 2nd thing is that some version of beveling the back edges of each end almost always helps on curves for short and long pieces. On inside curves you can make pieces sit closer to the wall by cutting or grinding off the backs of its ends. On outside curves, beveling the ends back at an angle is required so that the front faces of adjacent pieces fit together without a gap. I usually did these bevels by hand using my grinder mounted with a cutting wheel. Sometimes I used my tile cutter.

3rd, you must compensate for gaps between the veneer and the curved walls by simply adding more mortar in those spots.

4th, with our “stackable” veneer, we could get multiple rows ready (simply setting them in place) before actually installing them, because they stacked and stayed in place, for the most part. We could move things around like a puzzle until we got the fit and look we desired. My wife was excellent at this.

There are a number of things I would like to point out about this first photo, taken near the start of the veneering. We built and used a temporary “scaffolding” to hold up the first layer of veneer on the pool wall. Our water line tile was already in, so this “scaffolding” had to be mounted and screwed into the plaster below the tile line, then extended over the tile to the veneer. The new pool surface would take care of those holes later. To tell you the truth, from this picture I don’t know if those stone veneer pieces are just sitting there waiting to be mortared in, or are already mortared in.

Also, note the waterfall ledges have been installed. I went through a number of experiments to determine the best angle and edge cut to get water to flow cleanly off the ledges, and I failed to find a good combination, but that will come later. Also interesting, our stone store (where we bought our travertine) did not carry any 30” wide travertine pieces to make the center waterfall ledge. Instead, we used a piece of granite that was cut out of our granite countertops for the cooktop. It had to be cut to the right size…it was a little bit thinner but it matched pretty well. Right then I knew that all the useless cr@p I hate to throw away…sometimes comes in useful, haha.


A view towards the middle


Here we have started the veneering on the other planter walls. The top of the wall itself is level. The pool deck is slightly sloped to allow water to flow off. The veneer is level…the gap at the bottom gets slightly larger farther away from the pool, we used wedges to hold in place when mortared in.


A look at the completed pool wall.


This planter wall is finished…notice the travetine over the pool water leveler is still not done (neither is the skimmer)…I dreaded that.


The trapezoidal planter is complete


SURPRISE ! We painted our back wall (not the pool wall). I have had a nice paint sprayer since I had painted my house a few years earlier. We finally got around to painting our entire wall…it took all of 4 hours including cleanup and $125 in paint. I’ll never know why we waited over 20 years to do that.


One last view of the stone veneer and painted wall


Enjoying this content?

Support TFP with a donation.

Give Support
Re: DIY Pool / Patio Remodel in sunny Arizona (lots of photos)

Thanks AP!

Pool Equipment

I had decided to replace all the pool equipment so that had to be done before the pool resurfacing. I had replaced my pump a couple times throughout the 20 years we had owned the pool. The pump was decent and only about 3 years old (Hayward Northstar). It was definitely not an energy saver. We still had the original sand filter; I changed the sand a few times…the last time was only a couple years prior. I hated the diversion valve on the sand filter (backwash or filter pool water), it required too much maintenance. My control box was simply a timer to turn the pool pump on and off at the same times every day. I had the original fiber optics box for pool lighting which I had decided to keep.

Here’s a picture of our original equipment. At the right side is the new outgoing 2” pipe to feed the waterfalls (original was a 1 1/2” pipe).


A side view of the same equipment. At top left (barely visible) are the two new 2” pipes (unconnected at this point) for backwashing or draining the pool: one to the lawn, and one to a hookup for a hose if needed.


After the demolition here is what is left.


A side view of the same thing. We would fix and pour a new pad. We would replace and enlarge as many pipes as possible. And we would eliminate unnecessary right angles and where possible replace them with 45s. But, with a 20 year old pool I was limited as to how far I could take this…all changes would be limited to this pump area.


I chose the following equipment:

Hayward EcoStar Variable Speed Pool Pump SP3400VSP – reasonably price VS Pump

Hayward Swim Clear Large Capacity Cartridge Pool Filter C5030 – overkill for my pool but seemed to me that a larger filter is always better (less pressure loss, larger and longer cleaning capacity)…don’t know if that’s true for sure. The only cons seemed to be initial cost and replacement filter cartridge cost. My choice of this filter did end the need for backwashing…so my pipe to the grass was now much less important. However, it is pretty common in Phoenix to occasionally replace a portion of your pool water to dilute it because of calcium build up…also when I drain the pool, I always put as much as possible in my yard.

Hayward Ecommand4 HPC-4-ACT-RC – the special numbers apparently indicated that the unit came with the two automatic valves which I needed for automatic control of filtering system and new waterfalls. It also was compatible with my new variable speed pool pump. I took a chance and bought it on EBAY, advertised as New – Open Box…it WAS brand new and hadn’t been taken from the box.

I found that for my pools two returns, both were fed by a 1 ½” pipe. The ‘T’ to those two pipes was also only fed by a 1 ½” pipe. I replaced that “T” with a larger one and fed it with a 2” pipe. All valves are now 2” valves and all piping is now 2” in this equipment area (except the pool in-floor cleaning system feeds). These were the relatively tiny improvements I could make to my pool’s plumbing system without digging up the pool.

Following is a picture of the new installed equipment. The valve at the filter chooses between pool filter operation or draining the pool. The valve on the back wall selects between draining the pool to the grass or to the hose (currently I have no hose connected to it). The automatic valve on the right selects between the pools in-floor cleaning system and the returns/waterfalls. The automatic valve on the left chooses between the pool returns and the waterfall. That’s pretty much it.

 
Re: DIY Pool / Patio Remodel in sunny Arizona (lots of photos)

Love the stacked stone. NICE job on the curves! LOTS of dust flying I bet! The backwash to the grass is awesome!

Now that back wall painted?? NICE! It gives a great finish to the whole area! Have you thought of letting an artist paint it with a mural?

Kim:cat:
 
Re: DIY Pool / Patio Remodel in sunny Arizona (lots of photos)

Thx Kim...it was very messy. No, we haven't ever considered a mural, and you will see once I finalize the updates that the landscaping covers much of that wide open wall. I've seen some murals that really add to the backyard atmosphere.

We are busy today with the grandchild and errands, so I will try to get the last few updates tonight...possibly. It's taken longer than I thought to get all the pictures and info together.
 
Re: DIY Pool / Patio Remodel in sunny Arizona (lots of photos)

Ok, Kim! It's past my bedtime. I've spent the whole evening, brushing the pool, adding salt, CYA, and calcium increaser. Then the last bit just floating on my back and watching the stars come out. Now I'm drip-drying in a chair with my back up against the plain white garage wall while watching Rosie do her sweeping in the pool and listening to the crickets. Honest, no lyin', I was just thinking how blah this wall is. Then I read your post. If I can ever find an artist who suits my vision and budget, you've convinced me!

I'm tellin' you people! Kim is a dangerous one with spending your money!!
 
Re: DIY Pool / Patio Remodel in sunny Arizona (lots of photos)

Work and Time Estimate

Marla, I had to look back at the photo time stamps to remember exactly how long this project took but if you recall from my first post, we did it in two stages.

We started the initial patio portion of this project in April of 2013. I worked full time on it for the next month, and my wife worked probably 3/4 of that time in order to complete that portion (summary, about 1 3/4 man-months).

The pool part obviously took longer. I worked full time on it starting mid Jan 2014 and worked until the end of April with just a couple weeks off during that time. My wife worked probably 1/2 of that time with me. So...about another 5 man-months ... total about 7 man-months. In addition, I continued to do some landscaping things on-and-off for another month.

But truthfully, about 1/2 of my "work time" on a project like this (where almost everything was new for me) is spent walking around, measuring, thinking, and driving to Home Depot. I'm embarrassed to admit it, but there were a number of times I would be there 4 times in a day. If we did a similar project again, it could be much faster.

- - - Updated - - -

I'm tellin' you people! Kim is a dangerous one with spending your money!!

I don't know Suz...by now you might have figured out that if Kim talked to me into a mural, my wife would definitely be painting it, and I would have bought the cheapest paint they have on clearance at Home Depot. I'm thinking I could get it done for under $30, haha.
 
Re: DIY Pool / Patio Remodel in sunny Arizona (lots of photos)

The Waterfalls

The pool equipment was IN so next I had to hook up the waterfalls and finish their interiors. Earlier I talked about the fact that I had run some trials to test how water was going to cascade off the three waterfall’s travertine ledges (actually one is granite). I tried various pitches for the ledge and different angled cuts on the actual lip. None of them worked; in fact I came to the conclusion that water was NOT going to flow off the stone ledges at all like I wanted it to.

So I went to Home Depot and bought a garage door weather seal and cut it so that it could be mounted on the under lip of the waterfalls. I used the “Clopay 18ft Replacement Bottom Weatherseal.” I only used about 6ft of it. One lip of the rubber seal was cut off and the remainder was mounted on the bottom of the waterfall ledges with a waterproof epoxy. For the waterfall cascade, perfection! The rubber seals might seem prominent in the pictures that follow because you are looking for them…in reality, no one ever notices them.

Also, in this next picture, notice the side rails on the ledges. These had to be installed before the stone veneer because they go back all the way to the back of the waterfall cavity (actually two pieces on each side due to the length requirement).


And a view of the bottom of a representative ledge


Now the insides. The design turned out to be fairly simple as you’ll see. All the squiggly stuff near the travertine tiles is just silicone caulk so that the travertine pieces that overlay this opening don’t clank around. In the picture a 1 ½” water pipe was run through the 2” sleeve and shaped as shown.

Not seen are the 20-30 holes on the bottom of the long white pipe (maybe ¼” in diameter, I don’t exactly remember). That is where the water flows out of the pipe into the small basin. That basin was created with miscellaneous porcelain tile pieces and that not-so-high piece of travertine (which is the “weir”). I used silicone to seal this area and keep those tiles in place. It is all hidden from view.

I showed this design to my civil engineer brother-in-law and he said. “Oh, you used a wier”……Say WHAT??? I thought I had invented something new and apparently this method is used in many places.

From WIKI: A weir /ˈwɪər/ is a barrier across a river designed to alter its flow characteristics. In most cases, weirs take the form of obstructions smaller than most conventional dams, pooling water behind them while also allowing it to flow steadily over their tops.

In this picture, water flows into the basin through the holes in the supply pipe and then overflows the “wier” onto the waterfall ledge heading out to the pool. The “weir” spreads the water out evenly across the waterfall ledge…but only if it is level itself. Not seen are some small holes on the bottom of the wier so that when the waterfall is turned off, the basin of water drains completely so it doesn’t fester (algae, mosquitos), in case the waterfall is unused for a week or more.


And another slightly different view of the same waterfall


Here are the insides of the middle, larger waterfall. Notice the valve on the right. There needs to be a control valve for each waterfall so that slight adjustments to the water flow to each waterfall can be made. You want to be able to “match” the apparent flow rates of all waterfalls so that they look nice and one is not, for instance, a Niagra Falls and the others being a trickle.

I ran only one 2” pipe to supply the three 1 ½” pipes that fed the waterfalls. These individual valves are absolutely needed…they can be adjusted once and left in place once the apparent flow rate is successfully adjusted. In reality, all three valves are close to all the way “open” because it doesn’t take much to successfully balance the water flow.


A close-up of the middle waterfall (granite countertop version)

 
Re: DIY Pool / Patio Remodel in sunny Arizona (lots of photos)

pretty talented design on the wiers! I am familiar with weirs, clarifiers at waste treatment plants used them for even flow around the basin. so I imagined you had to make sure the weir was level so that the flow could go out evenly wide?
 

Enjoying this content?

Support TFP with a donation.

Give Support
Thread Status
Hello , This thread has been inactive for over 60 days. New postings here are unlikely to be seen or responded to by other members. For better visibility, consider Starting A New Thread.