Solar Panel and Rack design help

robrinker

0
LifeTime Supporter
Aug 2, 2007
178
Northeastern Ohio
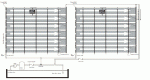
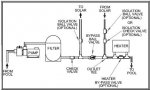
I've decided to get (6) SunHeater S601 Panels to add to my pool. That number of panels will equal about 43% of my pool surface. I will be installing them on racks on the ground next to the building that houses my filter and pump. This will put the racks approx 10' from the pump. I gimp'd the 'system layout' diagram from the S601 install manual to represent how I'd like to plumb them. Does anyone see any problems with this? I believe this plumbs them in parallel, which I understand to be the most efficient way. Will my 1.5hp superpump have enough power to get the correct flow through these? I also notice that the install manual only uses a 3-way valve. Most of the diagrams I've seen here show the 3-way, 2 isolation valves, and a bypass valve. Should I modify my plumbing plans to incorporate the isolation and bypass valves?

[attachment=0:xqnfyeqt]solar diagram rev1.gif[/attachment:xqnfyeqt]

How can I calculate exactly how large the rack should be? It obviously will be at least 12'x40' to accommodate the panels, but how much extra space should I allow for around the panels? How deep into the ground should the 4x4s that support the rack be? Do I need to fill around them with concrete? At what angle should the rack be installed?

I've seen a few diagrams for building a rack and most of them show 1x4's placed about 2 feet apart on the surface of the rack to support the panels. Would there be any benefit to surfacing the rack with 1/2" plywood (to insulate the back of the panels more) and painting it a dark color to help absorb heat from the sun?

Any thought or suggestions on the entire setup would be appreciated.
 

Attachments

  • solar diagram rev1.gif
    solar diagram rev1.gif
    33.1 KB · Views: 950
adding-solar-bear-panels-to-our-agp-the-process-with-pics-t11410.html
Here is our several week process, with plenty of pictures, and an embarrassing (for my husband) plumbing mistake that we left on the post for an example to others.
We used Solar Bear, which are 4'x20' (officially, but actually more like 4' x 21') each. We set the panels at an angle roughly equal to our latitude (30ish degrees). We used 2x4's and plywood, built the racks in sections the size of the pieces of plywood, stained them a darkish color, and then stood the sections next to each other.
We put lightening holes in the plywood, and when it is windy -more than 20mph- the areas over the lightening holes feel cooler than the area around them- apparently some wind cooling. I am glad we did not put them on open-back racks- I think we would be losing a lot of potential heat to wind cooling, as the wind always blows here.
We did not use concrete to set them into the ground. We will need to move the system for winter and to add another panel next year. Plus, the racks are already so heavy that they are not going anywhere. The vertical posts have sunk into the mud some from the torrential rains that we have been having, but they are not moving along the ground at all (even with water flowing across the site). In fact we had to move one set of them a few inches, and it was quite a production.
We have about 3-4 feet between the first rack and the pump area. The racks are parallel to each other, and we put about 4-5 feet between them. That is way more than necessary. We could just about fit a third panel in between them, and we are going to have to mow that area. We will put them about a foot apart next time and just keep the weeds and grass killed down.
We have about 28% surface area, and have seen significant water temp increases when we have sun, though that has not been often this strangely rainy spring/summer. We are using a solar controller to maximize the benefit and squeeze every ounce of heat from the panels (solar does not run when it would cool the water, running when there is any heat available). We get about 1 degree an hour on full hot sun, about 1 degree in 2 hours on partly cloudy. I think one more panel will be perfect for heating, but have some concerns about my pumps ability to properly run them. Even though it is labeled 1.5 hp, it is putting much less pressure on the panels than I expected. I rather suspect that Doughboy uprates the pump pretty significantly.
Anyways, hope that helps, and feel free to learn from our (many) mistakes.
 
Assuming the physical layout is the same as in the drawing, you should put a T in the supply pipe and run it along the bottom to both panels. Likewise, you should connect both returns together along the top of the panels and then come back around the side to get back to the pump. The way you have it now, there is a lot of extra pipe that you don't need.

Isolation valves are very handy. If one of the panels is leaking or you want to drain them down for a while while keeping the pool open, isolation valves come in very handy. As long as you have a positive seal diverter valve, and you aren't worried about an automated controller turning the diverter valve at the wrong moment, all you really need are the two isolation valves.

The rest of the setup, with intentionally leaky diverter valve, bypass valve, check valves, and bleeder valve is only important when the panels are raised up well above the pool water level.

There are lots of different ways of doing the valve arraignment. For example, you could simply add a check valve on the return and that, plus a positive seal diverter, would be enough to isolate the panels in your current drawing. And there are a number of other ways to set it up.
 
Jason - the physical layout is the same as in the drawing. I updated the drawing in my post; does this represent what you were describing as far as the plumbing goes?

I don't really understand what you meant about 'draining them down'. Wouldn't they automatically drain down when the diverter valve has them bypassed?

amjohn - thanks for you input on the racks. I think I'm going to sheet mine with plywood. They will be permanent, unlike yours, so I'm not too worried about the weight. Also, where they will be placed, they'll be shielded from the wind on 3 sides, so I don't think I have to worry about the wind picking them up.
 
Yes, the changes in your drawing are exactly what I was talking about.

The panels won't drain unless they are completely above the pool water level and you have a vacuum breaker valve (or you disconnect them). The vacuum breaker valve lets air in and gravity does the draining.

When the panels are below the pool water level, the only way to drain them is to disconnect them from the pool.
 
Complications... :(

Well I watched the area that I want to install my panels today, and I don't think it's gets full sun for enough hours, because of this monster...The top of my pool house is 14', so you can get an idea of just how big this guy is.

[attachment=2:2j2d6onh]tree.JPG[/attachment:2j2d6onh]

I noticed another area of the yard that may work. The red square is where I want to put the panels, the blue is the area that I think will work.

[attachment=1:2j2d6onh]location.JPG[/attachment:2j2d6onh]

Unfortunately, the blue square is about 60' from my pump. I'd need to trench and bury the pvc if I ran it to this location. What would an extra 60' of 1 1/2" PVC do to my pump?

To make the panels face south, I'd have to build the racks like this...

[attachment=0:2j2d6onh]racks.JPG[/attachment:2j2d6onh]

Can you mount the panels longwise like that?


The only other option would be to have the monster (and the tree next to it) taken down. Unless I could get a lumber company to come out and buy some trees, I'm looking at several thousand to have that done... :(
 

Attachments

  • tree.JPG
    tree.JPG
    96.7 KB · Views: 922
  • location.JPG
    location.JPG
    89.9 KB · Views: 922
  • racks.JPG
    racks.JPG
    82.8 KB · Views: 924
I don't know if I was clear, but it will be 60' to the panels and then 60' back (120') total.

So I would use an adapter to go from 1.5' up to 2', run to the panels, then convert back to 1.5' to connect to the panels, and then the reverse for the returns?
 
On the draining down issue, we do not have a vacuum breaker valve to drain them back into the pool, but since they are below the pool level, they stay full of water. They seem fine with the water staying in them, and we do not get so much air coming through the returns each time they start. If we were above the pool level, the vacuum breaker makes sure that they are not exposed to a vacuum when they do drain down. From what I have researched, a vacuum on the panels is very BAD.
When it comes time to disconnect them for this winter, we are going to have to consider how to get the water that is in the panels back in the pool. Any suggestions would be welcome.
On your sun exposure issue: I can tell you from my experience so far- if you do not have full sun on the panels for at least a few hours a day, they will not do you much good. It is a lot of work to set these up, and they need the sun. If you do not have sun, your money and effort may end up with rather disappointing results.
For example, one end of our panels is in the shade up until 10 am, and the controller won't even turn them on until they are in full sun during our cooler spring weather. This will change when the air temps are blazing hot I think, but by then the panels will be set for cooling, not heating. (Next year we will move them a couple more feet away from that shade, but the area in that direction was full of water this year). We are reluctant to cut down any trees, because they are hard to come by in our area. They look pretty plentiful in your area.
If you were to set the panels at the orientation you show in your picture (basically the short ends sticking up in the air), I would think you would want the inlet at the bottom and the outlet at the top. Your latitude is roughly 40 degrees, and if you mount them at that angle, those are some long sticking up in the air racks. Can you consider shorter panels (the 10 or 12 foot long may sit better)?
 

Enjoying this content?

Support TFP with a donation.

Give Support
Thanks amjohn. With all my thoughts on installation and sun, I completely overlooked the height of the racks. Even if I can install them where I want, the way I have in my diagram (and angled at 40*) the racks would be over 14 feet tall in the back...that's not going to work!

Still assuming I can install them where I want, if I do 4 panels instead of 6, that would still give me 28% of my surface and the racks would be a little over 7' tall in the back. From what I've read here, 28% should still provide a decent temp boost.

How much difference does the angle really make? If I mount them at 30*, my rack height goes down to 5' 8"...

EDIT: Found this information in a Fafco Sunsaver installation manual, that answers my question about angle...
FAFCO said:
The panels should be facing true south, for the Northern Hemisphere, with the inclination as follows:

1. For year-round heating: equal to latitude of installation.
2. For summer heating: equal to latitude minus 10* - 15*.
3. For winter heating: equal to latitude plus 10* - 15*.

The inclination must always exceed 15* to ensure proper drainage.

Since I only use my pool in the summer, I'm going to mount the panels at 30*.
 
I have %28 coverage, and it is doing great when we have sun. But then, this is Texas, and when we have sun, we have SUN!!! If I had conditions as shady as yours with my panels, I would guess maybe half as much improvement? That is still enough to get you an extra 3 degrees or so on a really good day. I am not sure if you mentioned how much of the day that area stays in the sun. Will it stay pretty sunny from roughly 10am-5pm at least? I get about a degree an hour during those hours if I have full sun, so I am just ballparking about half that for you.
 
EIGHTY-SEVEN DEGREE water yesterday and EIGHTY-EIGHT DEGREES today. Only 81 degree air temp (feels warmer in the sun) and 50s at night- still unusually cool for this time of year. Last year this time, we had a daily air temp high of 95-99 degrees. Solar panels are reading 101 degrees. Man I love these things. They were two months of hard work, but they were worth it. Sparkly warm wonderful water below. Please note, this has not been vacuumed in six weeks because of the solar panel install, so the bottom is dirty. But the water is clean.
 

Attachments

  • may2009 not vacuumed.JPG
    may2009 not vacuumed.JPG
    250.9 KB · Views: 813
Ok...getting closer to build time. The blue square area in the above picture is where we've decided to put the panels. That area gets full sun from noon until about 6pm. We got (12) SunGrabber 2x10 in-ground panels that I'm going to put on (3) 4 panel racks. I only got one "System Kit", even though I realize I need one for each rack. I'm glad I did. All of the stuff in the System Kit (which costs about $148) can be had from a hardware store for about $50. The one thing I'm having a hard time locating is a vacuum breaker. Can anyone provide a link to one, or recommend a specific one? I need to be able to easily drain the panels for winterization.
 
Hello Rob,

I installed a Watts Vacuum Breaker in our system that was brass and 1/2" pipe thread. I know some people don't like having metal in thier pool water lines but I think the amount of exposure is low enough it should not be a problem. I just adapted a PVC Tee fitting in the line at the highest point to fit the 1/2" threads. You can see the Vacuum Breaker at this link, http://shop.solardirect.com/product_info.php?products_id=164.

If you want one that has more rubber mounting to fit into a rubber hose coupling they are also available and you can see one at this link here http://shop.solardirect.com/product_info.php?products_id=304.

Hope this helps.

Dennis
 
I finally finishing building and plumbing my solar system. Due to logistics, I ended up getting (12) 2x10 Sungrabbers that I installed on (3) racks. I decided to forgo the 3 way valve for now, and plumbed my system like this:

[attachment=0:1kl27ok4]plumbing.jpg[/attachment:1kl27ok4]

Even with the bypass valve completely open, the solar panels still filled up with water (enough for me to realize I didn't tighten the clamps on some of the rubber couplers enough), and I had a 4 psi increase at my filter. How can I determine if I have enough flow going to the panels? I think I read somewhere that you want a 1psi increase for each panel you have (12psi in my case?), or is touching the panels to see if they are staying cool a good enough test?

Also, is there a way to determine if you have too much flow going to the panels?

Thanks to the unseasonably cool weekend we had here, my pool is down to 74*. I'm excited to see how the panels do today...
 

Attachments

  • plumbing.jpg
    plumbing.jpg
    27.6 KB · Views: 432
4PSI increase isn't too bad at all - probably right on for the distance/#of panels you're running - the increase is very dependent on your panel configuration, if they are all run in series your PSI increase would be huge. Having too much water go to your panels isn't a bad thing, you'd have 100% efficiency at the worst, having too little water run through is where you lose efficiency.
Leave the panels off for 15 minutes, feel how warm they get, flip the switch, put your hand on the return outlet and feel how warm the water is - lukewarm for 15-20 seconds then cooling down means you've got good flow and good heat transfer. Once you have flow, your panels should stay cool - around the same temp as your water.
 

Enjoying this content?

Support TFP with a donation.

Give Support
Thread Status
Hello , This thread has been inactive for over 60 days. New postings here are unlikely to be seen or responded to by other members. For better visibility, consider Starting A New Thread.