New liner project

BobbyR

0
Jun 1, 2013
142
Toronto, Ont
Our pool liner, already 12 years old and very faded, developed a leak late last year so we decided to replace the liner. Installation was scheduled for the Spring. We closed the pool with the old liner, leak and all, and placed an order for a new liner after deciding on a liner pattern. The old liner started out a very deep blue and looked very dramatic when new but quickly faded to light blue, going on white. Because the very dark colors apparently don't last, we went with a new liner pattern that is not as dark as the original. Well, spring has arrived and my pool guy finally arrived today to start the installation. Normally, the pool would be open by now but it's been a very cold spring and it's easier to work with vinyl when it's warm out so the opening was delayed until now. I don't know how long this project is going to take because we are competing for time with everyone having their pools opened right now but I'll post pictures as we go. We are replacing all the fittings and covers and modifying the plumbing so there's a bit more involved than just replacing the liner.

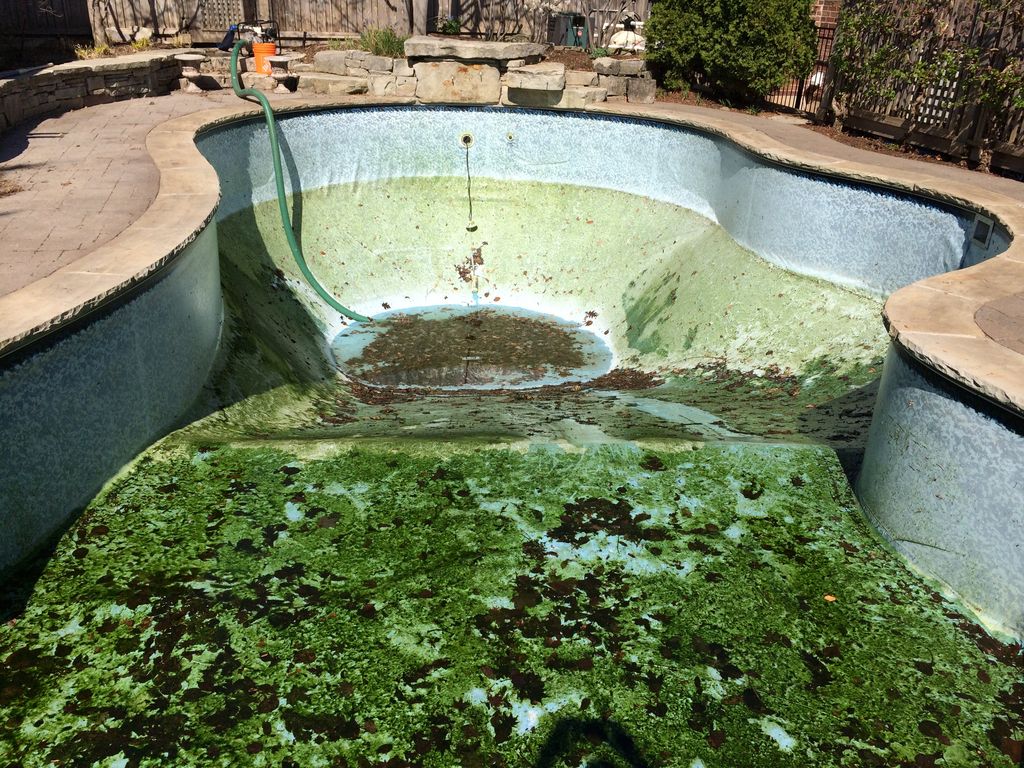
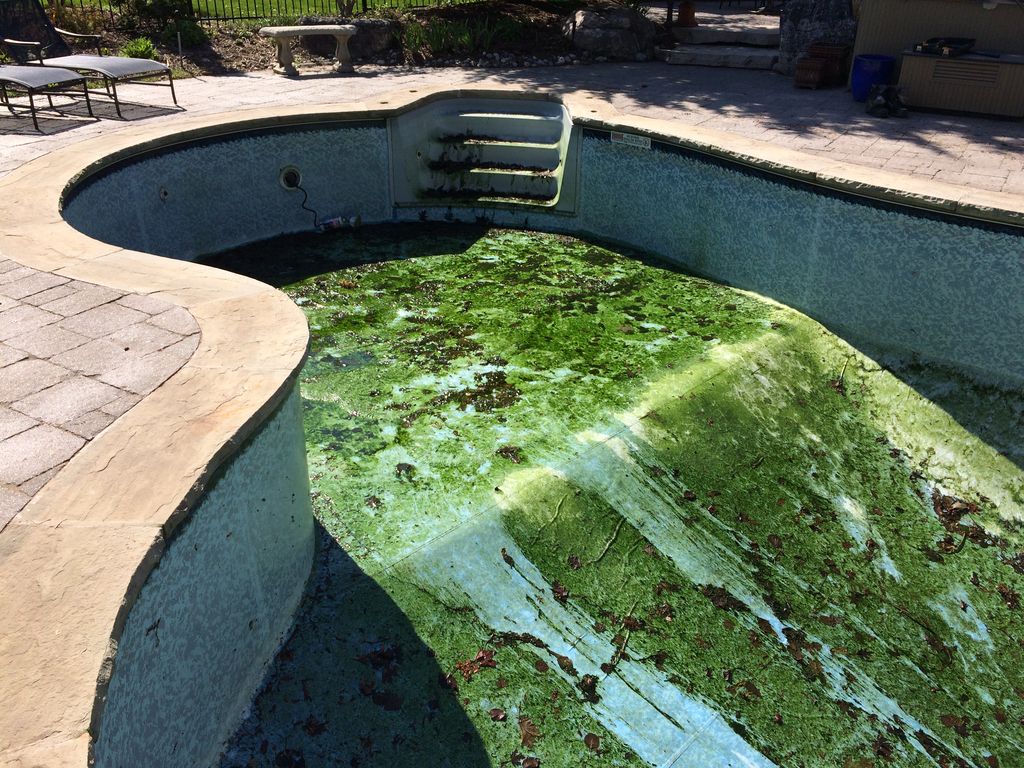
As you can see, the pool has a lot of leaves, dirt and algae. It didn't look so bad when the cover came off and the pool was still full but, with the water pumped off, it looks more like a septic tank than a swimming pool. After about 3 hours with a box cutter, the liner was cut up, removed, rolled up and discarded and a first power wash was done of the walls and the floor. Everything looks pretty good although there's a bit of rust at the base of a few of the wall panels and there is a lot of grunge and calcium deposits on the walls.


IMG_2754.jpg

IMG_2759.jpg

IMG_2760.jpg

More to follow as this proceeds...
 
The walls are steel and the floor is concrete which is pretty standard for vinyl pool construction around here. The walls haven't been cleaned up yet and are coated with scale. There are also some rust spots near the bottom of some of the wall panels. The floor of the pool is pretty clean and smooth with no cracks or any other visible damage. Shouldn't be too big a job to get it prepared for the liner.

We shall see...
 
It's been exactly a month since I first posted this thread. Since then the pool has sat empty waiting for the new liner to arrive. There was a problem with the measurements which caused a delay in the manufacturing process. However, the liner arrived a couple of days ago so we got going today. I have a number of pictures but I can't upload them as I have exceed my attachment space limit with the pictures already posted. There must be a way around this limit as many threads have lots of pictures. Any suggestions on how to expand my attachment storage limit?
 

Enjoying this content?

Support TFP with a donation.

Give Support
The liner finally arrived along with the two guys to install it. First thing was to drain off a month of rainwater and thoroughly clean the pool. A lot of debris and water collected in the shell during the past month so there was some rework here. There were some rust spots and calcium deposits on the walls. A rotary wire brush made short work of this. The rust was superficial and came off easily. The ground spots were then painted and the seams were re-taped as required. All the returns, the skimmer plate and the lights were removed as well during this step. Also removed the old pressure side cleaner jet (more on this later). Here's a couple of pictures at the end of this step. Somehow I managed to switch my camera to B&W for some of these shots. No idea how that happened...


Preparation complete and ready to drop the liner...


Here's the new liner in its box. Compact and very heavy. Checked the label carefully before opening to ensure the pattern was as ordered.


The liner pattern is called Stonewall Mosaic, one of several available from Fox Pools. Here's what it looks like...


Next step was to unpack the liner, unfold it and line things up. There were a couple of marks on the liner to help orient it in the pool but this critical step seems to be guesswork more than anything else. They got it lined up pretty quickly.

 
The guys then worked their way around the pool locking the liner into its track. My pool came with dual track coping, the top track for a lock in cover and the bottom track for the liner. We have a safety cover, not a lock in cover, so the upper track is unused and is just a dirt catcher. This allows the liner to be installed in the upper track giving a better appearance because it comes up further, covering the lower track and the portion of coping between the tracks.


Things got a little tricky in the deep end as things tightened up under the rock face...


Once the liner was in the track all the way around, the blower was turned on and the liner just sucked into place.


After a few minutes, it looked like this. Amazingly free of wrinkles with hardly any fussing or adjusting required...


Next step was to secure the fastening strips around the walk-in steps and then cut out the opening to the stairs.


With that, the hoses were turned on for about 30 hours to raise the water level to just below the returns (see black tape arrow at right of second picture below).


Bronson approves...


More to follow...
 
Although the planned modifications to the plumbing have not been completed yet, here is a picture of the pool with the new liner, filled with water. I'm very pleased with the appearance of this pattern. I will also post this photo in the liners thread in case anyone is considering it when choosing a new liner.

 
Wow how much fun!

Before you had people in the photo, your pool appeared to me as much much bigger.

I thought it was 60,000 gallons.

Neat you have that design with lights on both ends...did you convert to LED?
 
Beautiful! And I see you posted it in the liner picture thread. That will be helpful to those of us who are replacing our liners now and in the future. The hardest part about choosing a liner is trying to figure out what it will look like when full of water. Thank you! And enjoy your beautiful pool!
Sherry
 
Thanks for the comments!

Borjis, yes we have lights in both ends but they are not LEDs. I considered converting but they are very expensive and I couldn't justify the cost at this time. The liner itself cost enough. I'll continue this thread when my MIA pool guy finally shows up again to complete the plumbing mods. Meantime, I haven't received a bill from him yet so I can live without the waterfall.
 

Enjoying this content?

Support TFP with a donation.

Give Support
Thread Status
Hello , This thread has been inactive for over 60 days. New postings here are unlikely to be seen or responded to by other members. For better visibility, consider Starting A New Thread.