- Aug 24, 2015
- 10
- Pool Size
- 17500
- Surface
- Plaster
- Chlorine
- Salt Water Generator
- SWG Type
- CircuPool RJ-45
Hello,
I've ran into a significant, and unexpected, problem during my IG gunite pool renovation project and need some expert advise. While starting to replace the existing four (4) old Fiberstars fiber optic lights (circa 1993) in the pool walls with new Fiberstars Treo LED retrofit lights I was surprised to find that the original PB had glued a 1-1/2" to 1" reducer bushing directly to the back of lens housing fixture and used 1" flexible conduit all the way to the old Fiberstars illuminator. This left NO standard 1-1/2" PVC piping behind the wall fitting to install the new LED light. I need 3 inches depth of standard 1-1/2" pipe for the new light fixture but there's only about 1" of space before hitting the reducer bushing!
I'm now having to tear out the concrete around the old lens housings in the walls and cut them off behind at the point where the flex conduit is glued to the reducer bushing, hopefully glue on a new reducer bushing with a 3-4 inch long piece of pipe, and install a new lens housing. I hope there's enough "give" in the sandy soil here in Florida behind the pool shell to tamp the piping back far enough to set the new lens housing at the right depth prior to installing the new plaster finish.
This work must be done from inside the dry pool and I'm figuring that the contractor will need to bust holes through the concrete shell to gain access to the flex piping in order to cut off the reducer bushing then re-plumb and patch up the holes. I'm concerned about the pool shell leaking around these patches if there isn't a good bond between the old and new concrete. I shouldn't rely on the new Pebble-Tec finish to provide a watertight seal.
Any thoughts, suggestions or ideas would be greatly appreciated!
Thanks,
Kevin
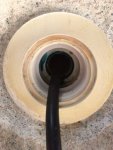
Here's some pics of my nightmare... the blue goo is the solvent welded reducer bushing directly onto the back of the lens housing. The 1" flex PVC can also be seen in the center of the bushing. This leaves no depth to install any light fixture.

- - - Updated - - -
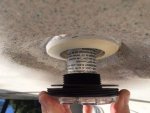
Here's another pic of the new light bumping against the reducer bushing. Sorry about the pic being sideways but I can't get it to post in the correct orientation.

I've ran into a significant, and unexpected, problem during my IG gunite pool renovation project and need some expert advise. While starting to replace the existing four (4) old Fiberstars fiber optic lights (circa 1993) in the pool walls with new Fiberstars Treo LED retrofit lights I was surprised to find that the original PB had glued a 1-1/2" to 1" reducer bushing directly to the back of lens housing fixture and used 1" flexible conduit all the way to the old Fiberstars illuminator. This left NO standard 1-1/2" PVC piping behind the wall fitting to install the new LED light. I need 3 inches depth of standard 1-1/2" pipe for the new light fixture but there's only about 1" of space before hitting the reducer bushing!
I'm now having to tear out the concrete around the old lens housings in the walls and cut them off behind at the point where the flex conduit is glued to the reducer bushing, hopefully glue on a new reducer bushing with a 3-4 inch long piece of pipe, and install a new lens housing. I hope there's enough "give" in the sandy soil here in Florida behind the pool shell to tamp the piping back far enough to set the new lens housing at the right depth prior to installing the new plaster finish.
This work must be done from inside the dry pool and I'm figuring that the contractor will need to bust holes through the concrete shell to gain access to the flex piping in order to cut off the reducer bushing then re-plumb and patch up the holes. I'm concerned about the pool shell leaking around these patches if there isn't a good bond between the old and new concrete. I shouldn't rely on the new Pebble-Tec finish to provide a watertight seal.
Any thoughts, suggestions or ideas would be greatly appreciated!
Thanks,
Kevin
Here's some pics of my nightmare... the blue goo is the solvent welded reducer bushing directly onto the back of the lens housing. The 1" flex PVC can also be seen in the center of the bushing. This leaves no depth to install any light fixture.

- - - Updated - - -
Here's another pic of the new light bumping against the reducer bushing. Sorry about the pic being sideways but I can't get it to post in the correct orientation.


