Caretaker Setting and Pool Plumbing

jeremysm1

0
Bronze Supporter
Nov 12, 2015
101
Scottsdale/AZ
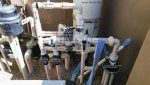
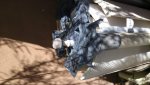
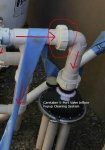
Below is a link to a picture of my pool plumbing. I really have no clue what's going on except that once my let go of my pool serviceman (he came for 6-minutes each time) some of the valves were in the wrong settings. I think he did that on purpose knowing I have no clue about this stuff. Little did he know I love this site and you guys are otherworldly and can help! In any case, my current dilemma is that I don't know what pipe does what and which direction it's going--and how all the valves come into play. Besides that, my issue is that I don't believe the Caretaker heads are working--and think it's the setting on the manual valve just to the left of it in the picture.

BTW--how does one go about adding storage to the quota on this site? I'm allowed like 3 pictures before going over and have to post these Google links which may get taken down and not help the next person. (thanks)

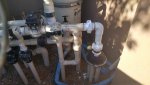
1. I have a Jandy Aqualink PDA system with some auto valves.
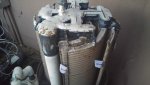
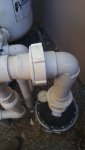
2. Just next to the DE filter, on the left in the pic, is my 2hp Whisperflow main pump. I'm guessing that those two pipes lead water up--one side from the skimmer the other from the main drain in the center of the pool. The valve controls that. Why would I want it to come from the main drain, and when/how should that be programmed?
3. I used to have an Aquapure salt cell going horizontally from left to right at the top (exactly where the current sensor is) but my ex-poolman replaced it with a Hayward and put it on the right going up/down. It is almost exactly at a 90 degree turn on both sides of the Hayward SWG, is that problematic? I recall reading that somewhere. Which way is the water going and why is it going in a circle?
4. What are the from 2 pipes towards the left doing?
5. The stuff all the way on the left is for the spa (pump) and waterfall and air blower. I'm not so concerned about that right now--just the main pool.

https://goo.gl/photos/gm3qa8rouVLUoGMB8

Thanks for any guidance or help with this.
 
Here is my attempt. Take a look. Also, I'll attach another view from behind...there are 2 PVC's after the DE that are going to the ground--where do you think those are going?
 

Attachments

  • Pool Equipment with Labels.jpg
    Pool Equipment with Labels.jpg
    79.3 KB · Views: 88
  • 20160322_120712.jpg
    20160322_120712.jpg
    63.4 KB · Views: 87
LOVE the badge! THANKS! Equipment is not my strong point so I will wait to see who jumps in to help. I will keep an eye on this thread and make sure it is covered.

Kim (man that is a scary bunch of pipes and such :shock:)
 
Holy pipe screensaver Batman! I love seeing systems like that and trying to figure them out is equally as fun. That being said lets start simple.

1.) On the caretaker valve there's a filter screen (or should be) in the top of the valve. It can be accessed by removing the section with 2 union connectors on it.
2.) If the DE filter in the picture is your only filter then the main drain line in front of the filter pump should be from the spa. Can check this by putting in spa mode and observe the actuator switch.
3.) As far as the SWG, it isn't recommended to plumb it in that way but not detrimental, generally you'd want around 8" straight pipe into and out of the cell.
4.) The 2 pipes going into the ground, IMO, are the pipes going to and coming from the heater. It appears there're multiple bypasses involved and can certainly be confusing.

GL!
 
Thanks Joel! I'm getting deeper and deeper into this mess of a pool and found that the Caretaker stops working after about 3 minutes. Turns out that strainer in the caretaker is catching a ton of little debris--it's spring here in AZ and the trees are shedding so much stuff into the pool. So, my next adventure I decided to take was to tackle the DE filter. I noticed that after I backwashed, a lot of DE made it's way back into the pool too. And figured that it's not catching all the debris.

Attached is the initial pic of the Caretaker strainer, and the DE grids when I opened it up---there was a lot of caking and sludge to remove. I cleaned it out and also found just one of the grids bad--it's the small one closest to the front--see pic. Do I need to replace all or just the one?

Anyone, please chime in on this and I'll follow your instructions. Can I get them from a local pool store here in Scottsdale? Thanks!
 

Attachments

  • 20160323_173605.jpg
    20160323_173605.jpg
    33.9 KB · Views: 71
  • 20160323_184842.jpg
    20160323_184842.jpg
    54.2 KB · Views: 71
  • 20160323_194046.jpg
    20160323_194046.jpg
    47.6 KB · Views: 70
Also, notice the pic of the DE filters in the middle--they have the Pentair tags on them. What are the odds that my pool guy changed out these filters in the pools 8-years of existence and used authentic Pentair replacement filters? I'm guessing low, extremely low. So, does that merit me replacing all the filters? Just a thought. Guidance? Thanks.
 
Pentair grids are more expensive than knockoffs so it's highly unlikely but not improbable. If the small one is the only one with holes I like to do the press test. Try to press your thumb through the center cylinder from the bottom. If it rips the fabric replace if not you should be good. Remember to put 6lbs of DE back in.

Grids are readily available, just let them know you need the small(partial)grid for a FNS60 or large(Full)grid if any rip.

GL!
 

Enjoying this content?

Support TFP with a donation.

Give Support
Thanks Joel. Turns out that one of the big online retailers has their main office about 10 minutes from my house and had the part in stock. I changed out just that one grid and after lots of messing around finally figured out how to get it back into place. Had to turn on/off the pool to get the crud cycled out of the filter and into the Caretaker so the leaves stopped plugging them. Then had to add DE and sweep the old DE from the pool floor. What a mess. I think along the way I over-tightened the Caretaker and maybe ruined an O-ring or two so that's on my next to-do list. Slowly, we're getting somewhere.
 

Attachments

  • 20160324_113311.jpg
    20160324_113311.jpg
    63 KB · Views: 66
Okay, new problem--self inflicted. I over-tightened the connector (is it called a union?) leading to the Caretaker system. Easy enough, I bought one of those cool tools--but I initially twisted the wrong way and now it's cracked. When I move the flow to the Caretaker system water spews out from the crack. It would be super if I could just replace that connector, but my spider sense is telling me that pvc plumbing work is going to be the only way to get this replaced. Can someone tell me what you call that piece and how I should handle fixing this? See pics. Thanks.
 

Attachments

  • Cracked Union.JPG
    Cracked Union.JPG
    60.6 KB · Views: 57
  • 20160325_070343.jpg
    20160325_070343.jpg
    28.2 KB · Views: 57
Well Peter Parker you are correct and I am so sorry! You DO have some PVC work ahead of you and it is going to be hard as you do not have much to work with. Use great care and take your time to figure out how best to do this. You CAN do it!

Kim
 
:confused: Been Googling this morning and found some creative ways to re-use the existing pipe connection. So, planning on cutting off the pipe that houses the connector that I cracked. Then heating up the PVC leftover that fits in the left hand side so I get that piece without the remnant. Finally, will try to replicate the replacement PVC with the one that I ruined. Need some parts, but I can do it!!! Will tackle tomorrow afternoon and will report. IF this sounds like a bad idea, please chime in..but it seems like the only real solution. Thanks!
 
I have good news--I was able to rebuild that corner of the plumbing and it doesn't seem to be leaking (yet). You can see my plumbing job in white as I haven't painted it. I'd like to say that cutting pvc pipe manually with a hacksaw is now on my top 10 least favorite things to do list. Okay, now for my newest issue, which is mundane compared to the previous ones so far. I am trying to select the correct valve position so the return jets have water coming out them with some force while the Caretaker system has enough pressure to keep the heads working. They are supposed to work like that, right? In the picture, I'm showing the valve off towards the Caretaker and the return jets are working great. When I put the valve to completely open for both (more or less twisting the valve handle 90 more degrees down) the Caretaker doesn't register more than 5 psi of pressure. When I move the valve to create a flow halfway to both, it seems that my return jets stop pushing out if the Caretaker gets 15psi.

Anyone with info about how these are supposed to be setup and working and what I should try? Thanks!
 

Attachments

  • 20160326_164053_HDR.jpg
    20160326_164053_HDR.jpg
    53.4 KB · Views: 49
Nice fix job! That IS a hard job!

Did you put lube on the o-ring inside the union? Tube lube is one brand. You want some around for all of the o-rings in your equipment.

Adjustment for cleaner and returns........I can't help as I really do not know. I guess playing with the valve in different places 20/80, 30/70 ect. will be the best way to find what works best.

Kim
 
Thanks Kim! Yes, I definitely lubed those o-rings so that is good to go. If anyone has experience with Caretaker settings that would be great. I'll call Caretaker tomorrow too and see what they have to say for themselves. I'm almost to the point where I can concentrate on my chemical levels. Thanks. Happy Easter everyone.
 
Sorry, I was MIA there. Looks like you got the issues figured out like a pro.

Lets look at the handle from a clock pov, we'll say the handle is pointing to 3 O'clock. The front, where it says off, if telling you where the diverter stopper is inside the valve.

So in your picture you have the stopper pointed at the Caretaker valve thus stopping the flow to the valve. In a perfect world you'd be able to have the handle pointed to 12 O'clock and have great flow throughout the system but usually that's not the case.

As Kim suggests you'll need to play with the valve to see where you get full extension from the pop-up heads. I'm guessing you'd need to have the handle pointed to 6 O'clock with the "off" tab pointed down at the ground and work your way either toward 7-8 O'clock or 5-4 O'clock. Once you get full extension to the heads the pressure is right and should hold until the filter gets dirty again.

GL!
 
Thanks Joel! I researched, experimented and called Caretaker (or whoever they are now--great support BTW) and decided to put an automated Jandy valve in the manual valve's place. I just couldn't get enough pressure through the Caretaker and the jet returns at the same time. From my info gathering, the Caretaker unit will need about 6-hours to do it's job each night, so my plan is to setup a program on the Aqualink that gives it that amount of time and when complete move the switch to the return jets. What do you think? The only alternative was to go for their new infloor popups as they need less pressure--but that would be a boatload of money because I have so many popup heads. I guess my next adventure will be learning the Aqualink system. I think I've touched almost every single part of this pool during the last month. :)
 

Enjoying this content?

Support TFP with a donation.

Give Support
Thread Status
Hello , This thread has been inactive for over 60 days. New postings here are unlikely to be seen or responded to by other members. For better visibility, consider Starting A New Thread.