Adding Solar Bear Panels to our AGP- The process with pics

amjohn

0
LifeTime Supporter
Jul 30, 2008
387
Rural NE Texas
After much debate and study, we finally chose Solar Bear AGP with 2" headers, made by FAFCO and purchased through Amerimerc.com. Parts are readily available, FAFCO is great to work with, and we already had experience with Amerimerc's super fast shipping to our area (1 day if they have it stock). And, when we had a break-down in communication on the parts, Amerimerc took it upon themselves to contact FAFCO and work out our parts issue- resulting in FAFCO fed-exing us free parts. We bought 2 panels 4ft by 20ft plus 2 mounting kits, a repair kit, and add-on kit (the part we did not need since we are plumbing in parallel, and the add-on kit is for a serial installation).
NOTE- Edit made 5/9/09... Amerimeric has gone up in price considerably on these parts since we bought them this winter. Two other web sites that have prices more in line with what we bought them for: http://www.bestbuypoolsupply.com/abovegroundsolar.htm
and http://www.aquasuperstore.com/products/ ... ~3664.html
We have not dealt with either of these, but if we add another panel, we will check into them...End Edit
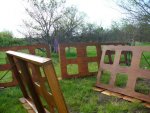
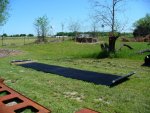
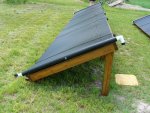
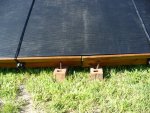
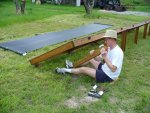
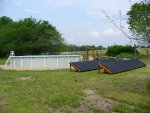
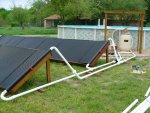
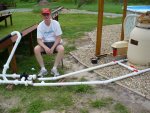
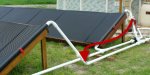
We are putting the panels on the ground on racks slanted at roughly 30 degrees- when you see our ground you will understand why I say "roughly" We are at 33 degrees latitude and are trying to get additional heat at the front and back of the main swim season. This, for us, means swimming as early as mid-April some years and as late as early November. We are actually at only 28% surface area of our pool, but we had to start somewhere, and we had to choose to stop spending money somewhere, so that is where we are now. We can always add another panel or two down the line. We are not able to put our panels on a roof, because the pool is too far away from any available roofs.
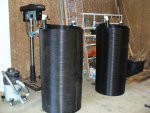
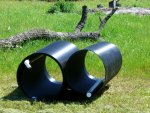
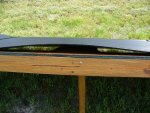
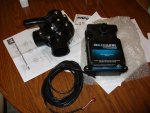
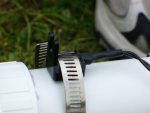
First set of pictures: the panels, as they arrived. They have been sitting in the shop for a couple weeks, which gets quite warm on sunny days, in hopes that they would unroll a little. They did not.
 

Attachments

  • P1000835coils small.JPG
    P1000835coils small.JPG
    198.6 KB · Views: 2,627
Next project- the racks. We built them out of pressure treated 2 by 4's and pressure treated plywood. We may have overbuilt a little, but we get some wicked winds here, so we need to make sure they would stay put. We also need to make sure they could be moved, because we will be removing the whole installation in the winter. That's right- the whole thing. The area where the panels are located is a drainage field- fine during our dry summers, but not a place you want to put anything that you want to keep when we get torrential Texas winter rains. We stained them for their protection as well as their looks. We also purchased a rebuilt paint/stain sprayer from Gleem paints. Worth every penny. We got them all stained in one miserable day. I did the spraying, and it took me two days to get all the stain off of me. Learned some valuable lessons about staining for when we do the deck and recondition our flat bed trailer.
 

Attachments

  • P1000830racks small.JPG
    P1000830racks small.JPG
    234.3 KB · Views: 2,585
  • P1000834sprayer.JPG
    P1000834sprayer.JPG
    155.5 KB · Views: 2,549
  • P1000832stain small.JPG
    P1000832stain small.JPG
    187.2 KB · Views: 2,563
So the we are ready to unroll the solar panels. Not as easy as it sounds. It was a 90 degree day and full sun, and it still took several hours sitting in the sun, two people, and a heavy 4x4 as weight to straighten them out. Once we got them open, the sun pretty much just "melted" them flat. I cannot imagine doing this on a cold day. We will have to plan carefully next spring when we go to re-install.
You also start to get an idea of the lay of the land when you look at these pictures. Up past where the panels are is 70 acres of pasture that drains right down onto us. The water actually runs across where the stretched out panel is sitting.
 

Attachments

  • P1000867unrolled.JPG
    P1000867unrolled.JPG
    256 KB · Views: 2,545
  • P1000868coils in the sun.JPG
    P1000868coils in the sun.JPG
    248.9 KB · Views: 2,545
On to mounting- the racks are facing due south, no trees to obscure. We have plenty of open space on this side of the pool. My husband nailed a lip on the bottom of each rack to keep the solar panel from sliding down the rack. (He got to buy a nice new nail gun for this project. New tools are good bribes.)
The front edge of the racks are setting on bricks fixed in with sections of rebar that stick up far enough to catch the front end of the rack. Everything is put together with screws so it can be taken down and moved. The racks are built in sections for the same reason. Moving and storing will not be easy, but it is possible.
The rack mounting kits are some plastic male threaded "knobs" that screw into the sides of the panels. Nylon straps lay across each panel and through slots in the knobs, and then male threaded caps screw down onto the female knobs, cinching the straps into place. We may have to improve on this system at some point, as I forsee perfect critter chew toys in this system. We'll see.
 

Attachments

  • P1000892 finished rack.JPG
    P1000892 finished rack.JPG
    269 KB · Views: 2,512
  • P1000872panels on racks.JPG
    P1000872panels on racks.JPG
    240.5 KB · Views: 2,508
  • P1000879install verticals.JPG
    P1000879install verticals.JPG
    260.9 KB · Views: 2,518
We were curious to see just how much of a difference the solar panels make. The water coming out of our tap is still pretty cold, so we opened up the ends of the panels and stuck the hose down in there to run some water through. What a difference they make- the water coming out was hot tub warm! However, hitting them with cold water on a hot day had an unforseen consequence- the panels bowed back up a bit between the mounting straps. The bowing reduced after the sun warmed them back up, but it was interesting to observe how much they reacted to the cold water.
 

Attachments

  • P1000898buckling from cold water.JPG
    P1000898buckling from cold water.JPG
    237.9 KB · Views: 2,506
Somewhere in the middle of this process it occurred to me that, with fairly small surface area of panels, we needed to get maximum efficiency. I also had read about how much of a difference some people had when they added a solar controller. Originally, we did not plan to do this. I was going to run out and turn them on when the sun came out, and run out and turn them off when it was cloudy. The spring hit, and I started counting how many times a day I would be going through this exercise, and I realized that my time was worth a solar controller. We started looking for a GL-235-LV-HV (which will run a booster pump or turn on/off our regular pump), but had some trouble finding one. Everyone seemed to be stocking the LV only (no pump feature- valve actuator only). We finally found an e-bay seller that had the AQ-SOL-LV-TC which would do want we wanted, plus has freeze control built in. It also included the Hayward 3-way valve PSV3S, the Goldline GVA-24 actuator, and the 10KOhm sensors. Everything fits 1.5 inch PVC, which is what we are using.
Now we had already mounted an Intermatic freeze timer for this winter, so not sure if we will use the freeze timer function yet, but it is nice to have options.
We got it all from bestpoolbuys.com on e-bay and is out of New York. Had not dealt with this vendor before, but I pelted him with questions to the point that a less determined person would have given up (the nag test). He had the right answers. The price was fantastic- almost too cheap. I hope we did not get taken. I do not think so, but we will find out shortly, as plumbing is in progress as I write this.
 

Attachments

  • P1000873small.JPG
    P1000873small.JPG
    159.8 KB · Views: 2,475
  • P1000901controller.JPG
    P1000901controller.JPG
    126.5 KB · Views: 2,462
  • P1010013valve and actuator.JPG
    P1010013valve and actuator.JPG
    167.3 KB · Views: 2,465
On to the plumbing. We had used flex hose when we first installed the pump and filter last year, but my husband is changing the arrangement some. Still using the flex hose for running from the filter to the solar system because of a weird angle involved in how we are laying this out. We are trying to have as many of the controls and important parts inside the "pump house" structure that is built around the pump and filter. Of course we did not build the pump house big enough, so that is turning out to be tricky.
We are also trying to have the entire solar system removable in winter, so that everything that is left through the winter is inside the pump house. We do not winterize the pool down here, just stop swimming in it and set the freeze timer to run the pump when the temps get to freezing. This happened 5 times this winter, and two of those times we had blowing sleet, ice, freezing fog, etc. We have also lost our house roof twice in 20 years to hail. So we need to keep our winter part of the system out of the ice and hail.
PLEASE NOTE: The plumbing shown in this post has changed due to our first round installation being WRONG- my husband mixed PVC Sched 40, low pressure drainage fittings, and who knows what else. Corrected plumbing pictures will be posted as the plumbing is reworked. (edit 5/3)
 

Attachments

  • P1010017pipes to pool.JPG
    P1010017pipes to pool.JPG
    246.6 KB · Views: 2,461
  • pump up close.jpg
    pump up close.jpg
    212.7 KB · Views: 2,455
If anyone sees any problems with where we are going or has any suggestions, please feel free to let us know. Better that than to find out the hard way- which we have done often enough to know we hate finding out the hard way.
 

Enjoying this content?

Support TFP with a donation.

Give Support
Actually, it was our only option. We have a dearth of pool contractors in our area, hardly anyone uses solar or knows what it is, and we have been through many a DIY project. The panels themselves are manufactured by FAFCO, so we did not "build" the panels- the first picture shows them out of the box as they came from the manufacturer. But everything from that point on has been our labor and research. And that always saves you money, but costs you time (2 months in our case).
 
Fascinating! Thanks for the write-up. I'm looking to do solar for my pool sometime in the next few years and was thinking about doing almost the exact same thing you did...only without having to worry about storing my solar rack. Your pics will save me quite a bit of research. Thanks!
 
PLEASE NOTE: The plumbing shown in this post has changed due to our first round installation being WRONG- my husband mixed PVC Sched 40, low pressure drainage fittings, and who knows what else. Corrected plumbing pictures will be posted as the plumbing is reworked. (edit 5/3)
Onward to the plumbing. So far things have been relatively smooth. Not with this. My husband has done lots of plumbing over the years. Our house is 20 years old, and almost all of the plumbing that can be reached without going through concrete has been replaced by him, one freeze or broken pipe at time. So we expected the plumbing to be tedious and time consuming, but not problematic. WRONG!
!! NOTE: my husband wanted to make sure that I mentioned that the reason for all the threaded connections is not that we are insane or he is incompetent. It is because we have to remove and store all of this plumbing in his shop during the winter!--end of disclaimer
As shown previously, we have a main bypass right by the pump where water flows from filter to the return. That is the part that stays on year round. It has a handle in the middle of it so that we can reduce the flow there as needed to send more of it to the solar panels, or less if we have too much pressure on the solar panels.
The sensor is next in line- this sensor "feels" the temp of the pool water and tells the system if it is the right temp. It is right before the three way valve. I was concerned about the location of the sensor- thinking it out to be closer to the pool (like in the skimmer pipe or something). According to my husband's plan, when the valve is "off", water will always be going through this section, so it will feel fresh pool water all the time.
Next comes the three-way valve with its bypass (2nd picture). Water is coming from the filter on the valve side (top pipe in picture) When the valve is off, it bypasses the solar panels and sends water back to the return (bottom pipe). When it is on, the water goes to through to the solar panels. We are still a little confused as to what is "on" and what is "off" on this valve, as it is not intuitive, and the directions are not helpful. Notice the hole drilled for the water temp sensor for the controller just before the valve. That is where the sensor was installed in the previous picture.
The next picture shows the whole shebang looking down from the pump area. Remember, water flows from the pool on the valve side (closest to the panels) and returns to the pool on the outside (further from the panels). Water goes in at the bottoms of the solar panels and exits from the tops, as is recommended on this site for panels on a slant. Also, the system is plumbed in parallel- water splits and flows through the two panels at the same time, rather then one panel after the other- to increase heat efficiency.
 

Attachments

  • P1010051looking down pipes.JPG
    P1010051looking down pipes.JPG
    398 KB · Views: 2,240
  • P1010029valve area.JPG
    P1010029valve area.JPG
    242.9 KB · Views: 2,240
  • P1010038water probe installed.JPG
    P1010038water probe installed.JPG
    71.7 KB · Views: 2,238
PLEASE NOTE: The plumbing shown in this post has changed due to our first round installation being WRONG- my husband mixed PVC Sched 40, low pressure drainage fittings, and who knows what else. Corrected plumbing pictures will be posted as the plumbing is reworked. (edit 5/3)
So here is where the problem comes in. The angles from the first bypass to the second where the 3ways valve sits are bizarre due to location and the way our land slopes. I suggested using flex hose. My husband said no, he prefers to do it with hard pvc and could make work. This went back and forth, but since he was the one with the hacksaw and PVC glue, he won. (You can see on his face that he was annoyed with my arguments)
You can see the bizarre angles in this photo. He got it all done (as you can see from the second picture). We waited for several hours to test it, and Sunday night at 7PM as the sun was going down and the weather closing in we tested it. LEAKS, LEAKS, LEAKS- I counted 6 places. Not geysors, but like a hose turned on at a trickle. 6 of those would make for a lot of water loss. AAUUGGHHH!
So now my husband has decided that flex hose may have been the better choice on that funky angled area. However, not all of the leaks were there. On of the main ones was out on the far end near the last panel, where the water comes out of the panel (at the top edge of the panel). My husband used teflon tape on all the threaded connections, so as far as we can tell, the leaks are coming from the glued joints, and not the threaded ones.
Since he can only work on this evenings and weekends, and since we are having daily storms this week, it will be this weekend before he can return to the plumbing repair. Any suggestions are welcome.
 

Attachments

  • all done.JPG
    all done.JPG
    246.8 KB · Views: 2,220
  • P1010030ken last glue.JPG
    P1010030ken last glue.JPG
    250.1 KB · Views: 2,221
Are you using schedule 40 pipe and fittings? Standard DWV pipe and fitting are not rated for pressure and have much less solid connections that can leak a lot more easily. All swimming pool pipe and fittings should be schedule 40. I have seen DWV pipe and fitting used, and it will often work for a while, but it tends to have problems either right away or a few years later.

I also notice that you have the pipe runs to the two panels different lengths. Water prefers to take the shorter path, so more water will flow through the closer panel. The panels will still work, but the uneven path lengths will rob you of some of your efficiency. You can correct this by running the return from the closer panel out to meet up with the return on the further panel and then running back to the pool from there.

The valve actuator, the electrical thing that actually turns the valve handle, has a setting to control which position it turns to. The manual that comes with it explains how you set it up, though many people find the manual confusing.
 
Yes, all schedule 40, and the threaded fittings are schedule 80.
So do you mean doing something like show in the picture below, where the read arrow replaces the existing return? That still does not change the fact that the inlet on the first panel is much closer than the second. Does that not matter also?
PLEASE NOTE: The plumbing shown in this post has changed due to our first round installation being WRONG- my husband mixed PVC Sched 40, low pressure drainage fittings, and who knows what else. Corrected plumbing pictures will be posted as the plumbing is reworked. (edit 5/3)
 

Attachments

  • change in plumbing length to balance.jpg
    change in plumbing length to balance.jpg
    81.9 KB · Views: 2,197
At least some of your threaded connections look like pipe unions. Unions should NOT have teflon tape, pipe dope, or any other sealant used on them - they are supposed to make up strictly on the pressure the locking ring exerts when it squeezes the two sides together... It is important to keep those surfaces clean and free from debris or they won't pull together properly. (However note that it can take a good bit of torque to lock them down. You will also have less trouble with unions if they naturally fall straight in line - they don't like being forced to pull angled joints together.

I agree with Jason on the need to get your pipe loop lengths uniform, or you won't get equal heat out of each panel. You can fix this either by re-routing the pipes to make the lengths equal, or a second alternative would be to put a throttling valve on the shorter loop and balance the flows by restricting the shorter loop - you can tell the loops are balanced if the output temp of each loop is the same...

Otherwise, great looking project. :goodjob:

Gooserider
 
We did not even think of the loop length issue, and we are both engineers. I was never very good with circuit design though. At this point, the throttle on the short loop is probably the most economical way for us to manage this, as replumbing that length may mean another month will go by before I get my solar panels. Another reason for the many threaded connectors is that this system will probably get expanded next year with another panel, and we need to be able to work in the additional plumbing at that time.
I sent gooseriders comment about the pipe unions to my husband- to me they all look the same and they all had the same part number label on them, but he hopefully knows exactly what he bought. All I saw was 8 bags full of assorted pvc parts.
So about the 3-way valve. The pictures below show it in place. Let us assume for the moment that we are not going to use a controller- which actually we will not for a few days until we are sure everything is doing what it is supposed to be doing.
You can see that there is one raised white triangle and two white triangle cut outs at 3 of the different positions (9:00, 6:00 and 3:00 clock positions). The 4th position (12:00) has no marking on it. One of the white cutouts (the middle one or 6:00 on the clock) has the word "closed" in front of it in raised letters.
Water is entering from the left (9:00). If it goes through the valve to the right (3:00), it is going to the solar panels. If it is sent towards the back of the valve (12:00 from this view) it bypasses the solar panels and returns to the pools.
My question? What position is this dumb thing in? Which way should the raised arrow point to allow water to flow through the valve to the solar panels. Which way should it point to close off the solar panels and send it through the bypass? There are no other markings, and the manual is very vague. It also mentions that we can change the way the arrows are aligned, but we are still at factory set up and want to figure out what is going on now. When we were leak testing, it seemed like water was going through regardless of where we set the valve, but water was everywhere, so it was hard to tell.
Please help!?
 

Attachments

  • P1010056 3way valve detail.JPG
    P1010056 3way valve detail.JPG
    195.5 KB · Views: 2,169
  • P1010057 3way valve side.JPG
    P1010057 3way valve side.JPG
    136.8 KB · Views: 2,168
Changing the plumbing as shown by the large red arrow would equalize the panels. The idea is to get the water to travel the same total distance. It doesn't matter where in that distance the panel it's self occurs.

On the three way valve: To turn off the solar panels you turn it so the handle points towards the pool and the closed arrow points towards the solar panels. To send all of the water to the solar panels you would turn it so the handle faces the side without a pipe and the closed arrow points towards the short bypass pipe. In normal operation you would probably want it somewhere between those two positions, because you don't have enough panels to send the entire pump output to the panels.
 

Enjoying this content?

Support TFP with a donation.

Give Support
Thread Status
Hello , This thread has been inactive for over 60 days. New postings here are unlikely to be seen or responded to by other members. For better visibility, consider Starting A New Thread.