simicrintz said:
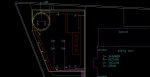
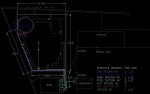
Plumb the main drains (which are an outdated way to keep pool floors clean since the creation of pool cleaners, or "moving main drains") to the front of the skimmer and the pump to the back of the skimmer (that is why there are 2 holes on the bottom of the skimmer). Run a dedicated 1 1/2" line from the middle of the pool back to the equipment pad and put a 3 way valve on that to control the skimmer versus the cleaner (you can put all of the suction to either one, or split it, that way). 4 main drains in the bottom of the pool is silly, especially if the thought process is for draining the pool (every 2 to 3 years, most likely).
On the vacuum issue, the reason I didn't have it in the middle, near the bar stools, is that I was afraid the hose would get tangled around the bar stools. It's only 28' long so it should still reach if I have it at the end where it is in the diagram, correct?
Yup, it will reach from end to end, you'll just have 30' plus of hose in the pool (and it will still get caught up in the bars stools!)

That is a lot of hose in the pool.
Onto the drains..., my understanding was that I have to have two per suction line to prevent entrapment but now I can't find the source for that. So one main drain with a sump and hydrostatic valve. Then one regular suction outlet (no sump) for the water feature suction. And that will pass code?
Yes, split main drains are code. Two in the floor (again, not required) will need to be split, and the ones for the water feature as well, although those are typically put in the wall of the pool, not on the floor. 36" minimum separation, and a sump 1 1/2 times the pipe diameter in depth.
And finally, the lights. I want them on the side pointing away from the house, but was afraid the bar stools would be in the way or cause large shadows. Since I'm going with the Savi Led lights that are small and fit in a standard reutrn fitting, do you think I can put them on the bar stools themselves?
I wouldn't put them in a bar stool. Rule of thumb is no more than 4 sweeps for electrical, and it would be difficult to get those run back if they were in a bar stool. I don't think it would work out for depth either, as bar stools are typically 12" to 18" in diameter. If you think you will use th ebar stools a lot, then put them in. But, they are a pain to clean around and take up space, so keep that in mind as well. I just don't like swimming into lights, so that is why I commented on that area.
And nobody comented on the return line and skimmer location, so I assume they look good!
The return lines should all be plumbed at a 90 degree angle to the pool wall, roughly 18" below water and with 1 1/2" pipe so that you can put directional eye ball fittings on them. The one in the step area should not be in the top step! I would try and move that over somewhere else so that is at a better elevation.