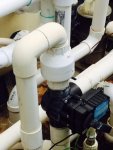
My spa just started draining into the pool, so I am assuming I have a bad check valve. Attached is a picture of the valve and it looks like there is no room either on top of or beneath the valve to cut it out and put in a new one (will replace with Jandy). My real concern is on the bottom as there is no room at all between the check valve and the spa/pool valve. I sure don't want to have to replace the spa/pool valve. Any suggestions?

Replacing check valve
- Thread starter Billrector
- Start date
You are using an out of date browser. It may not display this or other websites correctly.
You should upgrade or use an alternative browser.
You should upgrade or use an alternative browser.
rphpool
0
You might have to use a heat gun to loosen the connection on the valve. I would cut the top part so you can wiggle as you heat up the bottom part. You could also cut the bottom and use heat gun to try and get whats left of the PVC pipe out of the valve. Good luck and keep us updated!
You can use a 2-1/2" pipe on the outside of the Jandy valve. Put the check valve on the other side with unions so you can replace it next time.
- May 23, 2015
- 24,381
- Pool Size
- 16000
- Surface
- Plaster
- Chlorine
- Salt Water Generator
- SWG Type
- Pentair Intellichlor IC-60
Try one of these -
http://www.ohiopowertool.com/P-11007-wheeler-rex-internal-plastic-pipe-cutter-for-2-schedule-40-pipe-and-dwv-2290.aspx?CA_6C15C=120016460000021541
You probably will need to take apart the automatic valve below the cut so as to avoid getting PVC shavings in the internals of the three-way vlave. I would also put the new check valve on the other side where there is more room.
I'm assuming the white bulging kinda looks like a union thing is your check valve? I'm used to the Jandy ones so just checking.
There is a way to save your 3-way valve below. Go ahead and cut out the check valve. You're left with a tiny nub of pipe sticking out of the 3-way that you can do nothing with. Ah, but you can!!")
You need to remove the glued-in pipe from the 3-way valve so you can glue in a new piece of pipe. There are a couple ways to do this:
How to remove glued pvc pipe. no special tools - YouTube This guy uses fire...literally.
Recover Glued Pipe Fittings - YouTube Thus guy uses a heat gun.
Personally, I use a heat gun to do this but it requires patience. I haven't tried the fire method although it does look much faster and easier.
The Jandy fitting is Schedule 80 so it is thick. It takes some patience to heat it up. You must heat it up evenly spinning around and around and around and around the fitting. It will take you a good 5-6-7 minutes to do it and believe me, it will feel like an eternity. So gut the valve, get a comfortable sitting position and have your screwdriver and needle-nose ready to go. You'll also want a spare piece of 2" (or whatever size you have there) of pipe because you'll want to insert this pipe into the hot valve once the glued-in fitting has been removed. This will ensure that it keeps it shape as it cools. I would sand the sharp edge of the pipe so it goes in easily and doesn't gouge the valve upon insertion.
As you can see in the fire video, you'll want to use the screwdriver to pull away a small section of the pipe so that you can get a grip on it with the needle-nose. Then your roll the needle-nose and pull the pipe away from the wall. It works quite slick. Just be careful with the screwdriver. Do not dig into the valve and mess it up...dig only into the pipe. You may wish to practice on an old fitting you have laying around to get the hang of it before trying it out on your valve.
So you basically heat, test with the screwdriver, heat some more, test, heat, test until the pipe pulls away from the valve easily. The more time you spend heating, the easier things will be.
Also, have a bucket of water standing by with a sponge in it. Once you insert the pipe, you can sponge the hot valve to cool it down or you can just ignore it for a half hour and come back.
Oh, and leaving a nub of pipe in the valve makes it a bit easier to get the screwdriver in there because you can start pushing on the nub to start pulling the glued-in pipe away and keep away from touching the valve body.
- - - Updated - - -
Actually, if he gets a Jandy check valve, replacing it is a matter of unscrewing the face and bolting in a new flapper valve assembly. This is true of all their designs now that I think about it. Forward thinking those Jandy folks!
There is a way to save your 3-way valve below. Go ahead and cut out the check valve. You're left with a tiny nub of pipe sticking out of the 3-way that you can do nothing with. Ah, but you can!!
You need to remove the glued-in pipe from the 3-way valve so you can glue in a new piece of pipe. There are a couple ways to do this:
How to remove glued pvc pipe. no special tools - YouTube This guy uses fire...literally.
Recover Glued Pipe Fittings - YouTube Thus guy uses a heat gun.
Personally, I use a heat gun to do this but it requires patience. I haven't tried the fire method although it does look much faster and easier.
The Jandy fitting is Schedule 80 so it is thick. It takes some patience to heat it up. You must heat it up evenly spinning around and around and around and around the fitting. It will take you a good 5-6-7 minutes to do it and believe me, it will feel like an eternity. So gut the valve, get a comfortable sitting position and have your screwdriver and needle-nose ready to go. You'll also want a spare piece of 2" (or whatever size you have there) of pipe because you'll want to insert this pipe into the hot valve once the glued-in fitting has been removed. This will ensure that it keeps it shape as it cools. I would sand the sharp edge of the pipe so it goes in easily and doesn't gouge the valve upon insertion.
As you can see in the fire video, you'll want to use the screwdriver to pull away a small section of the pipe so that you can get a grip on it with the needle-nose. Then your roll the needle-nose and pull the pipe away from the wall. It works quite slick. Just be careful with the screwdriver. Do not dig into the valve and mess it up...dig only into the pipe. You may wish to practice on an old fitting you have laying around to get the hang of it before trying it out on your valve.
So you basically heat, test with the screwdriver, heat some more, test, heat, test until the pipe pulls away from the valve easily. The more time you spend heating, the easier things will be.
Also, have a bucket of water standing by with a sponge in it. Once you insert the pipe, you can sponge the hot valve to cool it down or you can just ignore it for a half hour and come back.
Oh, and leaving a nub of pipe in the valve makes it a bit easier to get the screwdriver in there because you can start pushing on the nub to start pulling the glued-in pipe away and keep away from touching the valve body.
- - - Updated - - -
You can use a 2-1/2" pipe on the outside of the Jandy valve. Put the check valve on the other side with unions so you can replace it next time.
Actually, if he gets a Jandy check valve, replacing it is a matter of unscrewing the face and bolting in a new flapper valve assembly. This is true of all their designs now that I think about it. Forward thinking those Jandy folks!
I'm assuming the white bulging kinda looks like a union thing is your check valve? I'm used to the Jandy ones so just checking.
There is a way to save your 3-way valve below. Go ahead and cut out the check valve. Your left with a tiny nub of pipe sticking out of the 3-way that you can do nothing with. Ah, but you can!!
You need to remove the glued-in pipe from the 3-way valve so you can glue in a new piece of pipe. There are a couple ways to do this:
How to remove glued pvc pipe. no special tools - YouTube This guy uses fire...literally.
Recover Glued Pipe Fittings - YouTube Thus guy uses a heat gun.
Personally, I use a heat gun to do this but it requires patience. I haven't tried the fire method although it does look much faster and easier.
The Jandy fitting is Schedule 80 so it is thick. It takes some patience to heat it up. You must heat it up evenly spinning around and around and around and around the fitting. It will take you a good 5-6-7 minutes to do it and believe me, it will feel like an eternity. So gut the valve, get a comfortable sitting position and have your screwdriver and needle-nose ready to go. You'll also want a spare piece of 2" (or whatever size you have there) of pipe because you'll want to insert this pipe into the hot valve once the glued-in fitting has been removed. This will ensure that it keeps it shape as it cools. I would sand the sharp edge of the pipe so it goes in easily and doesn't gouge the valve upon insertion.
As you can see in the fire video, you'll want to use the screwdriver to pull away a small section of the pipe so that you can get a grip on it with the needle-nose. Then your roll the needle-nose and pull the pipe away from the wall. It works quite slick. Just be careful with the screwdriver. Do not dig into the valve and mess it up...dig only into the pipe. You may wish to practice on an old fitting you have laying around to get the hang of it before trying it out on your valve.
So you basically heat, test with the screwdriver, heat some more, test, heat, test until the pipe pulls away from the valve easily. The more time you spend heating, the easier things will be.
Also, have a bucket of water standing by with a sponge in it. Once you insert the pipe, you can sponge the hot valve to cool it down or you can just ignore it for a half hour and come back.
Oh, and leaving a nub of pipe in the valve makes it a bit easier to get the screwdriver in there because you can start pushing on the nub to start pulling the glued-in pipe away and keep away from touching the valve body.
- - - Updated - - -
Actually, if he gets a Jandy check valve, replacing it is a matter of unscrewing the face and bolting in a new flapper valve assembly. This is true of all their designs now that I think about it. Forward thinking those Jandy folks!
Great answer! Thank you for taking the time you did to write your very thorough post.
Maybe a dumb idea, but why not leave the bad one as is and install a new one in the straight section of pipe on the other side of the two 90 deg elbows? It is not likely that the other will leak out and make you lose water. I think there would be enough space on that section and the bottom fitting in the picture looks to be a coupling that you could remove anyway.
Just a thought.
Just a thought.
Great answer! Thank you for taking the time you did to write your very thorough post.
Another tip. When prying with the screwdriver, you'll want to pull the glued-in pipe completely away from the wall in that spot. So pry, yank, pull, push in further...pry yank pull push in further until you 'bust through' the pipe completely. THEN you use the needle-nose and roll the rest of the pipe out. If it is difficult to do this, heat it some more.
All of that stuff with fire and screwdrivers is way too complicated. Look at the pic of the equipment pad in post #4 of my build thread, link in sig. The pipe going to the Jandy valve on the right had to be replaced. Cut off the 2" pipe flush with the valve and use a 2-1/2" pipe glued on the outside of the Jandy valve. There is also a pic of check valves plumbed with unions in that same post. Although, I agree that the Jandy check valves are cool and I will use them next time.
Jandy folks were also smart about making their valves fit inside 2" and outside 2-1/2" plumbing.
Jandy folks were also smart about making their valves fit inside 2" and outside 2-1/2" plumbing.
check valves have an up position and a flow position so you cant mount it in left side pipe
i would hacksaw the flow valve between the knurled area and main body
and left pipe in a convenient spot
then work at removing knurled section from pipe to pool/spa valve
if you have time you could probably file it away
but i suspect you can unscrew it from pool/spa valve and see a better way
when you rebuild make it a bit taller and add unions
Agree on the 2" - 2 1/2" ability the Jandy valves but to be a tad more precise, it is 2 1/2" fitting that fits on the outside and not a pipe.
2 1/2" fittings can be a bit challenging to find some times. I know my local HD and Lowe's doesn't carry such things but I got lucky and found a local h/w store that actually carries 2 1/2" fittings.
2 1/2" fittings can be a bit challenging to find some times. I know my local HD and Lowe's doesn't carry such things but I got lucky and found a local h/w store that actually carries 2 1/2" fittings.
If you get the Jandy check valve, there is no correct direction for the valve body since you can remove the guts of the check valve and simply flip it 180 and rebolt it in and bingo, you have the flow direction you want.
Spring loaded check valves do not have up or down mounting restrictions. In my solar plumbing the check valve on the left stops water from flowing down and the one one on the right stops water from flowing up. There is an arrow on the valve to show the correct water flow direction but it does not need to be up or down.
Thread Status
Hello , This thread has been inactive for over 60 days. New postings here are unlikely to be seen or responded to by other members. For better visibility, consider Starting A New Thread.