Bayside Build

Hi All,

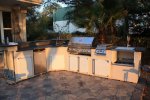
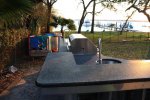
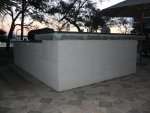
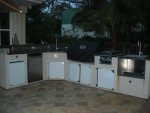
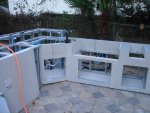
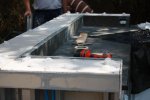
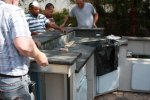
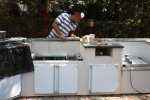
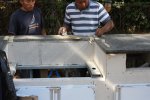
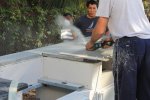
Time for another update. I feel like I have turned the corner and on the downhill side of the build now. Made quite a bit of progress this weekend. Started by finishing the electrical work. Added the final circuit for the exposed outlets. It is a GFCI circuit since these will be wet locations. Mounted all the boxes and ran the wire for each and terminated with the outlets.

Here are a few pics of the completed electrical work.

[attachment=2:3491u252]DSC09588 (2).JPG[/attachment:3491u252]
[attachment=1:3491u252]DSC09590 (2).JPG[/attachment:3491u252]
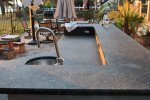
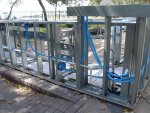
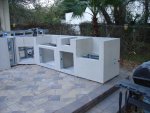
TIP:
Notice in the picture below that all the holes in the studs lined up for the power and water runs. When I cut the first few and thought about it for a minute I decided that I needed to make all the holes line up so I could make a straight shot through them easily. Taking that into account early I was able to plan and cut that section first from each full length stud so they would match then made the second cut in the stud for the upright in the bar area and finally used the remaining portion of the stud for supports across the front of the where no service lines were needed. Not required if it is electric only running through the island but might save a few feet of wire but would be a pain trying to run pvc through them if they were not even.
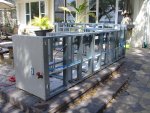
[attachment=0:3491u252]DSC09591 (2).JPG[/attachment:3491u252]
 

Attachments

  • DSC09588 (2).JPG
    DSC09588 (2).JPG
    120.3 KB · Views: 1,223
  • DSC09590 (2).JPG
    DSC09590 (2).JPG
    112.8 KB · Views: 1,196
  • DSC09591 (2).JPG
    DSC09591 (2).JPG
    115.9 KB · Views: 1,196
Saturday afternoon and Sunday morning I got started really working with the Hardie Board. Started by closin of the grill compartment then the compartment under the side burner that will house the propane tank. Then moved on to putting in the sides of each cutout. Then installed the front pieces since they were the most involved to cut. I figure adding solid pieces across the back of the island will be easy since they will be straight cuts will no cutouts. I really needed to get the front on and cutout done so the granite guy can come and build the templates this week. The plan is to template on Tuesday the 10th then have it installed next Friday the 20th.

Here are some pictures of the hardie board progress.

[attachment=2:1ybdww85]DSC09597 (2).JPG[/attachment:1ybdww85]
[attachment=1:1ybdww85]DSC09598 (2).JPG[/attachment:1ybdww85]
[attachment=0:1ybdww85]DSC09599 (2).JPG[/attachment:1ybdww85]

What a mess cutting that stuff is. I am using a circular saw to make most of the cuts and an angle grinder with a cement blade. Across the front I put up full sheets then used the grinder for the cutouts and doors. Worked well just makes a ton of dust. If using this method to cut I recommend a mask and eye goggles.
 

Attachments

  • DSC09597 (2).JPG
    DSC09597 (2).JPG
    106.6 KB · Views: 1,195
  • DSC09598 (2).JPG
    DSC09598 (2).JPG
    96.3 KB · Views: 1,188
  • DSC09599 (2).JPG
    DSC09599 (2).JPG
    97.9 KB · Views: 1,186
Once I had the board in place for the critical area that needed it prior to templating for the granite I thought it best to test fit all the components.

Here is how it looks so far for the areas with hardie board installed.

Doors only.

[attachment=2:2rky2tfr]DSC09600 (2).JPG[/attachment:2rky2tfr]

Doors, Grill and burners.
[attachment=1:2rky2tfr]DSC09601 (2).JPG[/attachment:2rky2tfr]

[attachment=0:2rky2tfr]DSC09602 (2).JPG[/attachment:2rky2tfr]

It is nice to really see it taking shape. My wife and neighbors can finally get a good idea of the finished look now and see what all the cutting noise they have endured for weeks now with look like.

I have a couple more openings in the front to board up and finish then skin the entire backside. I hope I can get that done in one more good day then figure out how to stucco this thing. I am getting excited now that it is getting close.

Brad
 

Attachments

  • DSC09600 (2).JPG
    DSC09600 (2).JPG
    72.5 KB · Views: 1,181
  • DSC09601 (2).JPG
    DSC09601 (2).JPG
    63.2 KB · Views: 1,173
  • DSC09602 (2).JPG
    DSC09602 (2).JPG
    60.4 KB · Views: 1,171
I have to get busy this weekend and get the rest of the hardie board in for the front and compartments at least. The granite guy showed up yesterday and made the templates. He is cutting it today and says he will have it ready next week. I want to be ready for him when he shows up to install it.

Brad
 
I made some progress on the build this weekend but the rain slowed me way down. Only got in about half a day both Saturday and Sunday. I was able to get the hardie board installed for the sides in the left side compartments and the rest of the front done. I also got the hardie board in for the top and bar area. I know some do not do this but the granite fabricator strongly sugested doing it with 1/4" hardie board to give more surface area for the adhesive he uses and ensures a good bond.

Now all that is left hardie board wise in the back sides. I will get that done this weekend and it should not be too bad since it will all be straight cuts. I will also be installing vents high and low in the back panels. I will put it on after the granite installed so I can make the faucet connections easier. I will be able to get to both faucet connections with the granite in place and the back on however with the back opened up it will be easier.

By the end of the weekend I should have a functioning kitchen with working appliances. The only thing left will be to get the stucco on and install the low voltage led lights.

Sorry for the lack of pictures in this post but my wife is travelling with the camera right now.

Brad
 
Great thread!!! Thanks for sharing.
I was tempted to use angle iron for my framework since I'm used to metal fabrication but now that I have seen it, the metal studs are way better suited. I'll be referring back to this thread when I get around to doing mine.
Can't wait to see your next round of pics with the granite installed.
 
shellsingleton said:
Great thread!!! Thanks for sharing.
I was tempted to use angle iron for my framework since I'm used to metal fabrication but now that I have seen it, the metal studs are way better suited. I'll be referring back to this thread when I get around to doing mine.
Can't wait to see your next round of pics with the granite installed.


Thanks for the feedback. I appreciate it. Yeah metal studs are the way to go. Prior to this project I had never worked with metal studs. I quickly figured out they are very easy to work with and once you get started you realize there are aot of things you can do with them that you can not do with wood. Things like vairous joints, you can squarely fasten them instead of trying to toe nail them in like wood etc. When I came across a joint I thought "how can I attach it and get teh most metal contact" then planned cuts accrodingly. This meant sometimes cutting just the small sides and bending them flat like the wide part of the stud and attaching (this also worked for flairing out just one side if appropriate), other joints I would cut the sides up to the wide part of the stud then cut the flap off completely and bend the wide part back to the rest of the stud to box the end. That worked great and could be attached squarely to the stud at the end of the "box". I just 20 gauge studs and when contructed it was very solid prior to the hardie board.

Hope this helps and let me know if you have any other questions. I would be happy to help.

Brad
 
Hi All,

Got a major step completed on Thursday with the installation of the granite. This is the only step that I have hired out as I do not have the tools to cut and polish granite. Nor a forklift to move the slabs to work with them. Turns out my outdoor kitchen is about 65 square feet of counter area with the bar. Most granite slabs whole are about 55 to 57 square feet. May be a good idea to factor this in so you do not end up needing two slabs. In the end I was able to get the 2 slabs on sale and have a fair bit of the second slab left. The fabricator is storing it for me. I may end up using it if I decide to build a firepit or buffet down the road. Another factor to keep in mind for granite is the slabs usually run from 110" to about 118" wide so planning for this will prevent you from having alot of seems in your kitchen. I have only 2 seems that are right behind the grill area since that area is very thin so they will not be noticable.

Here are some pics of the granite being installed. This is the largest slab being fitted first.
[attachment=2:29keom63]IMG_0105 (2).JPG[/attachment:29keom63]

Here the backsplash is in now with one outlet cover on to make sure they will fit properly and the silicone in place ready for the bar top.
[attachment=1:29keom63]IMG_0134 (2).JPG[/attachment:29keom63]

Bar going on.
[attachment=0:29keom63]IMG_0135 (2).JPG[/attachment:29keom63]
 

Attachments

  • IMG_0105 (2).JPG
    IMG_0105 (2).JPG
    99.8 KB · Views: 1,053
  • IMG_0134 (2).JPG
    IMG_0134 (2).JPG
    64.8 KB · Views: 1,055
  • IMG_0135 (2).JPG
    IMG_0135 (2).JPG
    86.5 KB · Views: 1,055
Here is the area behind the grill being prepared to test fit where the seam will be.

[attachment=2:1s8eqioh]IMG_0137 (2).JPG[/attachment:1s8eqioh]

Here he has some epoxy that is colored to match the granite to fill the seam.
[attachment=1:1s8eqioh]IMG_0136 (2).JPG[/attachment:1s8eqioh]

Here is a shot of them cutting the hole for the side burner. He decided to make this cut once the granite was in place to get it exactly where needed. They also polished the edges in place.

[attachment=0:1s8eqioh]IMG_0141 (2).JPG[/attachment:1s8eqioh]
 

Attachments

  • IMG_0137 (2).JPG
    IMG_0137 (2).JPG
    85 KB · Views: 1,039
  • IMG_0136 (2).JPG
    IMG_0136 (2).JPG
    81.7 KB · Views: 1,036
  • IMG_0141 (2).JPG
    IMG_0141 (2).JPG
    79.6 KB · Views: 1,038

Enjoying this content?

Support TFP with a donation.

Give Support
Here is a picture of the completed granite install with all the components in place for a test fit. The faucets are not attached either just there to make sure they would go down the hole properly.

[attachment=2:eek:ctq2o7v]IMG_0154 (2).JPG[/attachment:eek:ctq2o7v]

From the bar looking down the grill side.
[attachment=1:eek:ctq2o7v]IMG_0157 (2).JPG[/attachment:eek:ctq2o7v]

And down the other side.

[attachment=0:eek:ctq2o7v]IMG_0158 (2).JPG[/attachment:eek:ctq2o7v]
 

Attachments

  • IMG_0154 (2).JPG
    IMG_0154 (2).JPG
    107.9 KB · Views: 1,038
  • IMG_0157 (2).JPG
    IMG_0157 (2).JPG
    102.9 KB · Views: 1,032
  • IMG_0158 (2).JPG
    IMG_0158 (2).JPG
    95.7 KB · Views: 1,032
Here is the money shot. 8) The sunset view from the bar area. The camera was sitting on the bar itself. The picture really does not do the sunset justice though. This is why I laid the kitchen out this way so guests can enjoy the view from the bar area while I am grilling.

[attachment=0:2jxml8ki]IMG_0165 (2).JPG[/attachment:2jxml8ki]

Let me know if you have any questions about the granite install or want any other pictures. I have more just could not post them all.

Today the goal is to get the faucets installed, install sink drain line, outlet installed and make the final electrical connection to the house, connect NG gas lines for the grill and side burner, connect LP gas line for the recessed burner, work on LED lighting and try to get the hardie board installed on the back. I also need to fix the gap below the grill. The cutout dimentions in the grill documentation for depth where obviously way to deep. I am thinking though of building it up higher and incorporating vents in this area as well for good cross ventalation to the back vents.

Of course more pics to come.

Brad
 

Attachments

  • IMG_0165 (2).JPG
    IMG_0165 (2).JPG
    104.2 KB · Views: 1,025
Very well done Brad, and thank you for documenting the granite installation so well. In my 10 years on Forums, you are only the 2nd person I know of to document and share this process, I was the first.

I'm certain that many will follow, knowing that it can easily be done. Tiles are a lot more work and since I have had both can say are not even close to being as classy as having granite slabs.
 
Really nice. 8)
I like the color of the granite, it is very similar to what's in my kitchen and the wife wants it outside as well. So, it's great to see it in this application. She's gonna get a kick out of this thread too.
What are the chances of finding similar granite for my project? Is there alot of variety with granite, or basically just a few color variations?

And what is going in to the right of the sideburners? Sorry if I missed it mentioned earlier.
Edit-Nevermind, found it on the second post. :oops: Recessed burner for big boiling pots.
That's a GREAT idea, and I like how you don't have any wasted space since it's covered by what looks like a cutting board.
Umm, I bet you won't be throwing any crawfish into that pot will you? :-D
 
DrDave said:
Very well done Brad, and thank you for documenting the granite installation so well. In my 10 years on Forums, you are only the 2nd person I know of to document and share this process, I was the first.

I'm certain that many will follow, knowing that it can easily be done. Tiles are a lot more work and since I have had both can say are not even close to being as classy as having granite slabs.

Thanks Dave.

No problem sharing that is what it is all about. I have planty of other photos of the granite install if you are interested in them. I was not sure if there were limits posting them to the forum here so I tried to pick ones that would provide a good over view.

Brad
 
shellsingleton said:
Really nice. 8)
I like the color of the granite, it is very similar to what's in my kitchen and the wife wants it outside as well. So, it's great to see it in this application. She's gonna get a kick out of this thread too.
What are the chances of finding similar granite for my project? Is there alot of variety with granite, or basically just a few color variations?

And what is going in to the right of the sideburners? Sorry if I missed it mentioned earlier.
Edit-Nevermind, found it on the second post. :oops: Recessed burner for big boiling pots.
That's a GREAT idea, and I like how you don't have any wasted space since it's covered by what looks like a cutting board.
Umm, I bet you won't be throwing any crawfish into that pot will you? :-D

Thanks Shellsingleton,

The granite is Brushed Uba Tuba. The brushed finish is different than that of most granite in that the top is not polished but rather a flat textured finish. The Brushed Uba Tuba is not as dark as the polished verision and has more greys and browns in it. Outside I think it looks really good. You should be able to find it pretty easily as most granite suppliers should be able to get it. There is a huge variety in granite colors. Vist a granite fabricator or dealer in your area and you will see there are hundreds of variations of granite colors. Also you will find prices can vary greatly depending on colors with the more exotic colors costing more of course.

You guessed it as well for the recessed side burner. We do alot of crawfish during crawfish season usually 2 sacks when I cook them so I need a big pot large enough to cook a sack at a time. During the summer we will cook shrimp or crabs as well so again need a large pot for crabs. Spicy crawfish as my favorite though.

Brad
 
I made alot of progress this past weekend getting the hardie board on the back side of the island and completing the punch list of smaller things I made that needed to be finished once the granite was installed. I installed the faucets, connected the natural gas line for the grill and side burner. That was exciting getting to fire them up to make sure they worked properly. I was able to install the dante key and LP gas lines for the recessed side burner. I managed to make the electrical connection for the island to the house breaker panel as well. Once this was done I tested all the outlets and plugged in the fridge. Now I can have cold beverages close at hand while finishing the island.

Everything worked as planned. 8) Whew. I now have a fully functional outdoor kitchen that we actually broke in on Sunday evening by grilling some chicken.

Sorry about no pictures for this update but the camera died. My wife is picking out a new one this week while I am travelling so when I get home I will test it out and get some pics posted of the back side of the island.

Brad
 
I have been following your build closely and appreciate the progress shots that you have taken throughout. I constructed a new 1,000 sf Ipe deck last year and was hoping to tackle my outdoor kitchen this year. We'll see if I can round up the money to pull it off.

One thing I am trying to get a handle on is budget. Do you have a breakdown of costs for your island? I have estimated mine will run $4000 - $5000, but I fear I am missing some things.

Thanks, and I can't wait to see the next round of pics.

Riles
 
Riles_J said:
I have been following your build closely and appreciate the progress shots that you have taken throughout. I constructed a new 1,000 sf Ipe deck last year and was hoping to tackle my outdoor kitchen this year. We'll see if I can round up the money to pull it off.

One thing I am trying to get a handle on is budget. Do you have a breakdown of costs for your island? I have estimated mine will run $4000 - $5000, but I fear I am missing some things.

Thanks, and I can't wait to see the next round of pics.

Riles

Thanks Riles. I created a thread for the cost breakdown. http://www.troublefreepool.com/bayside-build-material-list-t10848.html is the link to the thread.

Also as soon as it quits raining I will get to new pictures to post.

Brad
 
Hi All,

We bought a new camera so I was able to get some new pictures of the current state of the build. I worked a little on it this weekend when it was not raining and got the lighting & bottle opener installed. I drilled 3 holes in the granite backsplash and installed 3 stainless LED light clusters that shine down on the counter and light it all the way across the counter. Each light cluster contains 3 LEDs. Also installed on the same lighting circuit is a single LED positioned behind the bottle opener on the front side of the island. This backlights the opener very well and mounts flush to the Hardie Board so it will not get in the way of the opener. For the second light circuit I mounted the single LED lights under the bar top to provide some ambient lighting for the back of the island.

The first picture shows the back of the island with the Hardie Board installed and the lights under the bar. They are on but hard to see since it is not quite dark enough. I have not figured out how to take night shots yet with the new camera but when I do I will get some when it is dark to show the LED lights in action.

[attachment=2:3vtb7ev2]CIMG0747 (2).JPG[/attachment:3vtb7ev2]

This next picture show the lights installed in the backsplash and the swiches for the lights installed below the sink.

[attachment=1:3vtb7ev2]CIMG0748 (2).JPG[/attachment:3vtb7ev2]

And finally a full shot of the front with the current progress. The faucets are installed in this shot.

[attachment=0:3vtb7ev2]CIMG0746 (2).JPG[/attachment:3vtb7ev2]

I have to cut the vents both high and low in the back side of the hardie board and put the hardie board on the bar support under the bar. Once this is done I can move on to the stucco. I would like to get it done this coming weekend if it does not rain. We planning a outdoor movie in the backyard this Saturday night as well and will invite friends over to grill out and watch a movie if weather holds out. Looking forward to seeing how many folks we can get around the bar area.

Hope others find the information usefull and let me know if you have any questions.

Brad
 

Attachments

  • CIMG0747 (2).JPG
    CIMG0747 (2).JPG
    120.8 KB · Views: 876
  • CIMG0748 (2).JPG
    CIMG0748 (2).JPG
    82.9 KB · Views: 870
  • CIMG0746 (2).JPG
    CIMG0746 (2).JPG
    97.7 KB · Views: 865

Enjoying this content?

Support TFP with a donation.

Give Support
Thread Status
Hello , This thread has been inactive for over 60 days. New postings here are unlikely to be seen or responded to by other members. For better visibility, consider Starting A New Thread.