Newby questions - CH for "winter" in Charlotte, SWGs, Valves, Heaters, Oh My!

YoPool

Member
Jan 7, 2020
19
Charlotte NC
Hi everyone, I am a first time pool owner and we had our pool completed in Aug 2019. I have been managing the pool on my own since October and have come up with a few questions after reading pool school and scanning the forums. Happy to separate these questions into different threads/forums if it helps.

1) Calcium Hardness: When the guy opening the pool at the start took me through all the numbers he recommended that during the "winter" in Charlotte (rarely gets below freezing and so far the water hasn't gone below 45 degrees) to keep the CH around 200, saying if you let it get up to 300 it may cause scaling. The local pool shop paper says a target range 200-350 (though they don't differentiate by pool type). TFP says 350-450 for SWG. Why the difference? And do you think there is a chance of scale when the water is in the 40's if I go up to 350? Also, given how little my SWG appears to be working in the cold (In addition to the SWG I am using 12.5% "Pro Chloronizer" bleach to keep the FC around 2 since we are not using the pool right now) should I consider this a chlorine pool for chemical level purposes during the winter?

2) SWG - I cant find much literature on the temperatures SWGs stop operating at but it doesn't seem like mine is working much over the winter. I run the pump 23 hours a day, mostly on 18% but with 3 hours on 85%, during which I run the SWG at 100% (so the SWG is running full tilt for 3 hours). Any recommendations on if i should increase the amount of time I run the pump at higher speed with the SWG on or given how cheep bleach is should i keep doing what I am doing till it warms up and the SWG becomes more efficient? Does anyone know if SWG stop working all together when water is under a certain temp?

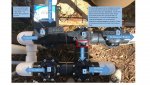
3) Valve install: I am wondering if one of the valves for my pool was installed backwards. In the attached picture you will see the red square marking the inlet of the valve that I think is installed incorrectly. The way it is installed the water is flowing out of this port, not in. The reason this is an issue is because the way the valve is installed I can't divert all the water to the cleaning robot pipe. When I open the valve to direct water to the robot pipe it also goes to the branch that sends water to my pool returns or the spillover of my spa (the lower section of the picture). If I rotate the valve 180 degrees from how it is pictured in the photo I would stop water all together (which seems like a dangerous design since pressure would build up). Right now when I set the valves such that water goes to the cleaner and the spillover there is not enough pressure to get the cleaner wheels rotating fast enough (the cleaner directions recommend 28 rpm and mine is less then 20). I asked my pool builder but haven't received a reply. Anyone agree with my assessment?

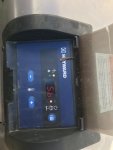
4) Heater Display - my Hayward heater is showing an "Sb" which indicates a keypad failure (see second attached pic). I have tried to "unstick" any stuck buttons on the keypad and it doesn't appear there are any stuck. I have also shut the heater down (turned off the electric) and restarted and the problem persists. The heater still works via the Omnilogic controller so its not a huge deal and scanning the forums this seems like a common issue and is resolved by replacing the display panel. Wanted to see if there were opinions on chasing my builder to fix it or if its not worth the hassle given the heater still works and it might break again down the road.

Thanks!
Nick
 

Attachments

  • valve (1).JPG
    valve (1).JPG
    296.9 KB · Views: 23
  • IMG_0401.jpg
    IMG_0401.jpg
    282.7 KB · Views: 23
Welcome! :wave: I'll kick the replies off here and let others follow:
1 - There's no need to increase CH to 350-450 right now. I believe the reason for that increase for SWG pools was because many SWG pools kept their TA a bit lower, so it helped to compensate. That may change later anyways. But let's not worry about that. If your CH is in that 250 +/- 25 ppm range, I think you're just fine. Remember it's not just a higher CH that increases the potential for scale, most importantly it's the pH. As pH increases, the potential for scale increase very quickly. Good thing is the colder water helps to counter-act that elevated pH impact. You can see how all of that works by using the PoolMath tool or APP (CSI). With chilly water, the pH can be around 7.8 or even 8.0 with no problem. If it gets much higher you may need to lower it a bit.
2 - SWG cut-off in cold water varies from 55 - 60 degrees or so depending on the manufacturer. For that reason, it's usually best to just leave it off in cold water and go manual with liquid chlorine (aka bleach). Easy in the winter.
3 - Ideally it looks like you would need to turn that valve 90 degrees clockwise which would place the duckbill (OFF) section towards the pool pipe. But it sounds like you are not able to do that right? I don't recall with Jandy if you can just unscrew/lift the top/handle of and install it 180 degrees back to the base, or if there's a stopper you can file off. I did that with mine. But hopefully another Jandy person will reply.
4 - As for the heater, I"m no help there (South Texas). :) But no worries, others will reply soon I"m sure. Hang in there.

Thanks for using the forum.
 
3 - I would recommend NOT filing the stop off as then you could possibly dead-head the flow of water. The word "INLET" should always be on the port closest to the pump - in your case, the port on the left in your pic. For the valve just below the one with the red square, "INLET" should be in the up side in the pic (closest to the valve above it).

To set the "INLET" correctly:
  1. remove the handle
  2. remove the 8 screws
  3. pop the cover off (carefully - see * below)
  4. rotate the cover so "INLET" is in the correct/desired position
  5. replace the 8 screws
  6. replace the handle
* There is an o-ring under the cover and 2 on the handle shaft, so use care when popping the cover off. And maybe add a little pool lube to the o-rings before reassembling. See this link for an idea of the assembly: Jandy Standard & Never Lube Valve Parts - INYOPools.com
 
Last edited:
3 - I would recommend NOT filing the stop off as then you could possibly dead-head the flow of water. The word "INLET" should always be on the port closest to the pump - in your case, the port on the left in your pic. For the valve just below the one with the red square, "INLET" should be in the up side in the pic (closest to the valve above it).

To set the "INLET" correctly:
  1. remove the handle
  2. remove the 8 screws
  3. pop the cover off (carefully - see * below)
  4. rotate the cover so "INLET" is in the correct/desired position
  5. replace the 8 screws
  6. replace the handle
* There is an o-ring under the cover and 2 on the handle shaft, so use care when popping the cover off. And maybe add a little pool lube to the o-rings before reassembling. See this link for an idea of the assembly: Jandy Standard & Never Lube Valve Parts - INYOPools.com
I recommend not doing anything and calling your builder and tell him your robot is not working properly and would he please send some one out since the pool is only seven months old and is still under warranty from the builder.
I have a Pentair heater that is controlled by my Easy Touch panel. The only thing I can do on the Heater itself is to read the temp display and the status leds when I turn it on by the panel. All the button pushs are disabled when control is from my Easy Touch panel.
As to your valve position question, more photos are needed....the entire system is not shown, there should be another automatic valve for spa operation.
Again, call the builder. Do not email, they are notorious for not responding to emails. Say your robot isn't working. Whoever he sends out, than, and only than have him explain the flow thru the various lines in Pool mode and than in Spa mode.
Request a call when they are thirty minutes away so you know when they are coming. They are very stealthy and come and go without notification, unless you have a big dog in the yard to foil them.
 
Last edited:
I recommend not doing anything and calling your builder and tell him your robot is not working properly and would he please send some one out since the pool is only seven months old and is still under warranty from the builder.
I have a Pentair heater that is controlled by my Easy Touch panel. The only thing I can do on the Heater itself is to read the temp display and the status leds when I turn it on by the panel. All the button pushs are disabled when control is from my Easy Touch panel.
As to your valve position question, more photos are needed....the entire system is not shown, there should be another automatic valve for spa operation.
Again, call the builder. Do not email, they are notorious for not responding to emails. Say your robot isn't working. Whoever he sends out, than, and only than have him explain the flow thru the various lines in Pool mode and than in Spa mode.
Request a call when they are thirty minutes away so you know when they are coming. They are very stealthy and come and go without notification, unless you have a big dog in the yard to foil them.
Thanks for all the responses. I have a call into the builder for the values. Crabcruncher, here is a more well annotated picture as requested. The automatic valve for spa operation is labeled "1". The only part of the system not shown is the valves on the other side of the pump which control what drains the water is pulled from but they aren't relevant to the problem.
 

Attachments

  • Pool Valves.jpg
    Pool Valves.jpg
    237.2 KB · Views: 19
If you are running your vs pump 23 hrs a day, I assume you have your pump speed quite low to save electricity.
I don't have a pressure side cleaner, but the name implies how it is designed to operate. I also assume the manufacturer has installed flow restrictors that must be adjustable. I also assume you have already done this and it still doesn't speed up.
Since I don't know what speed your pump is running, than I can only guess that you should set your vs pump speed higher to increase output pressure enough to get the desired rpms of cleaners wheels. Than you can just run vs pump a shorter time to get the required two pool turnovers per day for proper filtration, if that works.
Your swg set up is really too complicated. The swg should only come on when your pump is running, which is accomplished by using the pumps relay contacts as a source of power for the swg power station.
The swg puts out the same amount of clorine regardless of pump speed, it just depends on percent output and pump run time.
And the suction side of the pump does have a bearing on what happens on the discharge side..

As to your latest photo, as I see it ,Valve 3 to the cleaner should be left in the fully open position at all times when the cleaner is attached, and closed when cleaner is being detached.
Valve 2 is correctly installed in this position and is used to throttle output to cleaner just for the purpose of getting the wheels rpms correct and should be left in that position. You should not throttle the return lines and that is prevented by the correct installation of this valve. Hope this helps. Its a shame builders sell equipment at high markup, and than don't go over the operational side of it.

Don't be confused about the word "inlet" stamped on the valve, they are bi directional, and positioned in the pool circuit as to the plumbers needs.
 
Last edited:
If you are running your vs pump 23 hrs a day, I assume you have your pump speed quite low to save electricity.
I don't have a pressure side cleaner, but the name implies how it is designed to operate. I also assume the manufacturer has installed flow restrictors that must be adjustable. I also assume you have already done this and it still doesn't speed up.
Since I don't know what speed your pump is running, than I can only guess that you should set your vs pump speed higher to increase output pressure enough to get the desired rpms of cleaners wheels. Than you can just run vs pump a shorter time to get the required two pool turnovers per day for proper filtration, if that works.
Your swg set up is really too complicated. The swg should only come on when your pump is running, which is accomplished by using the pumps relay contacts as a source of power for the swg power station.
The swg puts out the same amount of clorine regardless of pump speed, it just depends on percent output and pump run time.
And the suction side of the pump does have a bearing on what happens on the discharge side..

As to your latest photo, as I see it ,Valve 3 to the cleaner should be left in the fully open position at all times when the cleaner is attached, and closed when cleaner is being detached.
Valve 2 is correctly installed in this position and is used to throttle output to cleaner just for the purpose of getting the wheels rpms correct and should be left in that position. You should not throttle the return lines and that is prevented by the correct installation of this valve. Hope this helps. Its a shame builders sell equipment at high markup, and than don't go over the operational side of it.

Don't be confused about the word "inlet" stamped on the valve, they are bi directional, and positioned in the pool circuit as to the plumbers needs.
Ahhh, I see what you are saying about the throttling of the cleaner output. I guess my problem is that even with the pump on 100% and the valves fully open I still don't get the wheel rotations recommended. I'll take a look at the robot hose and see if it has any leaks that may be causing a loss of pressure. Thanks for all the help.
 
... Don't be confused about the word "inlet" stamped on the valve, they are bi directional, and positioned in the pool circuit as to the plumbers needs.

Actually, three way Jandy valves come from the manufacturer with the word "INLET" on the cover pointed toward the bottom of the T. It is up to the installer to move the cover so "INLET" is pointed to the correct port. Some installers don't understand how the valve works or are too lazy to adjust the cover correctly.

In the OP's present configuration, the pressurized return flow (pump outlet) can be dead-headed when the automation is in pool mode and the manual 3-way Jandy valve - #2 in latest pic (with "INLET" facing the bottom of the T) is positioned with "OFF" facing to the left in the picture. If "INLET" on the cover is positioned on the left port of the T (in OP's pic), then the pump outlet (return flow) can not be shut off (dead-headed) in a properly functioning 3-way Jandy valve. In a properly functioning 3-way Jandy valve, the handle should only rotate 90 degrees left and right of the "INLET" wording on the cover (180 degrees full rotation) - and the "OFF" wording on the handle can never point toward the "INLET" wording on the valve cover. Of course, all this is predicated on the stops on the valve cover and handle being intact.

The note for valve #2 in the OP's latest is mostly correct - but it is not the entire valve that is installed incorrectly, it is the valve cover that is installed incorrectly. The cover needs to be installed so the word "INLET" is on the left port and not the bottom port.
 
Last edited:
Hi fellow Charlotte pool owner. Our pool was finished in September. I was told the same thing by the pool guy I used for the first few months but then I saw my ch at 150 and fired him(he wasn't even checking it). With all the rain and the recent storm Thursday I have had to drain some water out of the pool often. Just this week I went from 240ch to 170ch and now I am back to 230ch before I ran out of ch up. I am very new to all this but I would say go buy ch up from Home Depot(cheapest option here) and expect to use it if you are having to drain your pool like I am. I drained another 4 inches today in advance of the expected 4 days of rain. I also turned off my swg bought some trichlor tablets and liquid chlorine from Lowe's (3 dollars a gallon).
 

Enjoying this content?

Support TFP with a donation.

Give Support
Actually, three way Jandy valves come from the manufacturer with the word "INLET" on the cover pointed toward the bottom of the T. It is up to the installer to move the cover so "INLET" is pointed to the correct port. Some installers don't understand how the valve works or are too lazy to adjust the cover correctly.

In the OP's present configuration, the pressurized return flow (pump outlet) can be dead-headed when the automation is in pool mode and the manual 3-way Jandy valve - #2 in latest pic (with "INLET" facing the bottom of the T) is positioned with "OFF" facing to the left in the picture. If "INLET" on the cover is positioned on the left port of the T (in OP's pic), then the pump outlet (return flow) can not be shut off (dead-headed) in a properly functioning 3-way Jandy valve. In a properly functioning 3-way Jandy valve, the handle should only rotate 90 degrees left and right of the "INLET" wording on the cover (180 degrees full rotation) - and the "OFF" wording on the handle can never point toward the "INLET" wording on the valve cover. Of course, all this is predicated on the stops on the valve cover and handle being intact.

The note for valve #2 in the OP's latest is mostly correct - but it is not the entire valve that is installed incorrectly, it is the valve cover that is installed incorrectly. The cover needs to be installed so the word "INLET" is on the left port and not the bottom port.
In your configuration, pump can still be dead headed, when valve two shuts off discharge to jets and spa, with cleaner shut off.
If owner follows your directions and is careful to always have a line open on the discharge, he can get more presss
Actually, three way Jandy valves come from the manufacturer with the word "INLET" on the cover pointed toward the bottom of the T. It is up to the installer to move the cover so "INLET" is pointed to the correct port. Some installers don't understand how the valve works or are too lazy to adjust the cover correctly.

In the OP's present configuration, the pressurized return flow (pump outlet) can be dead-headed when the automation is in pool mode and the manual 3-way Jandy valve - #2 in latest pic (with "INLET" facing the bottom of the T) is positioned with "OFF" facing to the left in the picture. If "INLET" on the cover is positioned on the left port of the T (in OP's pic), then the pump outlet (return flow) can not be shut off (dead-headed) in a properly functioning 3-way Jandy valve. In a properly functioning 3-way Jandy valve, the handle should only rotate 90 degrees left and right of the "INLET" wording on the cover (180 degrees full rotation) - and the "OFF" wording on the handle can never point toward the "INLET" wording on the valve cover. Of course, all this is predicated on the stops on the valve cover and handle being intact.

The note for valve #2 in the OP's latest is mostly correct - but it is not the entire valve that is installed incorrectly, it is the valve cover that is installed incorrectly. The cover needs to be installed so the word "INLET" is on the left port and not the bottom port.
The pump can still be dead headed with your solution when cleaner line is shut off.
I would try your solution only because owner is complaining of weak pressure to cleaner. He could throttle valve to returns and spa allowing more pressure to cleaner. I don't like that solution. I would have builder refund cleaner cost, and buy a true robotic unit.
 
In your configuration, pump can still be dead headed, when valve two shuts off discharge to jets and spa, with cleaner shut off.
If owner follows your directions and is careful to always have a line open on the discharge, he can get more presss

The pump can still be dead headed with your solution when cleaner line is shut off.
I would try your solution only because owner is complaining of weak pressure to cleaner. He could throttle valve to returns and spa allowing more pressure to cleaner. I don't like that solution. I would have builder refund cleaner cost, and buy a true robotic unit.
While it is correct that shutting off the 2-way valve to the right (labeled valve #3) could dead-head the pump, the valve in question is the one with the red box around the word inlet in the first picture. And if inlet on that 3-way valve was set correctly by the installer to begin with, there would be no need for the 2-way valve to the right of it (in the picture). Basically, the valve labeled #3 is unnecessary if inlet on valve labeled #2 is set correctly with inlet facing to the left. If the OP does have the inlet on valve #2 set to face to the left, I would suggest replacing valve #3 with the dlear cover that comes with the Jandy check valve. The cover is available separately and would prevent the valve from being inadvertently shut off. Being able to shut/throttle return flow to the returns would allow more flow to the cleaner port.

Of course, a robotic cleaner is something to plan for in the future - as they do a better job and don't require the pool pump to run while they are in operation.
 
Thread Status
Hello , This thread has been inactive for over 60 days. New postings here are unlikely to be seen or responded to by other members. For better visibility, consider Starting A New Thread.