
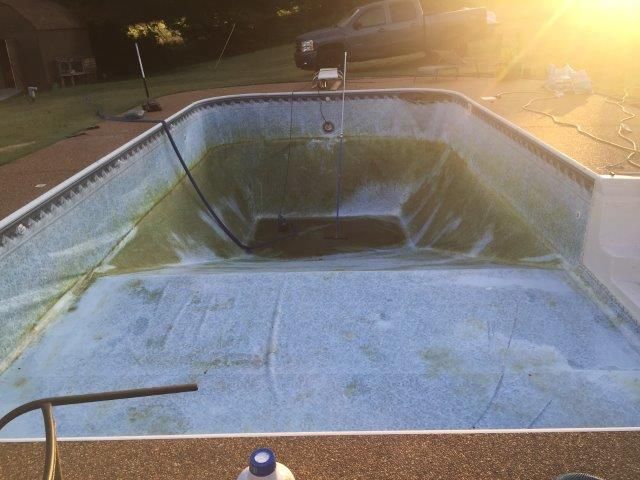
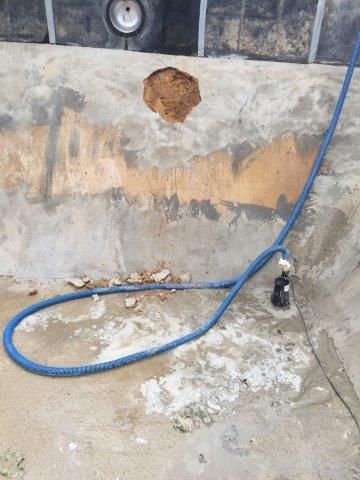
Replacing your own pool liner is possible. I hope this serves as an inspiration to someone considering it or at least shows you what's involved so you can decide if you want to go down that path. This is not a step-by-step guide. There are plenty of resources and monitized videos for that. My journey was much different from the average liner replacement. My pool was only 7 years old when my liner tore in one corner. I had a leak in the far corner of my deep end. It took about a month to find it. I was losing about 1-2" of water every day through a hold half the size of a pea. Unfortunately during this time it made the pool floor soft in that area and basically the water created a void and the slopes shifted and I think that stressed my liner to the point of tearing. I repaired this area 2 more times, but due to the void and age of liner, I would plug one hole and another would develop.
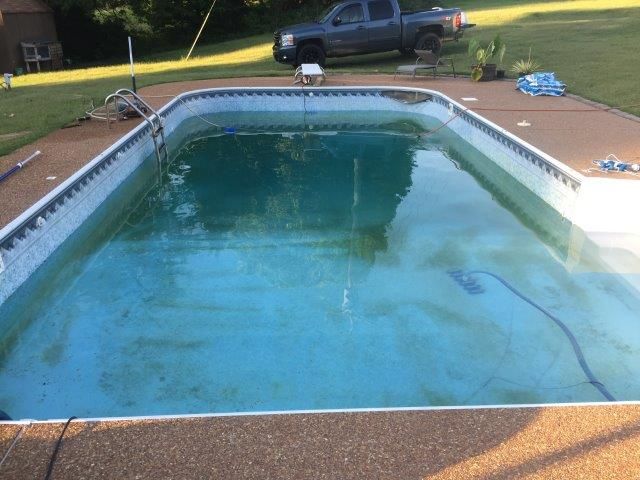
The shallow end also had begun to float terribly in any 3-4" rain event and I found after pulling liner water was coming up from the bottom due to much of the pool bottom being washed out and becoming soft. I would pump and pump from behind the liner, but the tear sealed the deal and I knew I had to replace the liner and I thought "minor" floor repair.
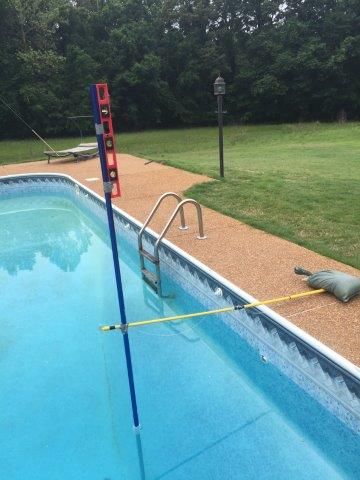
I did the research here and other places online, measured the pool and ordered my liner. I was so paranoid about measurements. I measured 5 different times and would always come up 1/4" to 1/2" in different no matter what. The liner rep insured that they "stretch" and I had nothing to worry about. "OK if you say so", I thought to myself. Here is how I measured the floor hopper area. I measured with plumb bob also, but found this much easier to measure and determine if stick was on the edge or not. You can't really feel the plumb bob on the edge but you can feel the pool stick. Then it was a simple measurement from stick to receiver bead.
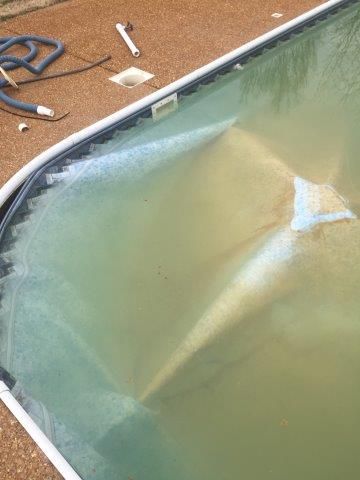
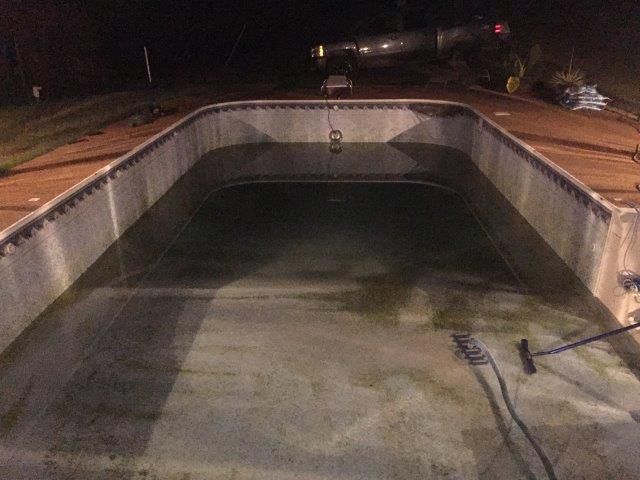
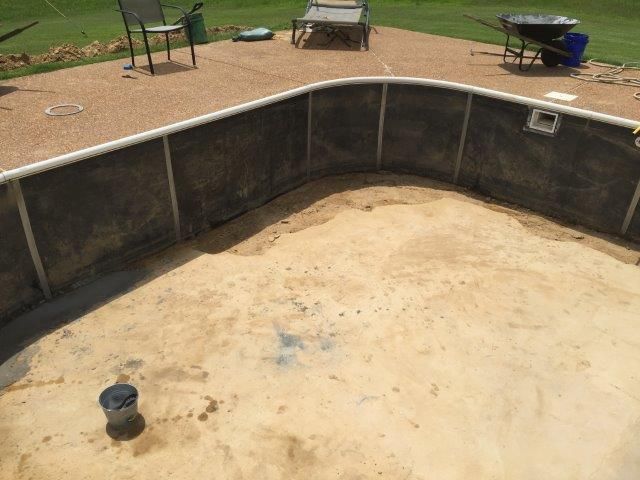
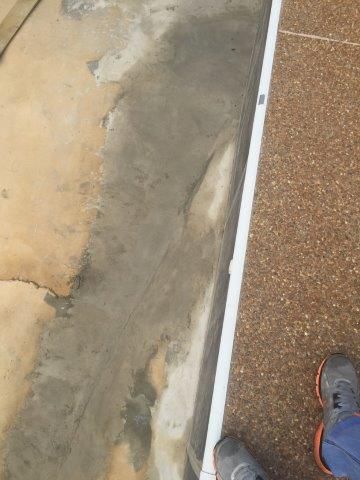
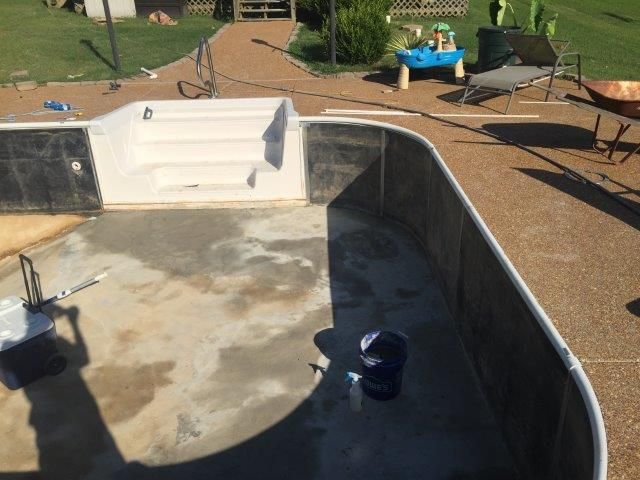
After spending all weak measuring every way imaginable I finally pulled the trigger and sourced the liner online and completed the measurement form. I picked up all the extras like skimmer faceplates, gaskets, light gaskets, step gaskets, returns, etc. The liner came in a few weeks later. I rented a pump locally for $40 I started draining pool on a Thursday afternoon and it was empty by Friday afternoon, so I cut out the old liner. What a mess...I recommend clearing your water first, but I couldn't since I couldn't keep water level up high enough. Cutting liner and removing was one of the easier parts.
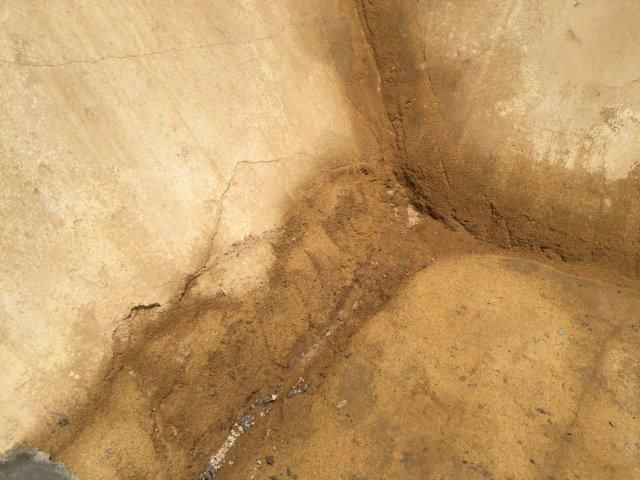
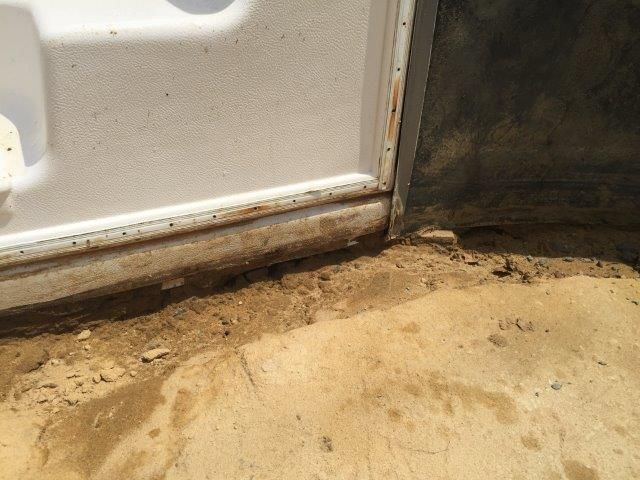
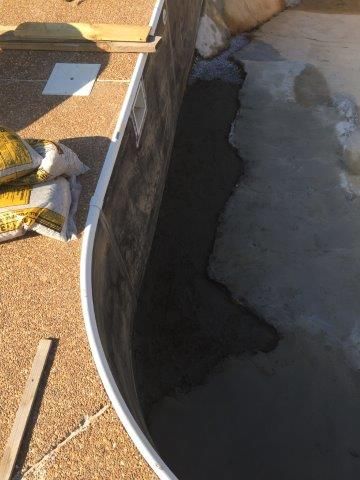
I even grabbed 3 bags of pool-krete for the "soft" spots. Well, I discovered really quick I had a lot of soft spots. The floor was so bad at one point I though I had a sand bottom pool. All the mortar had washed away and the entire shallow end was muse about 2-3 ft out from the wall. I begin removing the muddy mush and muck about 2-3" down unitl I reached dirt. This part was very labor intensive. I removed about 7-8 wheel barrows of muck. I found that the corner where I had leak was severely damaged along with the shallow end floor. Also the creases of the slopes were washed away. I realized real quick my 3 bags of repair material weren't going to go very far. I began at this point to try and locate a contractor to do the repair work on the floor. I felt I was in over my head. I called everybody in the area, but no one could get to me until maybe after season. I called contractors directly and also pool companies including the one who installed the pool. Each time it would rain it washed more floor material away so I had to do something.:-(
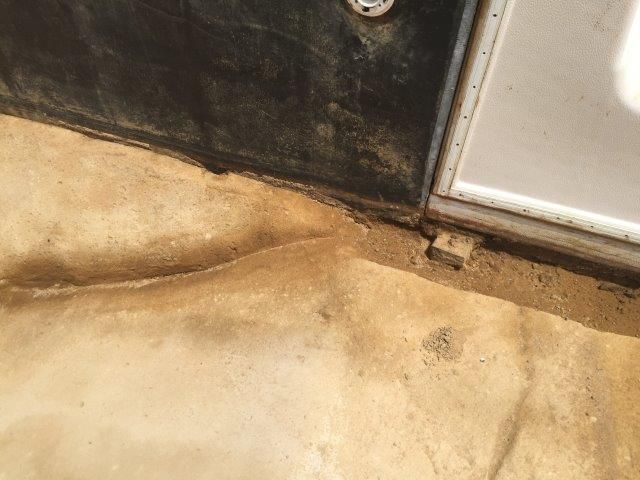
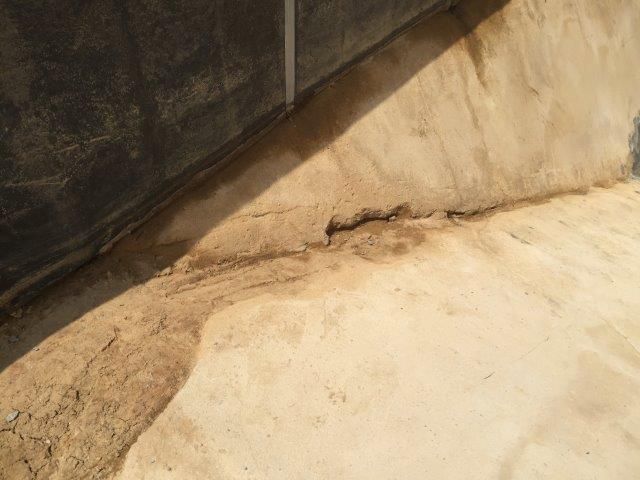
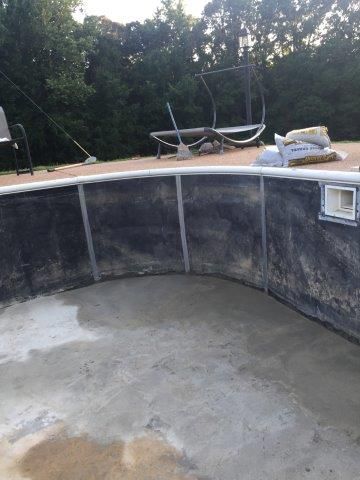
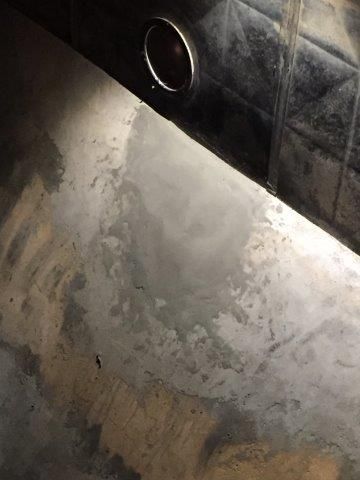
I was finally able to at least get a callback or 2 from some of the "best" contractors in our area by reference from some pool companies. I was really on the fence about using the pool-krete product since my pool was supposedly cement mortar. I was told by these professionals that it didn't matter and that they all used pool-krete for the repairs. One came out and looked at it but couldn't get to it. Based on some of what I have read online, I am still not sure this was the best route. I did however make sure I put a bonding layer of cement and concrete bonding glue as well as made sure existing concrete was wet. I did this everywhere the new krete met the old. I pasted it on as I went making sure it was wet when I applied new coats. I guess time will tell here. The pool-krete is very difficult until you get the hang of it and mix it correctly. There is no definitive guide here. I mixed mine in a mortar trough with a hoe until I got the consistency I wanted. Too wet goes on really smooth but when dry, it's very weak. Too dry and you can't work with it. There is a happy medium. I did purchase a round pool trowel but I was constantly created trowel marks. It's very hard at first. After a while, you kind of get the hang of it and don't really have to think it out and become aware of every trowel sweep. The pool-krete kind of like concrete foam if you can imagine that. It's very light weight compared to mortar / cement (which is like pushing bricks with your trowel) and somewhat easy to trowel. Mine was not perfect by any means, but I soon realized that the original floor had lots of waves and imperfections, that were unnoticeable even under a light.
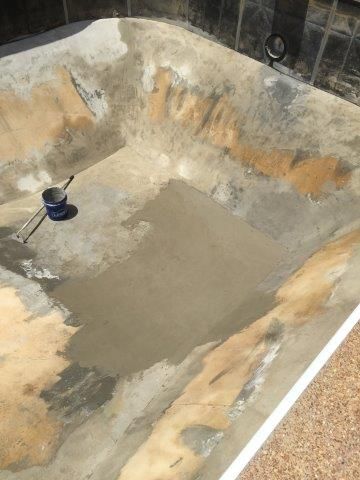
The dark gray is the bonding layer I mixed. It helps to seal the old mortar surface and bond to new surface. It looks quite ugly but seemed to work well. I wasn't able to do all at once so I had to work in phases.
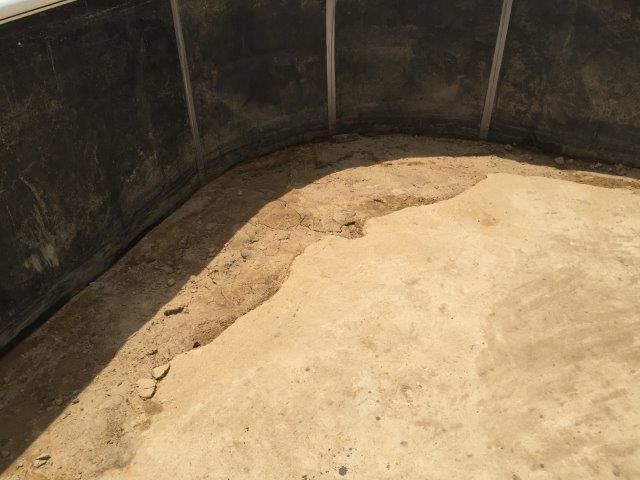
Around the shallow-end walls where most of the floor damage occurred, I attempted to reinforce with layer of gravel and then 4:1 sand / mortar for a stronger foundation. I then added the pool-krete product on top for last few inches making sure to put bonding layer and concrete glue between the 2.

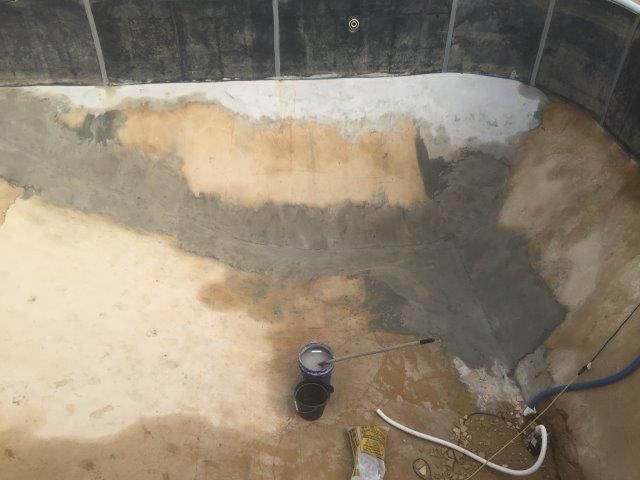
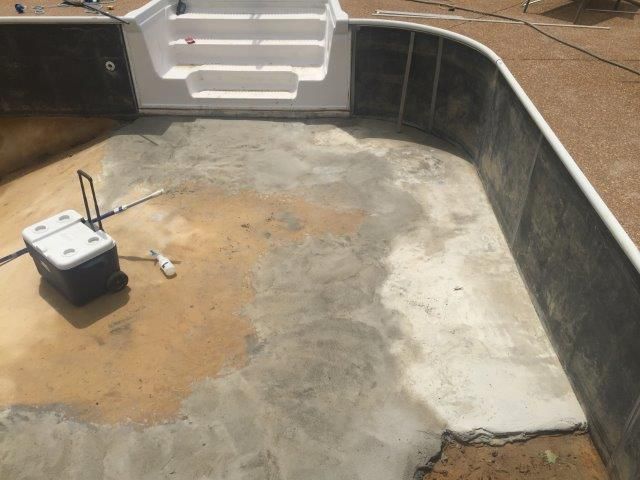
As I was finishing the hopper floor a big storm came through before my product had time to dry. It flooded pool just as I was finishing and putting a foot of water in the hopper ruining my finished work and even the pressure caused a piece of the wall to pop out. I had to pump out water and remove all the sludge and material that washed out. This was a very low point in the project...quite disgusted here.:-( I made quick repair of the work and took advantage of 100 deg and full sunshine and finally finished the hopper bottom. I wet sanded all the edges where new material met the old so there were no humps or lumps. I went over any rough areas as well and in the end even the minor imperfections I thought would show up did not. You can get away with a lot more than you think. When I held a light close to floor, it looked absolutely terrible. Even the original finish looked like ocean waves. Get it smooth as you can, but it doesn't have to be perfect. Even with my pool light on, you can barely see small ridges and imperfections.
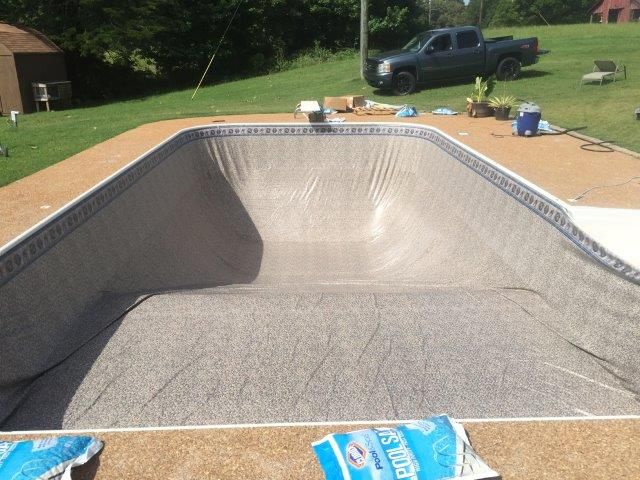
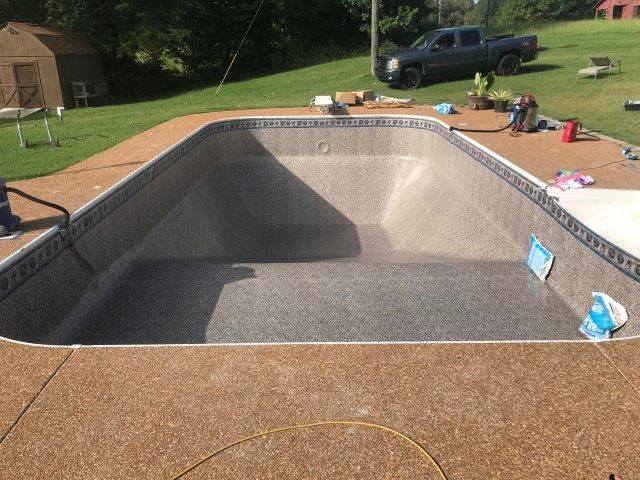
The day finally came, and after sweeping the floor several times and the deck area, we installed the liner. You need at least 2 people for this. One person needs to support the weight of the liner ahead of you while the other snaps it into the track. I was amazed at how easy the liner was to install. it just fell into place. The liner had the corners marked. I lined one of them up in the corner and worked my way around. I made one adjustment shifting it about 2" around after seeing the deep end seem not aligning with hopper edge, and that was it. Liner is really easy to install in track with help. I did this in full sunshine with it 95 outside so it was super stretchy. I put 2 shop vacs behind the liner to suck the air out and it was nice and tight all the way around. I guess all the measuring paid off. I put salt bags all the way around the shallow end to keep it from shifting into the deep-end and made sure it was very tight around the steps. My previous liner had about a 3" void all the way around shallow end. I think this allowed a lot of water to travel behind it and contributed to the floor washing away. That's just my theory.
I did not have to work any of the wrinkles out. The shop vac took care of that...It fit perfect...I was very surprised.
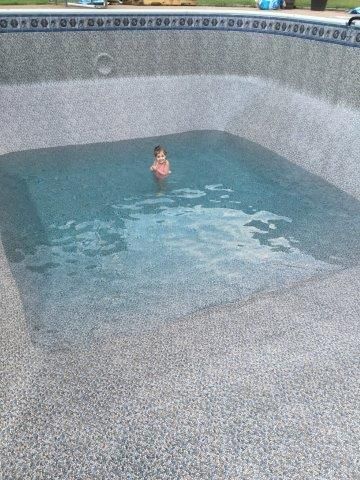
Time to start filling up!
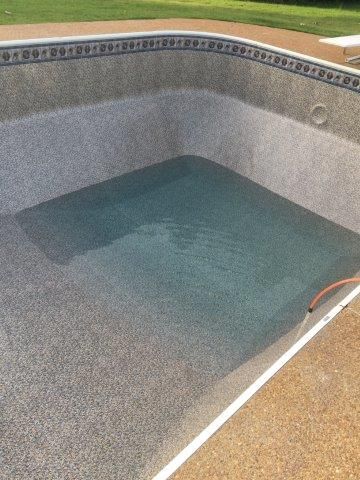
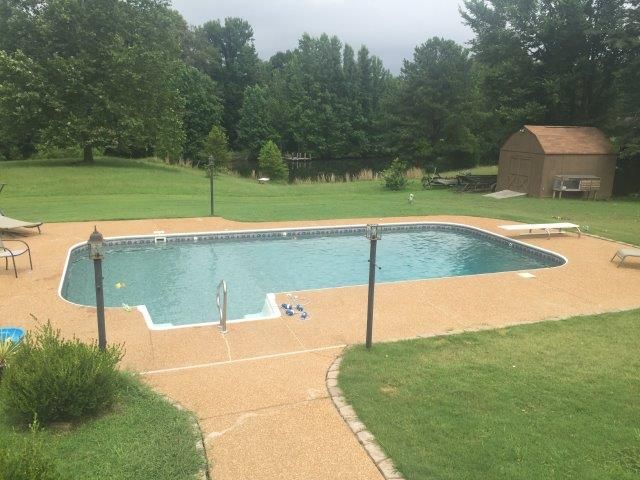
I really like how the brown liner creates a beautiful turquoise color that gets richer as water gets deeper. It's a really cool affect. I researched a lot of liners and looked at many installed before picking a brown one. I do not regret it. No one can believe the liner is brown and they ask me how I die my water that color


And if you have kids or grandkids make sure they participate in this part and let them use the slope as a slip-and-slide! They had so much fun!

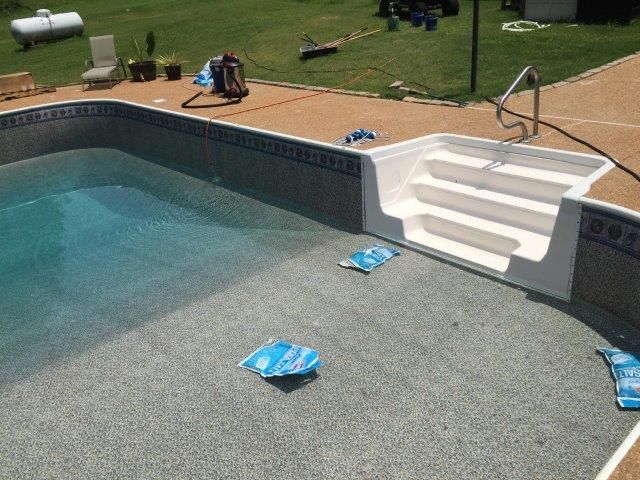
After carefully cutting out the step area, installing faceplates, gaskets, and returns we had an oasis again and all the hard work paid off. I did make one mistake. I realized I installed the bottom step strip on backwards after I already cut the steps out. Oh No! While it was not leaking, I wasn't sure it would hold up. The sealing surface has 3 ridges on each side of screw to make sure it doesn't leak. I drained pool until just below step strip and carefully removed a few screws to see if liner would try an drop or stay in place. Luckily it stayed in place and I was able to flip it over and re-install. We were wanting to do some landscaping this year, but the liner project set us back a bit so maybe next year.

So, yes, a homeowner who has never installed a pool liner can install one, but you should be prepared and aware of the process. A typical liner install most of the time does not include the floor damage I had. Other than floor repair, it was pretty straight forward and could easily be done over a weekend.
Measure Liner twice - 1hr
Draining Pool - 1 day
Cutting out old liner and removing it and faceplates - 1.5 hrs
Floor Repair - Unknown countless hours. I had little help here lost track of hours. 3 weekends about 16-20hrs each taking lots of breaks and drinking plenty of water. It was super hot!
Hanging the liner - 45 min
Trimming Steps and installing faceplates, returns, light, and gaskets - 2-3 hrs
I'm sure this has either inspired you to do it yourself or seek a professional...probably seek a professional lol.
The shallow end also had begun to float terribly in any 3-4" rain event and I found after pulling liner water was coming up from the bottom due to much of the pool bottom being washed out and becoming soft. I would pump and pump from behind the liner, but the tear sealed the deal and I knew I had to replace the liner and I thought "minor" floor repair.
I did the research here and other places online, measured the pool and ordered my liner. I was so paranoid about measurements. I measured 5 different times and would always come up 1/4" to 1/2" in different no matter what.
The liner rep insured that they "stretch" and I had nothing to worry about. "OK if you say so", I thought to myself. Here is how I measured the floor hopper area. I measured with plumb bob also, but found this much easier to measure and determine if stick was on the edge or not. You can't really feel the plumb bob on the edge but you can feel the pool stick. Then it was a simple measurement from stick to receiver bead.
After spending all weak measuring every way imaginable I finally pulled the trigger and sourced the liner online and completed the measurement form. I picked up all the extras like skimmer faceplates, gaskets, light gaskets, step gaskets, returns, etc. The liner came in a few weeks later. I rented a pump locally for $40 I started draining pool on a Thursday afternoon and it was empty by Friday afternoon, so I cut out the old liner. What a mess...I recommend clearing your water first, but I couldn't since I couldn't keep water level up high enough. Cutting liner and removing was one of the easier parts.
I even grabbed 3 bags of pool-krete for the "soft" spots. Well, I discovered really quick I had a lot of soft spots. The floor was so bad at one point I though I had a sand bottom pool. All the mortar had washed away and the entire shallow end was muse about 2-3 ft out from the wall. I begin removing the muddy mush and muck about 2-3" down unitl I reached dirt. This part was very labor intensive. I removed about 7-8 wheel barrows of muck. I found that the corner where I had leak was severely damaged along with the shallow end floor. Also the creases of the slopes were washed away. I realized real quick my 3 bags of repair material weren't going to go very far. I began at this point to try and locate a contractor to do the repair work on the floor. I felt I was in over my head. I called everybody in the area, but no one could get to me until maybe after season. I called contractors directly and also pool companies including the one who installed the pool. Each time it would rain it washed more floor material away so I had to do something.:-(
I was finally able to at least get a callback or 2 from some of the "best" contractors in our area by reference from some pool companies. I was really on the fence about using the pool-krete product since my pool was supposedly cement mortar. I was told by these professionals that it didn't matter and that they all used pool-krete for the repairs.
One came out and looked at it but couldn't get to it. Based on some of what I have read online, I am still not sure this was the best route. I did however make sure I put a bonding layer of cement and concrete bonding glue as well as made sure existing concrete was wet. I did this everywhere the new krete met the old. I pasted it on as I went making sure it was wet when I applied new coats. I guess time will tell here. The pool-krete is very difficult until you get the hang of it and mix it correctly. There is no definitive guide here. I mixed mine in a mortar trough with a hoe until I got the consistency I wanted. Too wet goes on really smooth but when dry, it's very weak. Too dry and you can't work with it. There is a happy medium. I did purchase a round pool trowel but I was constantly created trowel marks. It's very hard at first. After a while, you kind of get the hang of it and don't really have to think it out and become aware of every trowel sweep. The pool-krete kind of like concrete foam if you can imagine that. It's very light weight compared to mortar / cement (which is like pushing bricks with your trowel) and somewhat easy to trowel. Mine was not perfect by any means, but I soon realized that the original floor had lots of waves and imperfections, that were unnoticeable even under a light. The dark gray is the bonding layer I mixed. It helps to seal the old mortar surface and bond to new surface. It looks quite ugly but seemed to work well. I wasn't able to do all at once so I had to work in phases.
Around the shallow-end walls where most of the floor damage occurred, I attempted to reinforce with layer of gravel and then 4:1 sand / mortar for a stronger foundation. I then added the pool-krete product on top for last few inches making sure to put bonding layer and concrete glue between the 2.
As I was finishing the hopper floor a big storm came through before my product had time to dry. It flooded pool just as I was finishing and putting a foot of water in the hopper ruining my finished work and even the pressure caused a piece of the wall to pop out. I had to pump out water and remove all the sludge and material that washed out. This was a very low point in the project...quite disgusted here.:-( I made quick repair of the work and took advantage of 100 deg and full sunshine and finally finished the hopper bottom.
I wet sanded all the edges where new material met the old so there were no humps or lumps. I went over any rough areas as well and in the end even the minor imperfections I thought would show up did not. You can get away with a lot more than you think. When I held a light close to floor, it looked absolutely terrible. Even the original finish looked like ocean waves. Get it smooth as you can, but it doesn't have to be perfect. Even with my pool light on, you can barely see small ridges and imperfections.
The day finally came, and after sweeping the floor several times and the deck area, we installed the liner. You need at least 2 people for this. One person needs to support the weight of the liner ahead of you while the other snaps it into the track. I was amazed at how easy the liner was to install. it just fell into place. The liner had the corners marked. I lined one of them up in the corner and worked my way around. I made one adjustment shifting it about 2" around after seeing the deep end seem not aligning with hopper edge, and that was it. Liner is really easy to install in track with help. I did this in full sunshine with it 95 outside so it was super stretchy. I put 2 shop vacs behind the liner to suck the air out and it was nice and tight all the way around. I guess all the measuring paid off. I put salt bags all the way around the shallow end to keep it from shifting into the deep-end and made sure it was very tight around the steps. My previous liner had about a 3" void all the way around shallow end. I think this allowed a lot of water to travel behind it and contributed to the floor washing away. That's just my theory.
I did not have to work any of the wrinkles out. The shop vac took care of that...It fit perfect...I was very surprised.
Time to start filling up!
I really like how the brown liner creates a beautiful turquoise color that gets richer as water gets deeper. It's a really cool affect. I researched a lot of liners and looked at many installed before picking a brown one. I do not regret it. No one can believe the liner is brown and they ask me how I die my water that color
And if you have kids or grandkids make sure they participate in this part and let them use the slope as a slip-and-slide! They had so much fun!
After carefully cutting out the step area, installing faceplates, gaskets, and returns we had an oasis again and all the hard work paid off.
I did make one mistake. I realized I installed the bottom step strip on backwards after I already cut the steps out. Oh No! While it was not leaking, I wasn't sure it would hold up. The sealing surface has 3 ridges on each side of screw to make sure it doesn't leak. I drained pool until just below step strip and carefully removed a few screws to see if liner would try an drop or stay in place. Luckily it stayed in place and I was able to flip it over and re-install. We were wanting to do some landscaping this year, but the liner project set us back a bit so maybe next year.
So, yes, a homeowner who has never installed a pool liner can install one, but you should be prepared and aware of the process. A typical liner install most of the time does not include the floor damage I had. Other than floor repair, it was pretty straight forward and could easily be done over a weekend.
Measure Liner twice - 1hr
Draining Pool - 1 day
Cutting out old liner and removing it and faceplates - 1.5 hrs
Floor Repair - Unknown countless hours. I had little help here lost track of hours. 3 weekends about 16-20hrs each taking lots of breaks and drinking plenty of water. It was super hot!
Hanging the liner - 45 min
Trimming Steps and installing faceplates, returns, light, and gaskets - 2-3 hrs
I'm sure this has either inspired you to do it yourself or seek a professional...probably seek a professional lol.

