Newb OB with BYOP in Buckeye AZ - Completion and wrap up

I check for other things like angle of nozzle application, pumping the first few minutes of Shotcrete from the first load with no nozzle outside of the shell so the product is pure when it’s first applied inside and making sure every one inside the shell is wearing a mask to protect against breathing the Shotcrete dust, but these are hard to get crews to follow through with because it requires change from their normal routine.
 
  • Like
Reactions: Schwimmbad
@AQUA~HOLICS thank you so much as always. I added your latest nuggets of wisdom to my shotcrete checklist.

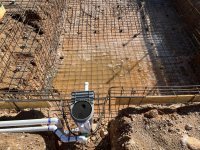
Here's an update with a few pics

My shy guy (return) is now out and proud and past the rebar, not very far, but looks like far enough (I hope).
IMG_5323.jpeg
While the plumber was here I asked about the skimmer area and he said they understand what I was pointing out but commented that they have not run into any issues because of plumbing, it's more about the shotcrete company. Yea, blame the other guy, I thought. I said shotcrete applicator skills is important but no need to make their job more difficult. He did tie up the returns to help prevent them from getting damaged when shotcrete goes in.

Pressure holding, currently just over 40 psi (guy on ladder installing gutters).
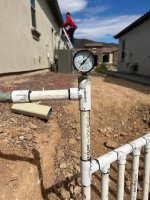
IMG_5330.jpeg

Inspector came, didn’t see my permit hanging by the main panel and left. :eek: :mad: I thought I saw his truck here for a few minutes and was waiting for him in the backyard or ring the doorbell. Next thing I know, the truck was gone! I called him up and he said he failed us because he didn't see the permit outside (lesson learned on that one). Thankfully he didn’t get very far before I called him so he came back. He gave us “partial approval” with “ok to gunite”. :goodjob::kim:He said wanted to see the rest of the bonding (perimeter and the run to the pad). I told him I talked to the inspection manager and he said they only needed to see the bonding connection at four equidistant points around the pool with tails. The inspector chuckled and said well if you talked to "Dave" and that is what "Dave" said than that's what "Dave" gets!

Glad I made that call. :D I owe it all to @ajw22 ⬇️⬇️⬇️ Thank you!!! I'm sure you saved me at least a couple days!
Best to see if you can have a phone conversation with the Inspector and ask what he will be looking for with the bonding wires.

I was interested in what he checked. He took a quick look around saw where I had the bonding, measured distance from the pool to back property line and to patio and that was it. He asked about the electric run and asked to leave the trench open for electric and gas (separate permit). He didn't even check the plumbing is holding pressure until I mentioned that "Dave" said they want to see 30psi. After our discussion he said he usually doesn't ring the doorbell unless there is a gate. How hard would it be to ring the doorbell to ask to see the permit? Aaaarrrrrgggghhhhhhhh Anyway, that's behind me now.

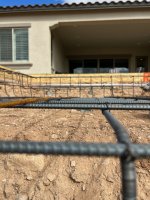
I've been out bending down rebar ties, have about half the pool done. That is time consuming and great opportunity to look things over closely. Most are cut pretty short. As I'm doing this I was wondering how far should I bend them and which if any are ok to leave as is. Anyway here are a few pictures of the ledge after bending down. How's it look?
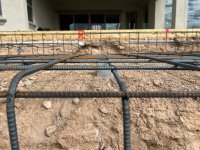
IMG_5322.jpegIMG_5321.jpegIMG_5320.jpeg
While doing this I found the rebar guy didn't install the #4 @ 3" o.c. vertical as required per a detail on the engineering. This is only for a small section for my right column where the depth is over 5'. I don't know how many times I have to bring this up, but it doesn't seem to matter. I just have to watch it and catch those details. When they first bid my job they based it off a standard design for 30psf (that's fine I didn't have engineering done). I later sent them the engineering plans and pointed out the design is for 45psf. They said the price is the same. I asked them to double check it and they increased the price accordingly. When they started rebar on Friday I mentioned the #4 rebar to the owner and the rebar guy and they both said they would do that the next day (Saturday). I figured all good and didn't notice until I'm bending rebar ties. They said they would fix it Thursday. Glad I didn't pay them yet! I've been doing all cash deals to get discounts (ranging from 3 to 6%) and was scheduled to pay today.

Shotcrete lined up for next Friday with a site meet this Thursday. Electrician this Friday. Will call for rough electrical Friday for a Monday inspection.

I still need to nail down my gas contractor and get that permit applied. It might take until the end of this week. Trying to coordinate gas between my pool work (future heater and fire bowls) and my backyard contractor (fire pit and outdoor kitchen). This should save me some $$$ and even if I don't save anything I can hopefully avoid any issues and the inevitable finger pointing headaches between two different gas contractors.

Getting close! Even though I've already reviewed all of the rite of passage links I'm sooooo looking forward to my own set of links from @kimkats!

As mentioned above, I'm attaching my shotcrete checklist I've assembled. It's a little rough, but is there anything else to add?

@Newdude I'm :love::love::love: the iOS posting hack!!!


Did I say how much :lovetfp:
 

Attachments

  • Shotcrete Tips.pdf
    472.6 KB · Views: 15
  • Love
Reactions: kimkats and Newdude
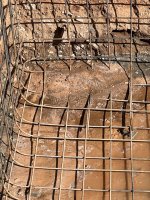
Pig tails look good from the pictures, be ready for the Shotcrete crew to do a number on the cage, nothing can be done about it, it’s just the way it is.

I provide a plastic tube with the words PERMIT printed on it that the pool plans and permit fits into with a threaded cap on one end and advise customers to hang on the inside gate latch with the cord so the inspector can’t get past the latch without moving the permit tube.
 
I'm pretty sure you need to let her spend a bunch of your $$$ on bling for your pool first. :eek: o_O:laughblue:
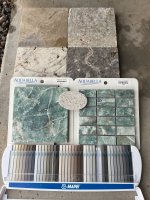
On that note, calling @kimkats to take a look at our waterline/feature wall/step tile (will do 2 rows of 1x2, squared, not offset) with the Finest Finish Universal Mini Sand Plaster (ignore the 4-6x6 travertine pieces, that is all silver premium that we decided against, too much variation in color). Trying to decide on the grout above and below the 6x6 tile. We are going for a green color pool. What do you like?
IMG_5336.jpeg
The split face in red circle for the columns.IMG_5229.jpeg

And the travertine is ANS Mermer Light (screen shot)
ANS Light.jpg


And by the way, look what came today!!! Glad to be a Gold Supporter!IMG_5337.jpeg
 
  • Love
  • Like
Reactions: kimkats and Newdude
MY TURN to spend your money!!! OH YEAH!

So do you want the tiles to blend together or each one standing out? Both ways are pretty. If pop out then light color such as off while or light gray. If blending then med. gray. In fact I am really leaning towards the med gray after looking at the tile again.

Now lets talk about the 6x6 tile. Go through the boxes and pull out any really pretty ones to put on the side of the pool you will first see when you walk out to the pool. Then pull out any "ugly" ones to cut up if needed.

LOVE the split face for the columns! That is one of my fav colors of them.

If you have read much of my posts you will know I love the 1x2 tiles so you did great there LOL

Have YOUR set of links all set to go!! Can't wait!
 
  • Love
Reactions: proavia
Interesting on your inspector guy and the permit. I had my first inspection yesterday and the permit guy asked "where is the permit?" I had never seen it myself. There is a pool sign (like a for sale sign) out front with a pvc tube, maybe its there I said. The inspection just goes out to the sign and puts his little "passed" sticker on the sign. Later I find the permit buried in the pvc tube with promo sheets. The inspector looked at the bonding but did no measuring to make sure I was not in the easement (right on the edge). He was here all of 5 min. I guess I got the luck of the draw on a guy who could care less.
 
Mother nature decided to try to make up for our lack of monsoon and graced us with about 1" of a very heavy rain Tuesday evening. The water made it's way from the newly installed gutters o_O:eek:

im an idiot GIF


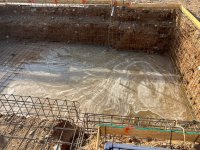
into the plumbing trunk line which made its way into the pool (I'm such an idiot that I didn't address this before the rain). We had about 18" of water in the pool. Figures, no rain at all in August which is typically the heavy monsoon time and within a week of my excavation we get nailed. Anyway, we didn't have too much in the way of cave in's, but there is a lot of places they have to dig out below the rebar.

Immediately the morning after the rain I rented a submersible pump and got the water down the top of the rebar. Now all the water is gone but it is still a mucky, muddy, mess. I have been working to line someone up to clean it out on Monday and reset the rebar chairs ahead of the shotcrete lined up for Friday. Anything else to pay close attention to since this happened? I can't believe cleaning the muck out is much fun, with all the rebar it's a very tedious job. I won't be home to watch over that work, hope it goes ok.

A few pictures, it actually doesn't seem too bad. Just a pain and a few more $$$'s flying out the window!IMG_5346.jpegIMG_5347.jpegIMG_5348.jpegIMG_5349.jpegIMG_5350.jpegIMG_5352.jpegIMG_5363.jpegIMG_5368.jpegIMG_5366.jpegIMG_5367.jpeg
 
  • Sad
Reactions: kimkats

Enjoying this content?

Support TFP with a donation.

Give Support
Looks like it's drying fast. This is our first Monsoon season in AZ. I remarked to my wife how some areas in valley get drenched and Us in Surprise barely get a sprinkle.
 
Is this too shallow for the microbrite light conduits (directly under the top rebar for the baja and benches)? Or is this typical? I know it will have 3" min shotcrete and another 3/8" or whatever the plaster is, I guess I just thought they were a little deeper.

IMG_5387.jpegIMG_5389.jpeg
 
Is this too shallow for the microbrite light conduits (directly under the top rebar for the baja and benches)? Or is this typical? I know it will have 3" min shotcrete and another 3/8" or whatever the plaster is, I guess I just thought they were a little deeper.
Best I can measure on my 9" deep ledge, the center of my microbrite is 9.5" below top of beam with a mere .25" below it to spare. The face of light is about 2".
 
  • Like
Reactions: Schwimmbad
Just got back from 4 days away golfing :cool: and got a call that the Shotcrete company wants to move us up to tomorrow :eek:o_O:eek:. In my usual panic I ran out and inspected the rebar fix and muck out. They didn’t quite get all the soil out and reset all the rebar chairs, so I reset them all myself.😫

Couple questions, how critical is it to have 3 inches everywhere? Overall it’s pretty good but there are some locations (bottom radiuses mostly) that aren’t quite there. Also, is the soil that dried up and flaked an issue for Shotcrete?

IMG_5448.jpegIMG_5447.jpeg
 
Last edited:
It’s best to have 3” behind the steel but common to have areas that don’t meet the requirements.
The weight and pressure of the application will flatten the flaked dirt.
Of all the trades to work on your pool the Shotcrete crew is the hardest on the steel cage, standing and bending the bars along with moving the blocks and not replacing them, just keep it all in stride.
 
  • Like
Reactions: Schwimmbad
Thanks @AQUA~HOLICS. Your note put me at ease. I was glad to be here as there were a few variances they wanted to get my input on. They said water depth on the baja will be about 10" rather than 12" and they wanted to check on step depths and water level depths. Overall they didn't use "rebound" but did use some shotcrete that was cut as they formed the walls. They put most of the cut material in the floor, but some did make it into a few of the steps.

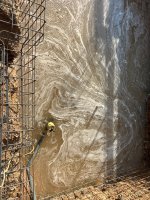
Overall it went fairly smooth, until the last truck. That had several small chunks of concrete from the drum and rocks that plugged the line. Probably about 8 times for that one truck. They watered the soil before starting and when finished they watered it all down and said to water it about 4 times a day. I have been hosing it down every few hours as it turns light gray.

I took a ton of pictures and a few videos. Any comments welcome, good or bad. It's a done deal now, and glad to have it taking shape.

You can see some shotcrete videos along with the timelapse videos on YouTube.

IMG_5456.jpegIMG_5467.jpegIMG_5472.jpeg
I asked them to minimize the water after seeing some of this.

IMG_5491.jpeg
One of the rocks that plugged the hose is in front of the tire.

IMG_5496.jpegIMG_5495.jpegIMG_5497.jpegIMG_5498.jpegIMG_5499.jpegIMG_5500.jpeg
.
 
Last edited:

Enjoying this content?

Support TFP with a donation.

Give Support
Thread Status
Hello , This thread has been inactive for over 60 days. New postings here are unlikely to be seen or responded to by other members. For better visibility, consider Starting A New Thread.