DIY 32x16 ish pool on steep slope

Went ahead and seeded and strawed the area behind the retaining walls.

pool6-29-01.JPG
pool6-29-01.JPG

pool6-29-02.JPG

pool6-29-02.JPG
pool6-29-03.JPG

pool6-29-03.JPG
pool6-29-04.JPG

Not the best time of year to seed, but with daily watering I hope it will work out.
 
Last edited:
With the retaining walls done, and the pool showing up Monday, it was time to focus on the final leveling of the ground. I started by inserting 15 2' rebars in in 3 rows spaced 8' apart, making up 15 8x8 grids. I then used a self leveling rotating laser to determine the high spot, and then put white electrical tape at this level on all 15 rebars. I then used very fine fill dirt, 2 inches at a time, and then tamped it real good with a plate tamper, and I used water to further assist with the compaction.

pool7-3-01.JPG
pool7-3-01.JPG

After about 6 hours of fun with the plate tamper, the dirt at all 15 rebars was within 1/8". Next I added about 3 inches of rock dust (aka gravel dust). I dragged each of the 15 8x8 squares with a 8' level both North/South, and East/West. This scraped off the high sports and filled in the low spots. I had to shovel in more dust to deal with the low spots.
pool7-3-02.JPG
pool7-3-02.JPG

Once I was satisfied that the entire floor was within 1/8" level, I started tamping everything, this time using a wider plate tamper. Unfortunately it started raining after I made my first pass.

pool7-3-03.JPG
pool7-3-03.JPG

I actually welcome the rain as it will help settle everything and it good for the newly seeded grass. Hopefully by Sunday I'll be able to complete the tamping and be ready for the pool to arrive on Monday.
 
Last edited:
Fascinating! Thank you for sharing your step by step process. I don't have a mind for these things, so I have to read it twice. I love following how you do everything - so interesting. You are incredibly meticulous with your work - like a master craftsman. And then we have the beautiful backdrop to go with your story - perfect.
Suz.
 
I got the vertical logs cut to size and treated 2x6s set on top of them where the decking will be.

I also went ahead and picked up 16 sheets of 1/2" insulation that is approved for below grade, so I don't think it will develop mold. Squared them all up and taped them together.

pool01-7-8-15.JPG
pool02-7-8-15.JPG

pool02-7-8-15.JPG
And I meet the truck driver down at the local brewery to pick up the pool itself. He would not have fit that 53' truck down the road I live on. :)

So far I laid the ground cover over the insulation pads and temporarily put the frame together so that I'll know exactly where to dig for the 24 cement pads for the support legs.

Grass is also starting to come up nicely already.

pool03-7-8-15.JPG
pool03-7-8-15.JPG
 

Attachments

  • pool02-7-15.JPG
    pool02-7-15.JPG
    886.6 KB · Views: 15
  • pool02-7-8-15.JPG
    pool02-7-8-15.JPG
    1.2 MB · Views: 15
Last edited:

Enjoying this content?

Support TFP with a donation.

Give Support
I was hoping you would be getting things done!

Have the girls been helping LOL
Lol, I wish! They went to the beach with mommy last week, leaving me to do the pool work.

So yesterday I got the cement blocks all set up, and boy was that a pain. Here's a shot of them being set loosely before being tamped in place, sitting in rock dust.

pool01-7-10.JPG
pool01-7-10.JPG

Got that done and assembled the pool, which was a little tricky given the small amount of clearance on 3 of the sides, but I prevailed in the end and started filling it.

Some shots from early this morning with about 1 foot of water in it.

pool02-7-10.JPG
pool02-7-10.JPG

pool03-7-10.JPG
pool03-7-10.JPG

pool04-7-10.JPG
pool04-7-10.JPG

pool05-7-10.JPG
pool05-7-10.JPG

The cement blocks were purposely set out 4" to account for the legs wanting to push out as the pool fills, but a few legs are not quite reaching the blocks yet, so I put wood blocks under them until the do. Not sure if it will work out in the end, but we'll see.

Got the stock Intex filtration system loosely plumbed.

pool06-7-10.JPG
pool06-7-10.JPG

I don't like that the Intex's don't come with a real skimmer, so I picked one up at the local pool supply place, along with the silica sand for the filter. Installing the skimmer was pretty straight forward with no need to cut the butterfly gasket since there is not much pressure on the liner yet.

pool07-7-10.JPG
pool07-7-10.JPG
 

Attachments

  • pool08-7-10.JPG
    pool08-7-10.JPG
    530.2 KB · Views: 2
Last edited:
I say hard plumb it with PVC and using valves and unions. Think ahead--------valves so you can shut off the water coming from the pool when you need/want to. Unions so you can remove and work on filter and pump.

Hard plumb as you have kids and you KNOW someone will run over, through, etc and knock that loose hose around.

Kim
 
I second Kim's advice on hard plumbing with valves.

If you use the PVC valves and don't want to restrict the flow through the valves (1 1/2" ball valves reduce to 1 1/4") use 2" ball valves with reducer bushings to 1 1/2" and you'll have 1 1/2" through the ball valves.


Sent from my iPhone using Tapatalk
 
hard plumbing is the way to go :) it will be much better and you can use 2 for suction and 2 for return...

love your build, nice work
 
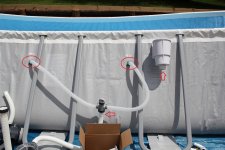
Good suggestion on switching to all hard plumbing, but is not a concern with stressing the fittings when the liner pool wall moves during horseplay in the pool?

I had to temporarily stop filling the pool around noon yesterday as the support legs on one end had started to dig in just in front of the cement blocks. Rather than emptying the pool, which was over half full at the time, I opted for a different solution which worked out very well. Once I listed each leg by about 1", I was was able to push the leg in and pull out the pin holding it to the pool line bottom, and then swing it out of the way to clear the dirt from in front of each block, and move them forward a couple of inches, and then swing the leg back down and reconnect the pin and lower the leg again.

pool01-7-12.JPG
pool01-7-12.JPG

Girls got back from the beach and immediately had to get in the pool although the water was still on the cold side to say the least.

pool02-7-12.JPG
pool02-7-12.JPG

I did pick up a 2" ball valve with unions when I stopped by Lowe's to pick up building material for the deck today, but need to figure out what side outside thread is on the Hayward skimmer. I think it might be 3". So I need to adopt it down to a 2" slip fit for the ball valve. So for now I have it connected as this, with no valve on the skimmer side, which will make cleaning the pump basket challenging to say the least. :)

pool03-7-12.JPG
pool03-7-12.JPG

Getting close to being filled up now. I suspect it will be done sometime overnight. Will have to check on it just before going to bed and probably shut it off then and resume first thing in the morning. Don't want it to overflow during the night!

pool04-7-12.JPG
pool04-7-12.JPG

I picked up 8 121 lf oz containers of bleach from Walmart. It states 7.86% available chlorine. According to the pool calculator, going from 0 to 3 FC is only going to take 69 fl oz, so just under one bottle. That seems low to me, but I guess that must be right? I'm assuming a CYA of about 40. I think I need to test that first before I know just how much chlorine to add. Once the water gets high enough to start the pump, is the best way to add chlorine to pour it slowly right in front of the return nozzle?

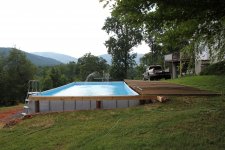
And yes, I have been doing everything solo so far except for putting down the cement blocks and the assembly of the pool itself. The latter being just about impossible to do single-handed. Fortunately my brother is here visiting on vacation from Denmark, so I put him to work and he will also help with constructing the desk, which we hope to start tomorrow when we know exactly where the top edges end up.
 
Last edited:
Wonderful use of your toy LOL to fix the pool block!

-CYA will not show up on test for about a week. Act as if it IS at the targeted level when dosing the FC.

-You can put the whole gal in to be on the safe side. YES pour is slowly in front of the return. It should be safe to swim after mixing for about 15 mins.

-Hard plumb-------- I bet there is some give on those walls. Maybe build a "fence" or something go keep kids and critters from running through the hoses?

-you can use a carrot or potato to use as a stopper for the skimmer (I can see it now "Honey I need a carrot for the pool please" LOL)

Good thing your bro is there t help with the putting up part!

"I'm not cold" as they stand there with blue lips and chattering teeth LOL

Kim
 

Enjoying this content?

Support TFP with a donation.

Give Support
Thread Status
Hello , This thread has been inactive for over 60 days. New postings here are unlikely to be seen or responded to by other members. For better visibility, consider Starting A New Thread.