
Leak in Jandy Plus HP pump housing
- Thread starter robl45
- Start date
You are using an out of date browser. It may not display this or other websites correctly.
You should upgrade or use an alternative browser.
You should upgrade or use an alternative browser.
Jabooh1
0
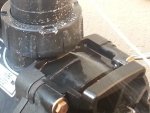
Kinda hard to tell from the angle of the picture but looks like the coupling. Can you determine if it is the coupling of the body?
With the pump off, you can try tightening the union nut. If that doesn't work, turn the pump back off and unscrew the union nut to see if you can see a crack.
Based on the spray pattern, I'm thinking that the pump housing might be cracked.
Based on the spray pattern, I'm thinking that the pump housing might be cracked.
There's no good way to fix it. Is it under warranty?
Even if it's not under warranty, Jandy might replace it for you if you ask.
Even if it's not under warranty, Jandy might replace it for you if you ask.
There's no good way to fix it. Is it under warranty?
Even if it's not under warranty, Jandy might replace it for you if you ask.
Its at least 8 years old. I bought some JB Weld clear weld. I figure I can put some in the inside and the outside and see if that fixes it.
I put the jb weld on the inside and outside of the leak area, there is a seem there where I believe it was leaking, that should hold it I think?
That type of plastic does not hold adhesives well. Also, a crack in a pressurized vessel creates a weakness that could allow a complete failure. I would recommend replacement.
That type of plastic does not hold adhesives well. Also, a crack in a pressurized vessel creates a weakness that could allow a complete failure. I would recommend replacement.
Yes, I did the repair but I'm thinking I may need to buy a replacement housing. The problem is, I unscrewed the 6 or so screws on the back, you can see two of the screws in the picture above and no way will the motor separate from the body. Does anyone know how to get it to separate?
To get it to separate, you have to remove the impeller and then the four screws the hold the motor to the seal plate (backplate).
However, based on the age of the pump, it might be better to get a whole new pump that would be more efficient.
However, based on the age of the pump, it might be better to get a whole new pump that would be more efficient.
To get it to separate, you have to remove the impeller and then the four screws the hold the motor to the seal plate (backplate).
However, based on the age of the pump, it might be better to get a whole new pump that would be more efficient.
well I was planning to get the Ecotech EZ variable speed motor to go with it. Even with the housing, motor, and automation control box for that motor, it is still like 300 less than a new pump.
so I unscrewed the 6 screws on the back of the pump, and you say I need to take the 4 screws out holding the motor in. I'm not sure what you mean by removing the impeller, I'm assuming I can't remove it unless I have the pump separated.
Ok, after you remove the six screws from the pump's seal plate you will need to pull the motor AND the drivetrain. It will look like this: http://wetheadmedia.com/wp-content/...gging-Impeller-On-The-Hayward-Super-Pump-.jpg
The the cone at the end of the motor will be the diffuser, remove the two connecting screws: http://www.mypoolyard.com/images/products/jandy_php_wftr_mhpm_jep_shp_pump_diffuser_r0445400.jpg
Then you must remove the impeller which is a little complicated but can be see here: https://www.youtube.com/watch?v=C41Rp4bkNK4
Ok, after you remove the six screws from the pump's seal plate you will need to pull the motor AND the drivetrain. It will look like this: http://wetheadmedia.com/wp-content/...gging-Impeller-On-The-Hayward-Super-Pump-.jpg
The the cone at the end of the motor will be the diffuser, remove the two connecting screws: http://www.mypoolyard.com/images/products/jandy_php_wftr_mhpm_jep_shp_pump_diffuser_r0445400.jpg
Then you must remove the impeller which is a little complicated but can be see here: https://www.youtube.com/watch?v=C41Rp4bkNK4
Yes, I get that, but when I take the 6 screws out, the whole assemble is pulling back maybe 1/4 inch and no further.
Yes, I get that, but when I take the 6 screws out, the whole assemble is pulling back maybe 1/4 inch and no further.
It may be stuck on something or the grime may have the seal a little stubborn. Looking at the parts diagram of the pump there is nothing keeping it in place.
There are 8 screws, not just 6. There are two at the bottom that need to come out.
Yea, I got them all, my mistake saying 6 screws., I'll have to pull a little harder when I try to take it out I guess. I didn't want to break anything. My hayward pump at the last house just pulled right apart.
Make sure that you're not removing the motor mounting screws yet. Sometimes, the bond wire or electrical conduit are stretched tight to reach the motor and make it difficult to remove the motor.
Thread Status
Hello , This thread has been inactive for over 60 days. New postings here are unlikely to be seen or responded to by other members. For better visibility, consider Starting A New Thread.
Similar threads
- Replies
- 40
- Views
- 759
- Replies
- 3
- Views
- 87
- Replies
- 3
- Views
- 111
- Replies
- 9
- Views
- 117
- Replies
- 10
- Views
- 159