Big problem with my sand filter

Zindar

0
Jun 4, 2011
209
Austin, Texas
I've been spending hours out there perspiring with tools, and can't seem to fix my problem. :mad:

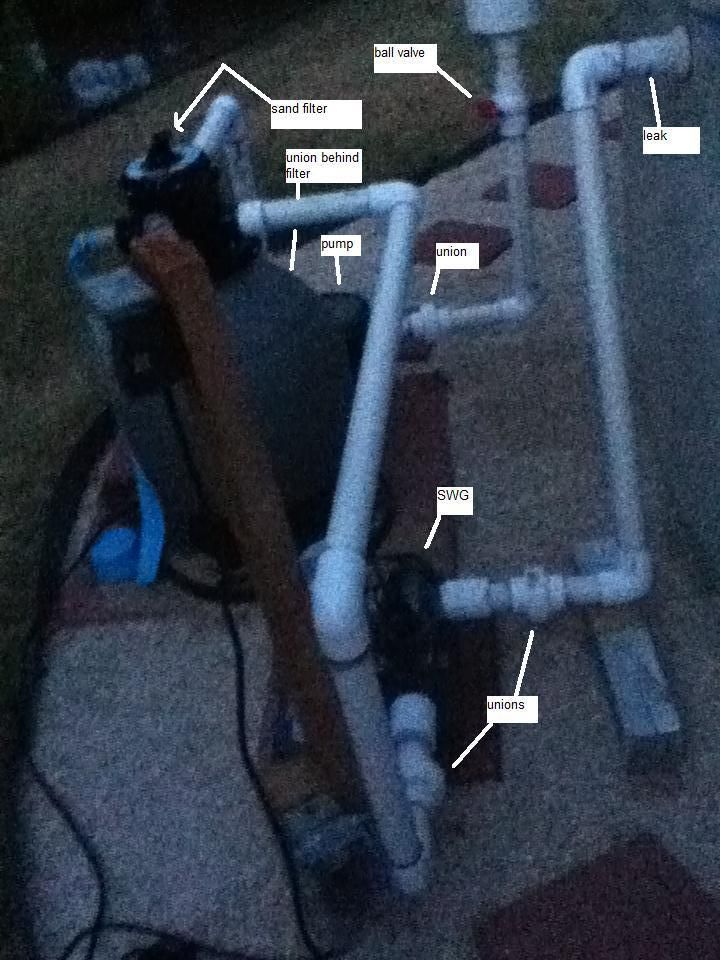
It all started because I took today off from work to install my new salt water generator. I wanted to replace all my flexible tubing with rigid PVC, and so I removed the old plumbing to get a good look at the threaded adapters so I'd know what parts to buy at home depot.

To make it easier to move my sand filter, I removed the drain plug to let water drain out. Unknown to me, it's actually a plug within a plug, and when I unscrewed the outer plug, both plugs unscrewed, and suddenly about a quart of sand leaked out through the drain plug. I immediately stuck the plug in there, but the damage is done.

I called the place that sold me the pool, and he said by taking off the inner plug, a nut would have come loose on the inside that holds it in place, and so now what I have to do is take apart the filter, evacuate all the sand, reattach the nut that holds the drain plug in place, and put the sand back in again.

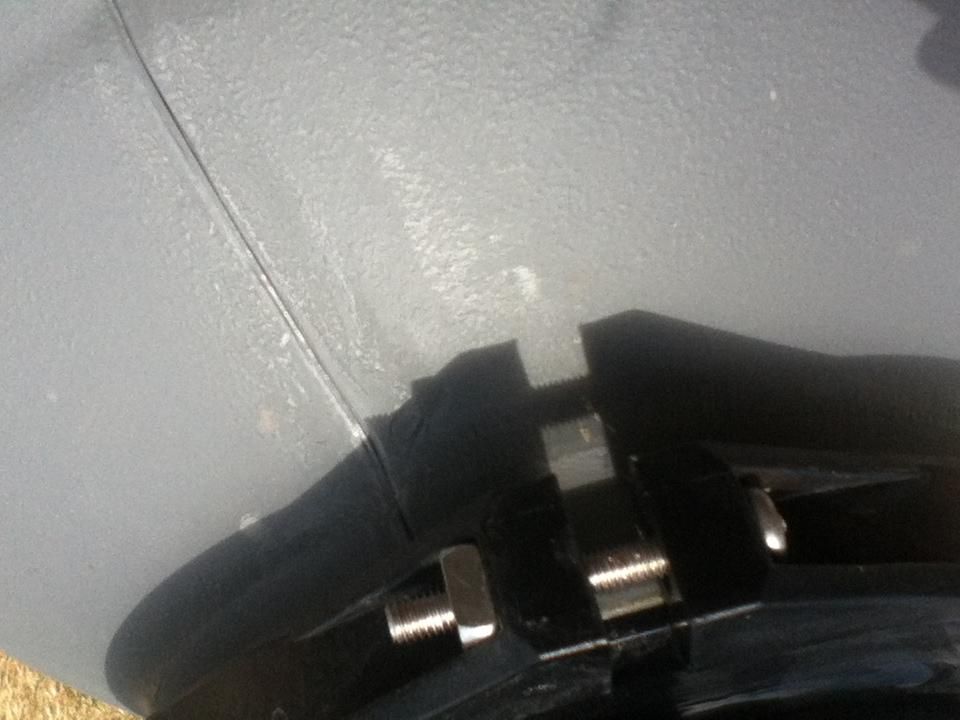
The problem is: to do this, I have to remove the collar that's held in place by two bolts and two square nuts. The nuts are recessed inside a slot so the only way to do this is with a philips screwdriver and unscrew the bolts. That's what I've spent hours attempting to to. I use all the strength I have, and I can even see the collars start to bend under my force, and those bolts won't budge. I'm doing it counterclockwise - they're just on really tight.

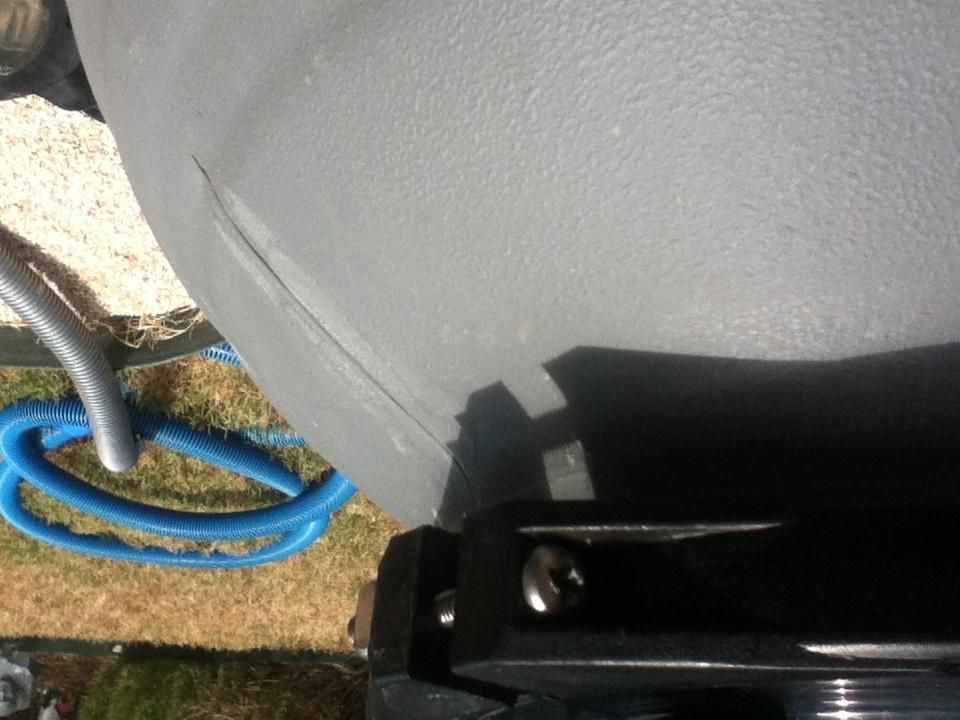
At this point, both bolts are getting partially stripped so it's getting harder to even get a good hold with my screwdrivers, and I've tried every screwdriver in the house, and nothing works.

I thought maybe I should use a hacksaw to cut one of the bolts in half and buy a new bolt to replace it, but it's hard to get my hacksaw in that small space. I'm running out of ideas on what to do, and now I have no ability to circulate my pool water until I solve this. :(
 
Oh, here's a couple of pictures of what I'm trying to unscrew:

IMG_04811_zps4d3f4c1c.jpg


IMG_04821_zps3ece8a6d.jpg
 
I'm indebted to your advice, because I didn't even know what a reciprocating saw was. I googled, and found one at my local "harbor freight" company for $28 dollar, so I bought one, plus about $7 for a set of blades, and I successfully sawed through that bolt. That was quite relieving.

I have a new question though. Here's what it looks like inside my sand filter:

IMG_04831_zps70cbf9fa.jpg


Do you see that think plastic tube with a sort of trapezoidal plastic cone on the end of it? What is that, and what does it do? I don't recall my previous sand filter having anything like that in it. I wonder if I need to position it in some special way when I remove and reinstall the sand in this filter.

Meanwhile, I guess I'm on my way back to home depot to buy bolts to replace the ones I cut off.

By the way, I see another handy use for this reciprocating saw... I'm about to redo all the plumbing on my pool (skimmer to pump, pump to filter, filter to SWG, SWG to return jet). What with that all the elbow joints I'll be installing, plus unions, this saw will come in handy cutting my PVC pipes.
 
For the mystery part look at the multi-port valve and see if there is an air bleeder on it. It looks like part of an air release system. If you have not bought your nuts and bolts yet be sure to get stainless steel.
 
The day has ended, and I'm not done. :(

I had to make two trips to home depot, which ate a lot of my time, and I've got about 1/3 of my pool plumbing redone, and have not yet fixed the sand filter, so I think I'm going to take tomorrow off from my job to hopefully finish this, because I'm worried about what will happen to my pool water quality if I don't get this all fixed ASAP.

The plumbing is taking awhile, because in all it's involving 7 elbow joints, 4 unions, and 4 segments to connect (skimmer to pump, pump to filter, filter to SWG, and SWG to return jet). The tricky part is the the SWG expects 2 inch pipe connections, and everything else expects 1.5" pipe connections, and it took me quite awhile to find parts at Home depot to make adaptations for this.

I feel stupid, because in hindsight I should have used 2' pipes instead of 1.5" pipes, because now that I look, I see that both the filter and the return jet have special adapters that let you use either size, so I could have avoided all this conversion business between 1.5" and 2". Oh well; I already have all the parts, and they're partially installed, so I'll continue tomorrow morning.

Hopefully I don't need to shop for anything else, and I can finish this project pretty soon.


For the mystery part look at the multi-port valve and see if there is an air bleeder on it. It looks like part of an air release system.

I checked my owner's manual and see this:

owners manual said:
Clear plastic tube attached to standpipe is an
air relief. As you are adding the sand into the
tank, try to hold the tube up against the standpipe.
The white piece on the end of this tube
should be ABOVE sand level when you are
done adding sand to the filter.
It doesn't mention anything about attaching it to the multi-port, so I guess I just leave it resting on top of the sand.

If you have not bought your nuts and bolts yet be sure to get stainless steel.
I bought some, and reading the package, it says zinc. (They're actually machine screws.) Is that okay for outside use? If not, I haven't opened the package, so I could return them if needed.
 
I'm about to remove the sand from the sand filter. I just thought of a neat idea that might save time.

The last sand filter I had, I used a cup to remove the sand by hand until I got too low to reach, and then used a shop vac for the rest, mixing it with water to make it easier to vacuum. But this filter is smaller, and the space between the stand pipe and the lip is too small for me to fit my cup. I guess a thinner cup could fit, but it'll take forever to scoop all that out.

My idea is based on the fact that this filter is smaller than my last, and not as heavy for me to lift or maneuver. I think I can set down a tarp next to it; roll it over onto the tarp, and see if most of the sand just pours out onto the tarp.
 
Well that worked nicely. To really clean it out (which I want to do so that I can clean the threads that holds the drain pipe), I should remove the laterals. In my last sand filter, I could fold them up and lift them and the stand pipe out. These don't seem to fold. I just checked my owner's manual, and see that they don't fold. Apparently each lateral twists into place, to the bottom of the stand pipe (i.e. they connect/disconnect entirely from the stand pipe), and the manual advises to do this inside the filter, as there's no other way to fit them through the opening.

So I'll now attempt the reverse of this process to get the assembly out of there.

I didn't even have an owner's manual of my last filter, but when I had this pool built two months ago, I was careful to keep and organize all my manuals (I actually keep them digitally stored in Evernote), and I'm now thankful I did this.
 
I'm starting to feel stupid. One of the main reasons for all this is because the salesman told me the nut that secures the drain plug is loose in the sand and I have to find it. I'm not seeing it in the sand. The manual doesn't mention anything about this nut, and it just says:

"Check drain plug (N) at bottom of filter to ensure that it is screwed on tight."

I should have suspected this, because it was pretty obvious to me that the drain plug opening is threaded, not smooth. I bet no restraining nut is needed. Still, it's not a waste that I did this, because

1) when I (foolishly) removed the drain plug, causing a bunch of sand to flow out, the threads got covered in sand. It will be good to wash all the particles out of those threads and the plug, before re-installing the plug. Everything I've done was a necessary step to that goal.

2) I lost sand through the drain port, and it needs to be put back into the filter.


At this point, I now have an empty basin with minor damp sand residue on the inside. I've wiped it several times with a towel to get as much out as I could.

True, I could rinse it out, but I don't think that's necessary. I just need to rinse out the threads and the plug, and re-install that. I also think it might be good to rinse off the lateral assembly so that they'll snap back on smoothly. (They twist on, but not along threads... there are some kind of grooves and slots that they twist into, but I may as well help prevent grains of sand from being caught in and crushed in those grooves.

If nothing else, this entire exercise will ingrain into my memory the importance of opening the correct part of the drain plug (the part that allows water out, but not sand), instead of the whole drain plug. I bet I don't make this mistake again.
 

Enjoying this content?

Support TFP with a donation.

Give Support
How did the plumbing go? I've got to do some work this weekend to fix a leak at my pump outlet.

I hit a blocking point, where I need to actually install my plumbing on the skimmer side; (I've been working on the return side first.) I needed a way to block the skimmer water from coming through and interfering with my PVC cement while it sets. I googled this site and found another thread for suggestions:


http://www.troublefreepool.com/thre...water-from-going-into-the-filter-amp-then-out

I followed them, but they didn't work, but after talking to my pool salesman, he recommended a solution, which I'm about to try right now.
 
Well I'm detecting a tiny leak that's coming through the teflon / theads in the piping from my skimmer, at the rate of about one drop per 14 seconds. Maybe that's not much to complain about, but I guess I'll need to address that later, as the day is getting late, and I'm still not finished. I accidentally lost the cap to my sand filter, and have been been looking for last hour for it, and just can't find it, so I guess I'm on my way back yet again to home depot to buy a replacement cap. I cannot believe how much of my time I'm spending on the road buying stuff for this project that's been going on two days now. I originally thought it would just take one afternoon.
 
Well I finished it, and I haven't turned on the pump yet, but I unblocked the skimmer (using the new ball valve I installed just under the skimmer), and immediately I could see water leaking through the threaded connection at the pump (where the pipe from the skimmer enters the pump). I had used teflon tape there, but either I didn't screw it in tight enough, or for some reason teflon lets water through.

I do have some lubricant (I think made of silicon), and on the tube it says among other things, that it can be used on threaded parts. Maybe I'll unscrew the part that's leaking and apply this silicon to it, in hopes it does a better job of making it airtight. The good news is that I've installed unions, so removing that pipe segment should be easy.

I worry though, because I have 6 threaded connections, and what if they're all leaking? The job of getting this connection water tight could take awhile, and I haven't circulated the water since yesterday morning, and the temperatures here are over 100 degrees. I hate that the water is sitting that long without being pumped.

Plus since I took apart the sand filter and put it together, I hope it doesn't leak around the collar. There are a lot of vulnerability points.
 
Well I put in silcon into the leaking connection, and let it set about an hour, and then I released the dam and allowed water into the pipes, but did not turn on the pump. The good news that leak where it was leaking doesn't leak anymore (but that doesn't prove it won't leak when I turn on the pump).

The bad news: one of the threaded connections at the return jet leaks. Here's a picture of my setup (sorry it was taken during twilight with my cheap iPod touch, so it's blurry):

temp_zpsdfc95394.jpg


The problem I have is, due to the location of the closest union to the return jet, the section of pipe I have to rotate to undo that and apply silicon to the threads to hopefully give it a more watertight seal, is so long, it will hit the skimmer. So I'm thinking that what I need to do is saw the pipe just around that first elbow joint near the eyejet, and after fixing the leak, either install a coupler, or another union. I'm inclined to make it a union in case I still have leak problems and need to undo that section again.
 
By the way, that may seem like a lot of pipe (altogether roughly 12 feet or so of pipe), but had the SWG been a mirror image of what it is, I could have used a more direct route. (Or alternatively, if the return were to the left of the skimmer instead of the right.)

In hindsight, I think if had some kind of elevated shelf I could have put the SWG on, I wouldn't have had to run the pipe down and then back up again like I did. [1] But I still had to do a U-turn from the filter to the SWG, regardless.

Hopefully this many feet of pipe won't cause too much degradation of water pressure, but then again I do have a 1 horsepower pump, which I'm told is overkill for my 7600 gallon pool.


[1] The up and down action isn't as bad as it looks in the picture. It's an optical illusion because the final section that ascends from the SWG to the return is actually a slanted section. It goes away from your viewpoint and up, diagonally.

Maybe tomorrow when the sun is up and I can take clear pictures, I can take one from two different angles and post it to this thread.
 
I was afraid of this: It's been Wednesday morning (so 3 days) since I've last circulated the pool water, and I'm seeing faint green residue forming on the floor. So whenever I get these leaks fixed, I'll be needing to SLAM this pool, for the 3rd time I've had it, and I've only had it 2 months.

I've just sawed off the last segment of pipe, and I'm on my way now to home depot to buy another union.

One problem I noticed: In the eyelet I have a PVC threaded adapter screwed in (with teflon), which is where the leak is. I just put some silcon on there in hopes that will seal the leak, but when I screwed it back on, I noticed I'm able to screw it another 10 or 20 degrees until it's 100% flush and won't screw in anymore beyond that, but I can't do that because then the elbow joint won't point at the next elbow joint in the the line. (I sawed it just past the first elbow joint, because there's not room to saw before that joint and still get a union in there.) Hopefully that's alright, and the silicon will do the job, but I guess I'll soon see.
 
Update: mostly good news.

New union is installed, and I put silicon in the leaky adapter. It seems to have fixed it, so now with no leaks with the pump off, I turned on the pump to see what would happen.

1) At first, no water flow. It didn't take long for me to realize I'd left the filter multiport valve in the off position, so no water could get through. So I turned off the pump, and put it in filter mode, and turned on the pump.

2) I saw a bunch of dirt or sand (not sure which) flow through and into the pool. After a few seconds of this I turned off the pump, and put it in backwash mode. I guess after emptying and refilling the sand, a backwash is needed? I hope this didn't damage the SWG... that would be supremely annoying.

3) Tested again, and the water is clear now, so backwash did the trick.

The good news is that with the pump on, though I do have a leak, it's actually a very slow one. I have six threaded adapters in my setup, two of which now have silicon on them, and 4 with only teflon. All four tefloned adapters are leaking, about one drop per 4 seconds or so each. Also, an even slower leak from the collar of the sand filter. Hopefully if I tighten the collar tight enough, it will stop that leak. By the way, I did lubricate the O-ring just inside the collar, so I don't think that's my problem.

Overall I say good news, because this very slow leak is slow enough that if I need to, I can run my pump and at least circulate my water. But maybe once I have (a late) breakfast with my family, I'll go out there, and remove all 4 leaky adapters and put silicon on them, and maybe it'll be a truly watertight system them. The good news is that my other unions are situated such that I can get all 4 of those adapters off without any sawing. :cool:

I'm really loving the ball valve I installed under the skimmer, with all this work I keep doing on the piping, and needing to shut off the water flow. I suppose I could have splurged and put a ball valve on the return side, but I didn't. If I really want to, I could still install one there at some point, just after the latest union I installed.

So that's 5 unions in total I have now, and I did lubricate all 5 O-rings. Hopefully today, I'll get another SLAM started. And when that's completely, I can finally add salt to the pool and put my new SWG into service. Also, when I vacuum the pool, hope whatever dirt or sand went in there by accident above will get send back the filter where it belongs.

One thing I really like about this above ground pool, vs my prior pool which was in ground: When you have a leak, it's easy to diagnose and repair, compared to inground, because you can see all the piping - it's out in the open and not buried under ground.
 
For the mystery part look at the multi-port valve and see if there is an air bleeder on it. It looks like part of an air release system.

I had never heard of such a device, but I have to say it's handy. In my last pool (which was in ground), the sand filter was larger, but had no air bleed system. Once when I replaced the sand in it, the way I had to get the air out (a trick which the filter salesman taught and advised me to do) is to unscrew the pressure gauge, then turn on the pump. Once the water filled up the filter, it would start shooting out of the pressure gauge hole, at which point, I'd quickly screw the gauge back in.

I actually had a gauge problem where they wouldn't last long before getting flooded with water, so I had bought several gauges in the course of my ownership of that filter - I don't know if this was related to the lack of an air bleed system or not. But my current filter so far has its pressure gauge in perfect condition, so hopefully I'll have a better experience with it.
 

Enjoying this content?

Support TFP with a donation.

Give Support
Thread Status
Hello , This thread has been inactive for over 60 days. New postings here are unlikely to be seen or responded to by other members. For better visibility, consider Starting A New Thread.