
This tutorial is geared toward the traditional grid-style DE filters. If you have a cartridge-style DE filter, you may want to switch over to JoyfulNoise's QuadDE Tutorial.
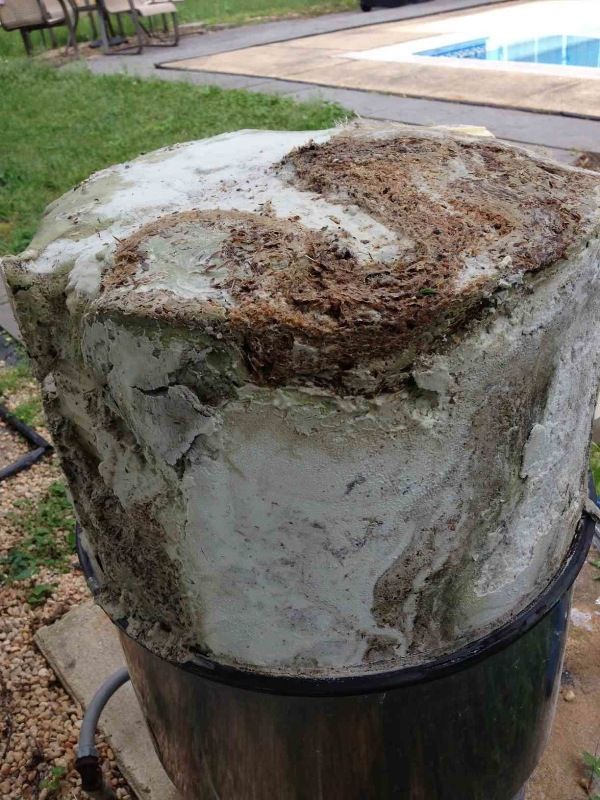
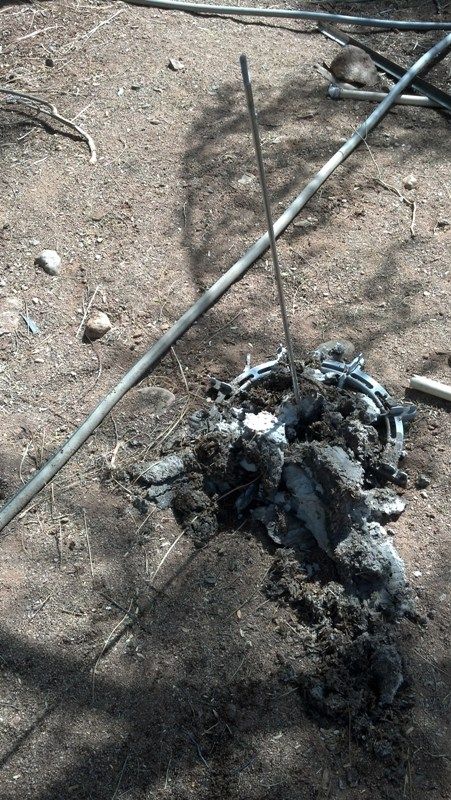
When DE filters are backwashed, not all of the DE/fiber cellulose (henceforth, the term DE will be used to refer to both) is removed from the filter. If owners are not aware of this, they may add too much DE back into the filter, reducing performance and eventually clogging it up as can be seen in this extreme case.

TFP recommends backwashing when the pressure rises 20-25% over the clean filter and then recharging the filter with ~80% of the manufacturer’s recommended amount of DE. TFP also recommends disassembling the filter for a thorough cleaning once a year to inspect for problems and to ensure peak performance. This tutorial will walk you through the process of taking a typical DE filter apart for cleaning and then reassembling and recharging the filter. This will not address the bump-type or cartridge-type DE filters. A Hayward DE6020 filter is used in this example.
Step 1: Backwash the filter. This is done by turning off the pump and turning your backwash valve (plunger or mutli-valve) to the backwash setting. Turn the pump back on until the filter sight-glass looks clear. It is usually good to alternate between backwash and rinse (or filter if you have a plunger) a few times to remove as much DE as possible. Be sure to turn the pump off when changing the valve setting. See HERE for more information. In this tutorial, I chose to skip this step so that I could throw the DE in the garbage instead of spraying it around the yard. Note, some setups may include a DE separation tank that will capture the DE before the water comes out.
Step 2: Be Safe. Turn off the pump and ensure the timer or automation system will not be able to turn it back on unexpectedly while the filter is disassembled.
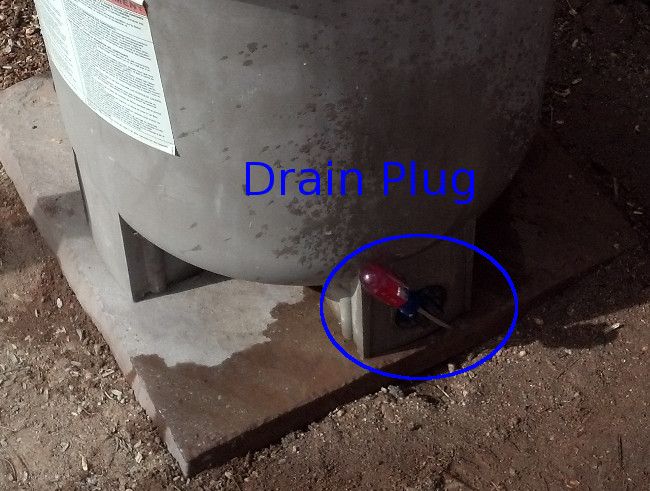
Step 3: Draining the filter. Open the Air Release Valve on the top of the filter to allow the water to drain out of the filter for a few minutes. You may also want to remove the drain plug (using a screwdriver in my case) on the bottom of the filter to allow the water to drain out of the bottom of the tank.


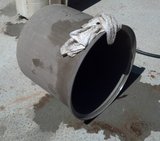
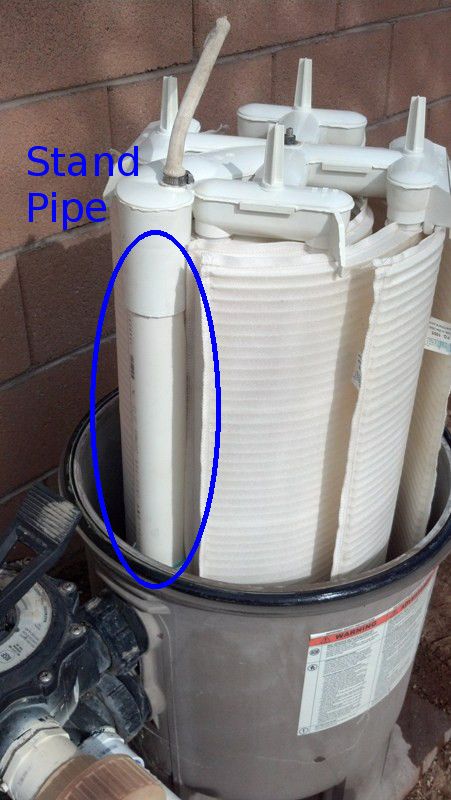
Step 4: Opening the filter. Loosen the nut holding the filter clamp, remove the clamp, and lift off the lid to reveal the mess. Some people may spray off the grids while still in the filter bottom and let some of the DE drain out the bottom. Or even remove the top manifold and take the grids out separately. I chose to lift everything out together … which was heavy because like mentioned previously, I did not backwash so that I could put most of the DE in the garbage and not around my yard. Also note that the o-ring on the stand pipe can make it difficult to lift the manifold out.


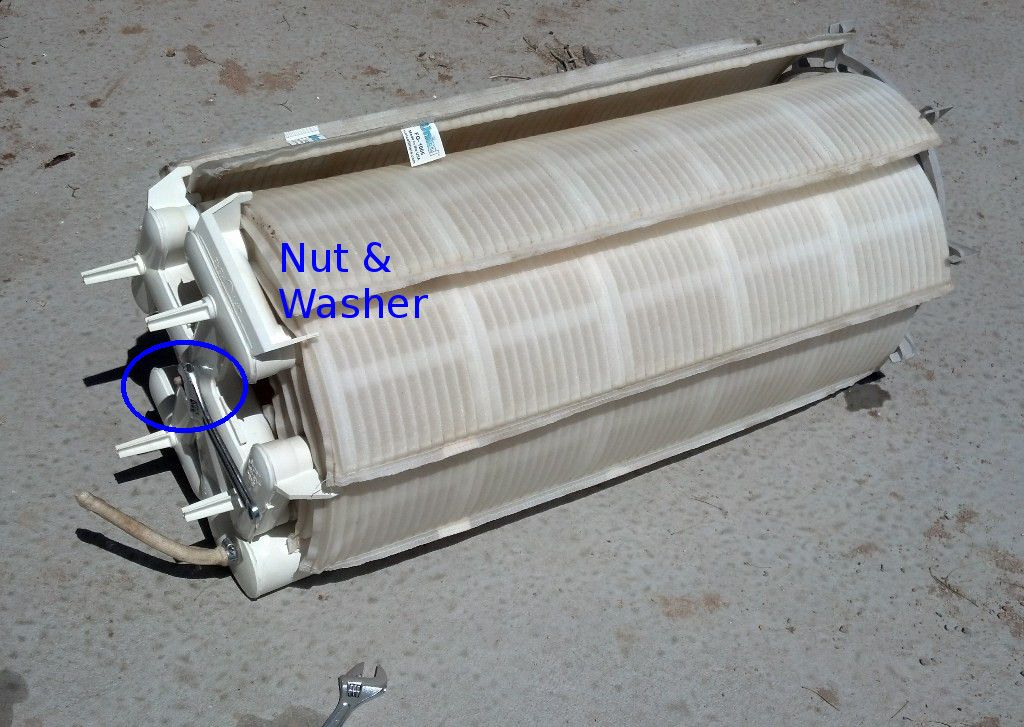
Step 5: Disassembling the grids. Remove the nut off the top of the manifold to allow disassembly. You will likely need to lay the assembly down so that you can hold the long bolt on the bottom and take the nut and washer off the top. Once the nut is removed, stand the assembly back up and lift off the manifold.


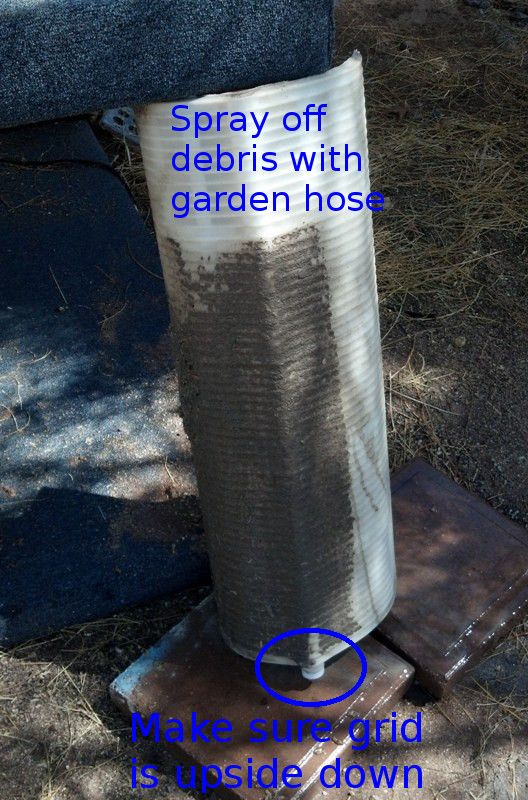
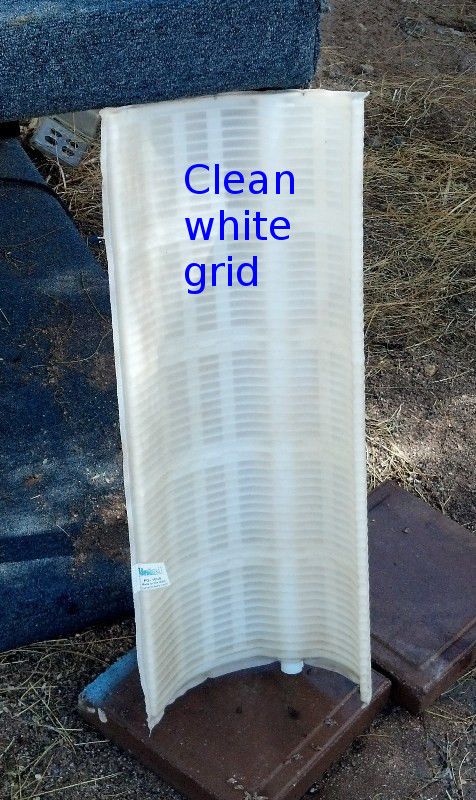
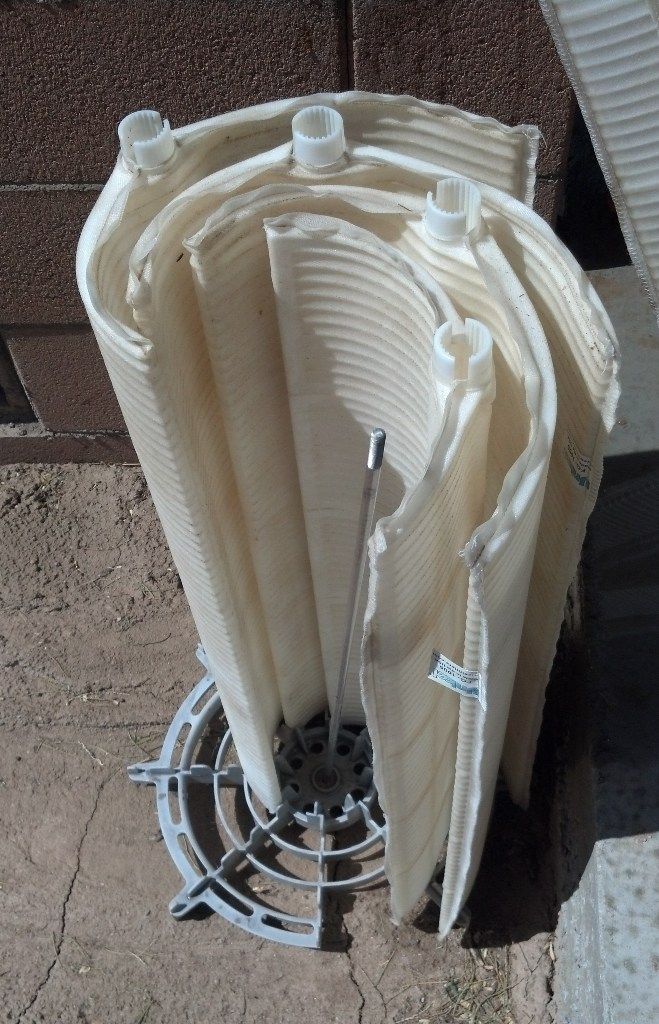
Step 6: Cleaning the grids. Lift out one grid at a time and spray them off with a garden hose (no pressure washers). I grabbed the larger chunks of DE and threw them in the garbage. Note that you should turn the grids upside down with the pipe on the bottom so that the grids can more easily drain while you are spraying them off.


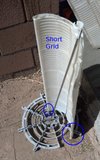
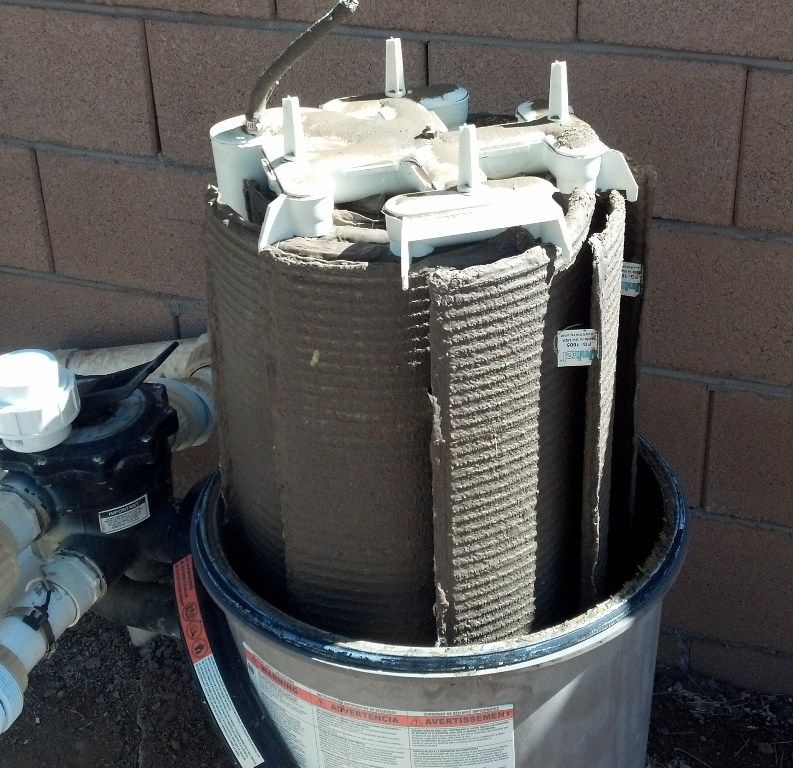
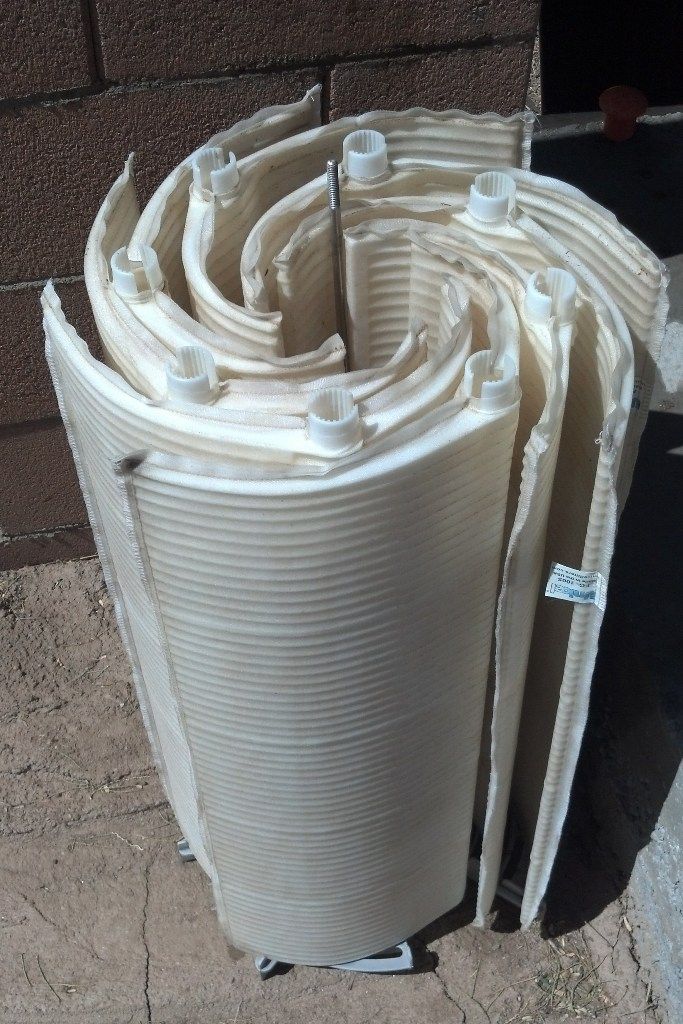
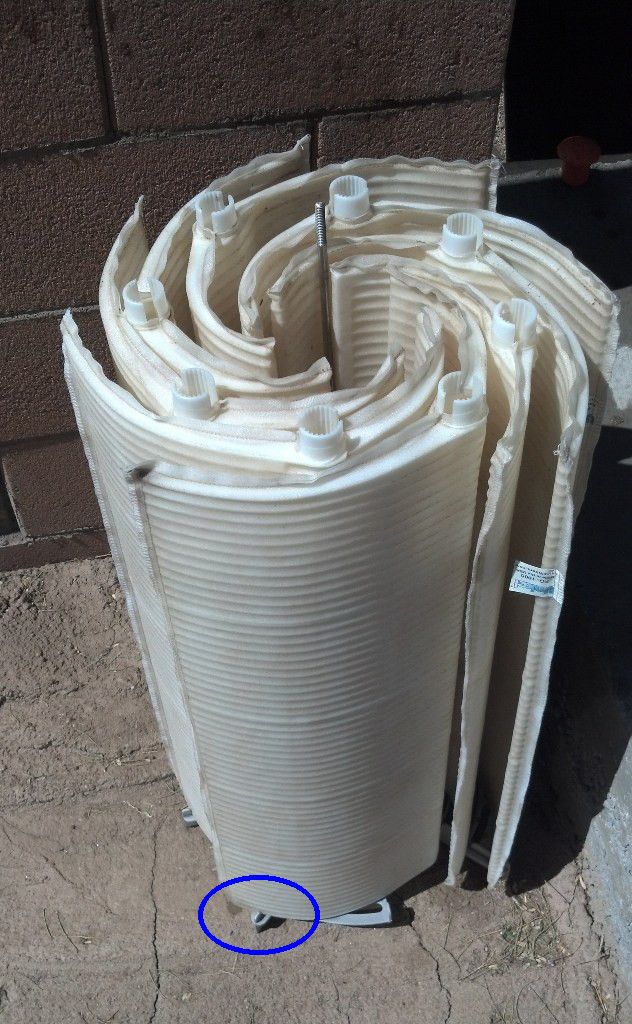
Here you can see half the grids removed, the large clumps of DE remaining (clean this up so it does not blow around when it dries out), and all the nice clean grids (note the shorter/narrower grid on the right).


At this point it may be desired to soak the grids in soap and/or an acid bath if they feel stiff from calcium build-up and do not let the water drain out quickly. My grids are only a year old and in good shape so this was not needed. See HERE for more information about soaking your grids.
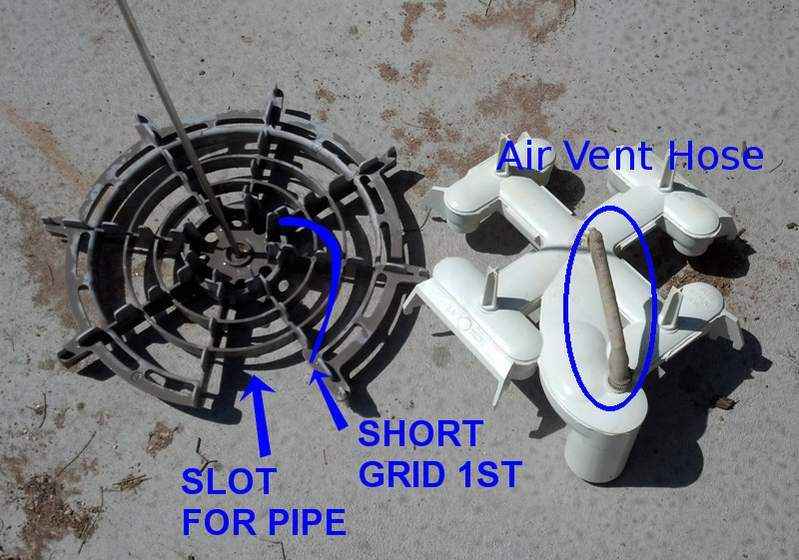
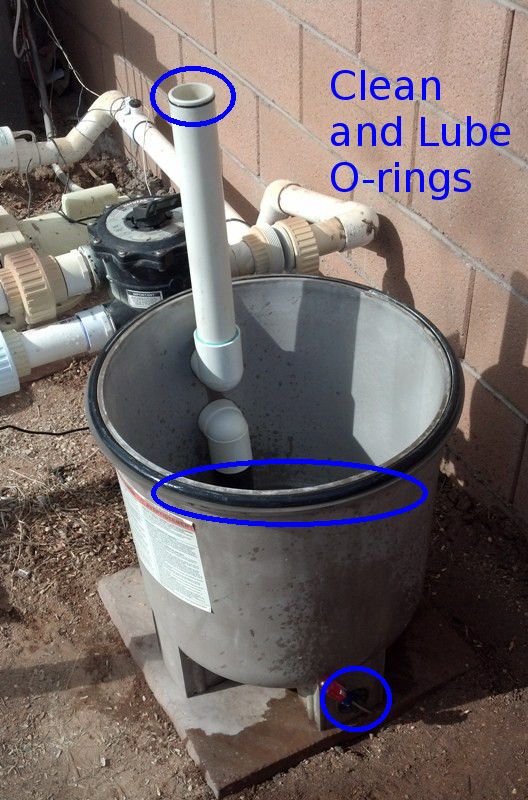
Step 7: Cleaning the rest. Spray off the bottom rack, top manifold, lower filter case, upper filter case and clamp. Inspect the air vent hose on the top of the manifold for damage. Remove the large o-ring from the lower case and wipe down the mating surface on both halves of the filter case. I found kind of a tacky mess that was very difficult to remove. I believe this is because the lube I used was Teflon-based, I may switch to Silicone-based lube which I hear is easier to work with. Also wipe down the seat for the clamp and the clamp itself to remove any dirt or debris that may have accumulated.


Step 8: Assembling the grids. This can be frustrating at first, but now only takes me a few minutes. I prefer to put the grids back together in the upright position; although I hear others prefer to do it upside down … to each their own. You will want to have all the grids within reach before you start so the assembly does not fall over (I spent more time getting these pictures than putting it together )
)
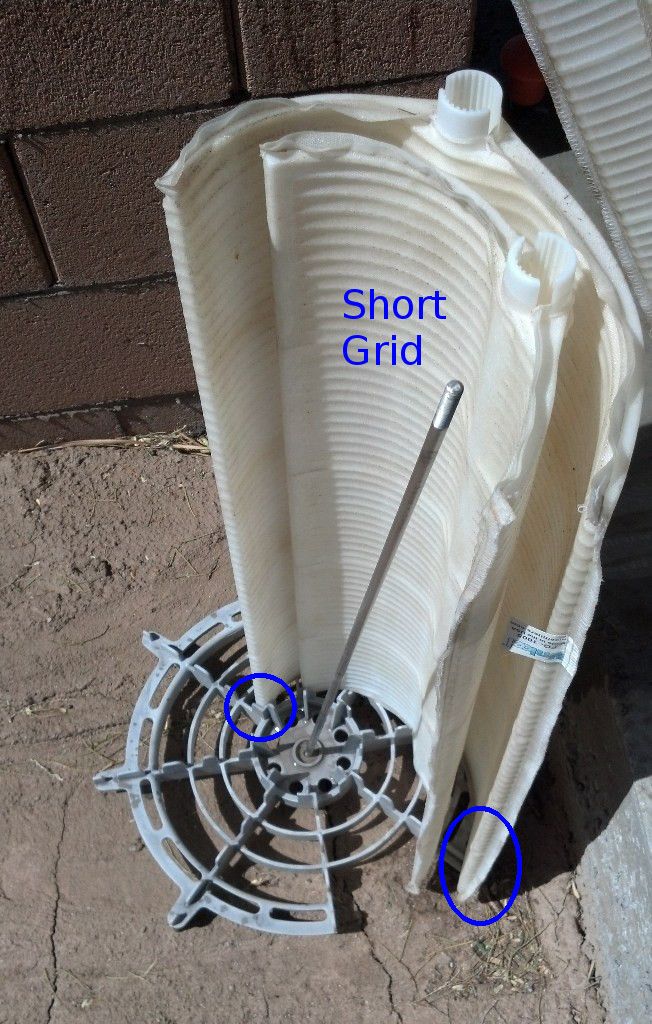
Start with the narrow grid. Locate it so that the side with the most curve is on the inside and sits in the corner slot just opposite the opening in the bottom rack. The outside will stop just into the opening in the rack and should be in the 2nd groove in from the outside. (Updated picture above showing short grid placement courtesy of member cardano, thanks) Next grab another grid and place it in the next inside corner slot CCW and around the outside of the short grid, ending just to the outside of the first grid. Continue this process by placing the grids in the next open slot and making sure the outside edge is sitting in the next open grove on the outside of the bottom rack.


Now place the top manifold on the grids with the opening marked “short element here” on the short grid ensuring the center bolt is in the middle hole. I work my way around the grids gently moving the grid pipes into place. With light pressure you can keep the first grids engaged in the manifold while you work your way around nudging things into place. Once the manifold is seated, place the washer and nut back on the center bolt (you may have to reach inside to lift it up to get the nut started). Then lay the assembly down and snug up the nut (DO NOT tighten this down too much or you can damage the grids ... just snug it up )

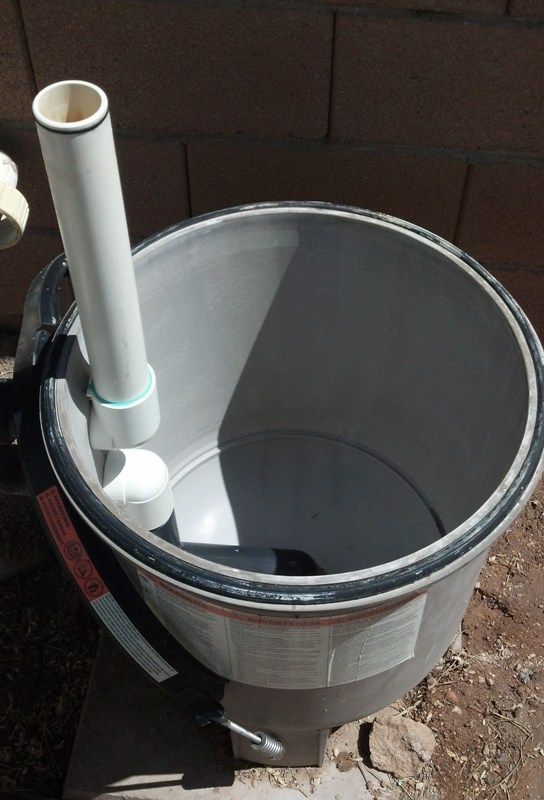
Step 9: Lube it up. Wipe down the large filter o-ring, the stand pipe o-ring, and the drain plug o-ring. Then apply a generous amount of Teflon or Silicone-based grease to all and set them into place. I also wiped down the manifold sleeve that fits on the stand pipe and rubbed some grease inside as well.

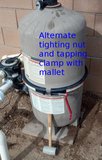
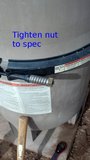
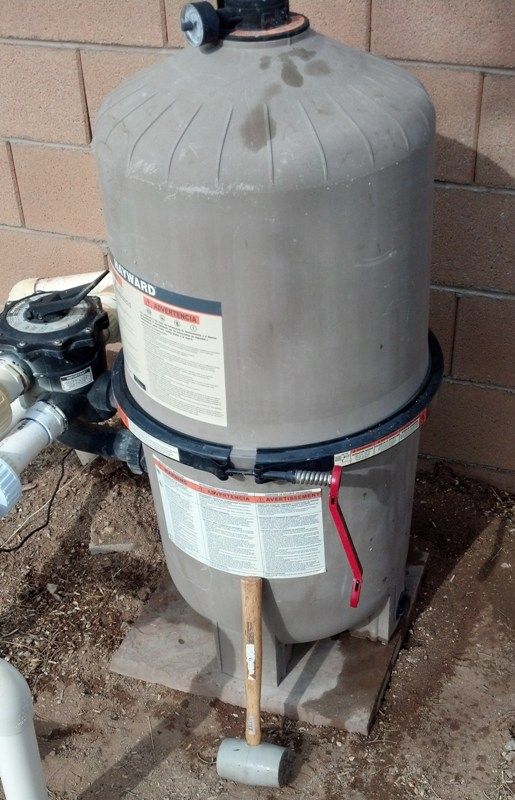
Step 10: Closing the filter. Set the grid assembly back into the filter ensuring that the manifold slips over the o-ring on the stand pipe. Place the top of the filter back over the grids on the filter o-ring. Wrap the clamp around the two halves of the filter and start to hand tighten the brass nut. I have found the best way to tighten this clamp and not risk breaking the nut is to alternate tightening the nut and gently tapping around the clamp with a rubber mallet (or use a regular hammer and a block of wood). If you alternate 4-5 times, it actually takes very little force on the nut to get it tightened to spec; whereas if you do not tap the clamp into place and just try to force it on only using the nut, you are very likely to break or strip the brass nut.
Step 11: Recharging the filter. Put the required amount of DE or cellulose fiber into a bucket and then fill it with water. This was my first time using the fiber and based on things I had read, I did not use the entire amount listed on the package. The bag said to use 15 cups for my 60 sqft filter, I chose to try 12 cups which is roughly half the 3 pound bag.

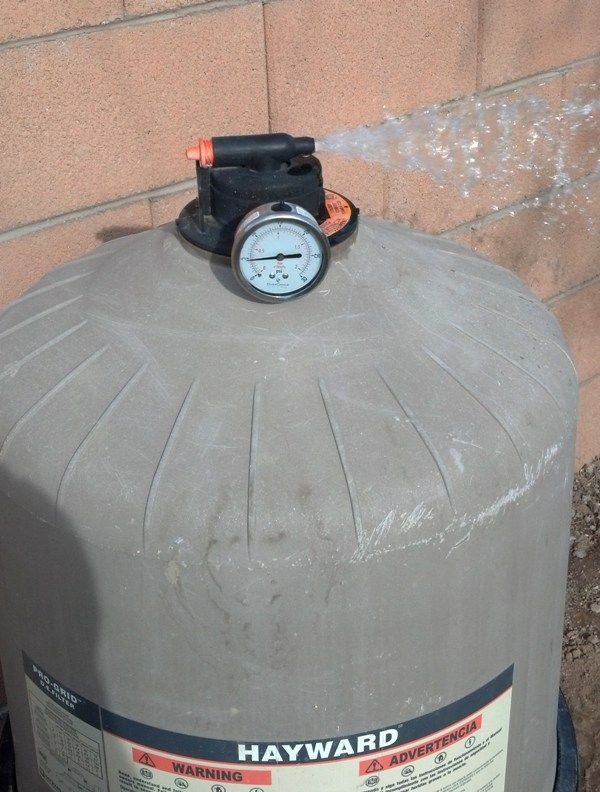
I stick my hand in the bucket to break up any clumps and mix it into a slurry. Remove the skimmer lid, the skimmer basket (note my rock that is BIGGER than the hole in the bottom of the skimmer to keep the basket from floating), and the float diverter (space ship looking thing). Go back to the equipment pad, make sure the air release valve is still open on the filter, turn on the pump on high speed and wait for the air to be purged from the filter. When water sprays out, close the air release valve and turn the pump back off.


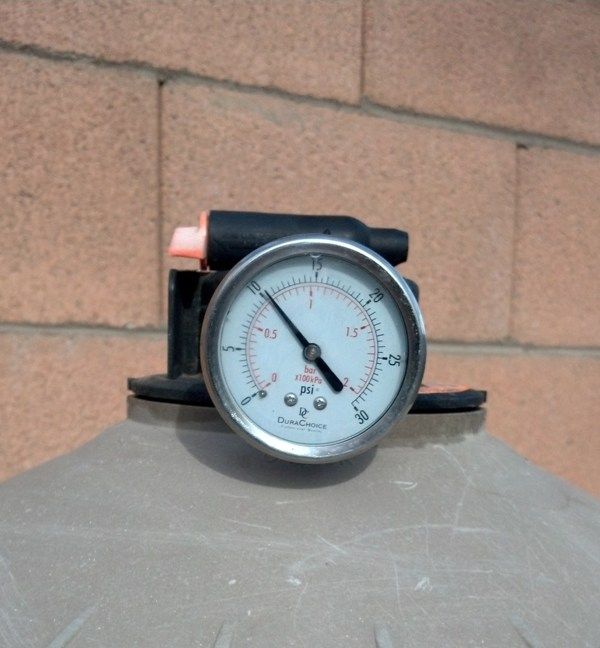
I remix the bucket of DE into a slurry and rinse my hand in the skimmer. Then turn the pump back on and immediately start to slowly pour the slurry into the skimmer, scooping up pool water as required to get all the DE out of the bucket. After a couple minutes, I usually crack the air release valve back open to make sure all the air is gone and then note the pressure reading on the gauge (note my new 2.5” liquid filled pressure gauge from tftestkits). You will want to write this value down somewhere so that you will know when the pressure rises 20-25% over this clean pressure and it is time for either backwashing or re-cleaning the filter.

Step 12: Bask in your triumph. Grab your favorite tasty beverage and lounge in the shade or go for a swim
  knowing that your DE filter is now working at peak performance
When DE filters are backwashed, not all of the DE/fiber cellulose (henceforth, the term DE will be used to refer to both) is removed from the filter. If owners are not aware of this, they may add too much DE back into the filter, reducing performance and eventually clogging it up as can be seen in this extreme case.
TFP recommends backwashing when the pressure rises 20-25% over the clean filter and then recharging the filter with ~80% of the manufacturer’s recommended amount of DE. TFP also recommends disassembling the filter for a thorough cleaning once a year to inspect for problems and to ensure peak performance. This tutorial will walk you through the process of taking a typical DE filter apart for cleaning and then reassembling and recharging the filter. This will not address the bump-type or cartridge-type DE filters. A Hayward DE6020 filter is used in this example.
Step 1: Backwash the filter. This is done by turning off the pump and turning your backwash valve (plunger or mutli-valve) to the backwash setting. Turn the pump back on until the filter sight-glass looks clear. It is usually good to alternate between backwash and rinse (or filter if you have a plunger) a few times to remove as much DE as possible. Be sure to turn the pump off when changing the valve setting. See HERE for more information. In this tutorial, I chose to skip this step so that I could throw the DE in the garbage instead of spraying it around the yard. Note, some setups may include a DE separation tank that will capture the DE before the water comes out.
Step 2: Be Safe. Turn off the pump and ensure the timer or automation system will not be able to turn it back on unexpectedly while the filter is disassembled.
Step 3: Draining the filter. Open the Air Release Valve on the top of the filter to allow the water to drain out of the filter for a few minutes. You may also want to remove the drain plug (using a screwdriver in my case) on the bottom of the filter to allow the water to drain out of the bottom of the tank.

Step 4: Opening the filter. Loosen the nut holding the filter clamp, remove the clamp, and lift off the lid to reveal the mess. Some people may spray off the grids while still in the filter bottom and let some of the DE drain out the bottom. Or even remove the top manifold and take the grids out separately. I chose to lift everything out together … which was heavy because like mentioned previously, I did not backwash so that I could put most of the DE in the garbage and not around my yard. Also note that the o-ring on the stand pipe can make it difficult to lift the manifold out.
Step 5: Disassembling the grids. Remove the nut off the top of the manifold to allow disassembly. You will likely need to lay the assembly down so that you can hold the long bolt on the bottom and take the nut and washer off the top. Once the nut is removed, stand the assembly back up and lift off the manifold.
Step 6: Cleaning the grids. Lift out one grid at a time and spray them off with a garden hose (no pressure washers). I grabbed the larger chunks of DE and threw them in the garbage. Note that you should turn the grids upside down with the pipe on the bottom so that the grids can more easily drain while you are spraying them off.

Here you can see half the grids removed, the large clumps of DE remaining (clean this up so it does not blow around when it dries out), and all the nice clean grids (note the shorter/narrower grid on the right).


At this point it may be desired to soak the grids in soap and/or an acid bath if they feel stiff from calcium build-up and do not let the water drain out quickly. My grids are only a year old and in good shape so this was not needed. See HERE for more information about soaking your grids.
Step 7: Cleaning the rest. Spray off the bottom rack, top manifold, lower filter case, upper filter case and clamp. Inspect the air vent hose on the top of the manifold for damage. Remove the large o-ring from the lower case and wipe down the mating surface on both halves of the filter case. I found kind of a tacky mess that was very difficult to remove. I believe this is because the lube I used was Teflon-based, I may switch to Silicone-based lube which I hear is easier to work with. Also wipe down the seat for the clamp and the clamp itself to remove any dirt or debris that may have accumulated.

Step 8: Assembling the grids. This can be frustrating at first, but now only takes me a few minutes. I prefer to put the grids back together in the upright position; although I hear others prefer to do it upside down … to each their own. You will want to have all the grids within reach before you start so the assembly does not fall over (I spent more time getting these pictures than putting it together
)Start with the narrow grid. Locate it so that the side with the most curve is on the inside and sits in the corner slot just opposite the opening in the bottom rack. The outside will stop just into the opening in the rack and should be in the 2nd groove in from the outside. (Updated picture above showing short grid placement courtesy of member cardano, thanks) Next grab another grid and place it in the next inside corner slot CCW and around the outside of the short grid, ending just to the outside of the first grid. Continue this process by placing the grids in the next open slot and making sure the outside edge is sitting in the next open grove on the outside of the bottom rack.

Now place the top manifold on the grids with the opening marked “short element here” on the short grid ensuring the center bolt is in the middle hole. I work my way around the grids gently moving the grid pipes into place. With light pressure you can keep the first grids engaged in the manifold while you work your way around nudging things into place. Once the manifold is seated, place the washer and nut back on the center bolt (you may have to reach inside to lift it up to get the nut started). Then lay the assembly down and snug up the nut (DO NOT tighten this down too much or you can damage the grids ... just snug it up
)
Step 9: Lube it up. Wipe down the large filter o-ring, the stand pipe o-ring, and the drain plug o-ring. Then apply a generous amount of Teflon or Silicone-based grease to all and set them into place. I also wiped down the manifold sleeve that fits on the stand pipe and rubbed some grease inside as well.
Step 10: Closing the filter. Set the grid assembly back into the filter ensuring that the manifold slips over the o-ring on the stand pipe. Place the top of the filter back over the grids on the filter o-ring. Wrap the clamp around the two halves of the filter and start to hand tighten the brass nut. I have found the best way to tighten this clamp and not risk breaking the nut is to alternate tightening the nut and gently tapping around the clamp with a rubber mallet (or use a regular hammer and a block of wood). If you alternate 4-5 times, it actually takes very little force on the nut to get it tightened to spec; whereas if you do not tap the clamp into place and just try to force it on only using the nut, you are very likely to break or strip the brass nut.


Step 11: Recharging the filter. Put the required amount of DE or cellulose fiber into a bucket and then fill it with water. This was my first time using the fiber and based on things I had read, I did not use the entire amount listed on the package. The bag said to use 15 cups for my 60 sqft filter, I chose to try 12 cups which is roughly half the 3 pound bag.

I stick my hand in the bucket to break up any clumps and mix it into a slurry. Remove the skimmer lid, the skimmer basket (note my rock that is BIGGER than the hole in the bottom of the skimmer to keep the basket from floating), and the float diverter (space ship looking thing). Go back to the equipment pad, make sure the air release valve is still open on the filter, turn on the pump on high speed and wait for the air to be purged from the filter. When water sprays out, close the air release valve and turn the pump back off.

I remix the bucket of DE into a slurry and rinse my hand in the skimmer. Then turn the pump back on and immediately start to slowly pour the slurry into the skimmer, scooping up pool water as required to get all the DE out of the bucket. After a couple minutes, I usually crack the air release valve back open to make sure all the air is gone and then note the pressure reading on the gauge (note my new 2.5” liquid filled pressure gauge from tftestkits). You will want to write this value down somewhere so that you will know when the pressure rises 20-25% over this clean pressure and it is time for either backwashing or re-cleaning the filter.
Step 12: Bask in your triumph. Grab your favorite tasty beverage
and lounge in the shade or go for a swim knowing that your DE filter is now working at peak performance