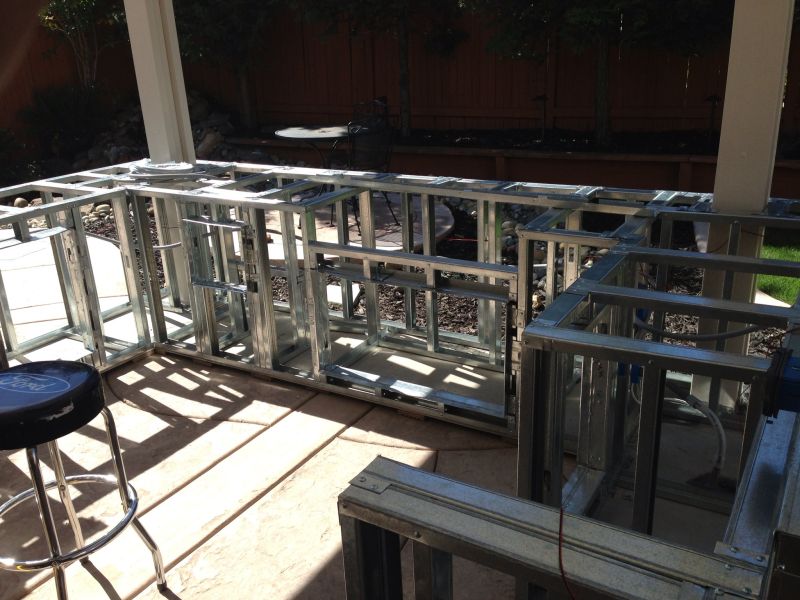
New build. Advice?

Great build! Quick question, you mentioned the issue with furring out the opening around each component to make them flush with your veneer, would you mind sharing how you went about solving that problem?


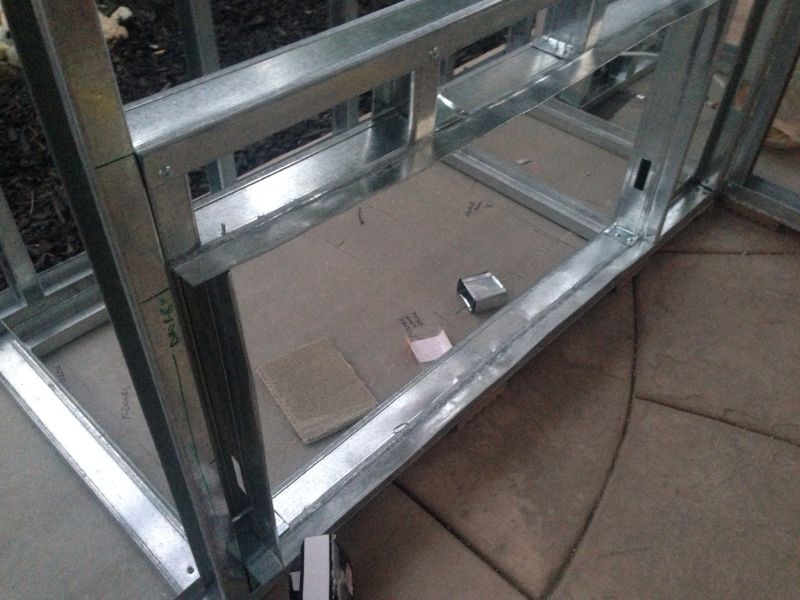
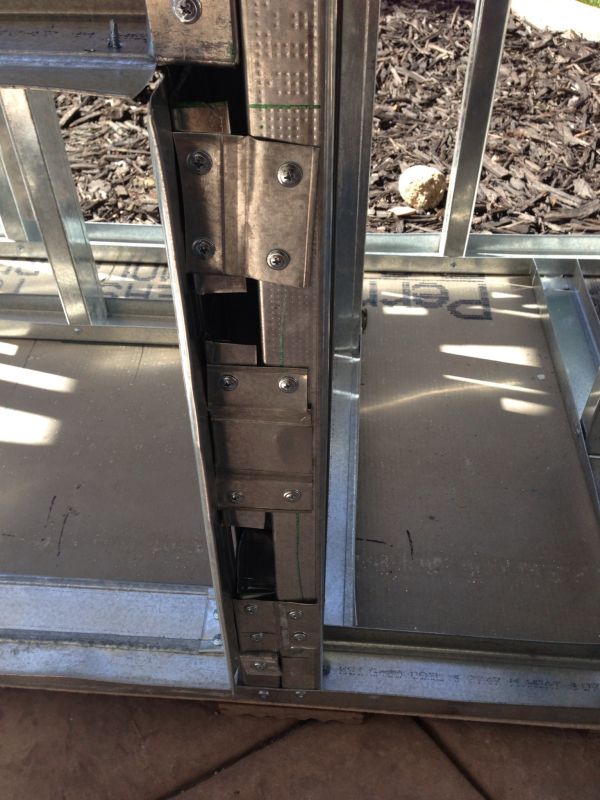
Thanx. I did fur out the openings but the doors didn't sit quite flush with the stone which was what I was shooting for, but close enough. I basically cut the side of the stud that formed the opening, hammered it flat, so that the stud went from a u-shaped stud to a l-shaped stud. I did the same for the header and footer. I hope this makes sense. I will attach a few pics

This is a close up. Notice that I added a stud whenever I modify a stud to fur out the opening. I braced the modified stud to added stud.
6a1d1ae80952540639c6ee6c584dac4d.jpg


A few more pics
This is the double door opening in the framing process
24d8cd16f2c6ae3f71076a86433854eb.jpg


Here is a far away shot of every opening furred out.

0eb875f525b5e90c8a2dd95e40367b8a.jpg


Sorry, I wish I had more pics. Hope this helps

- - - Updated - - -

Nice looking set-up! I'm interested in the stone work, what did you use?

I used Coronado dry stacked stone. A lowes store near me was overstocked and they were selling the stuff for $3 a sq ft. Couldn't pass it up.
 
Looks great!!

Can you please tell me where you got the holders for the wine bottles? What did you put in them and how do they work? Thanks!


My wife found the set up online. I went to lowes to get everything I needed, but a few of the parts a had to spray paint with copper paint since lowes only sold the parts in a galvanized finish. Home Depot had none of the parts. I'm sure a plumbing supply company would have everything too. Here is the link with instructions :http://www.designsponge.com/2009/08/diy-project-eriks-recycled-wine-bottle-torch.html
 
I'm using your build as a model for mine and I was laying my Trex board like yours and about to lay the hardibacker board to cover the bottom of the island, then realized I could just cover the entire bottom with Trex with only 6 more pieces and there would be no need to cover bottom with cement board. The Trex has gaps in the studs that allow water to go under. Any reason u didn't do that or why is shouldn't. Thanks
 
I'm using your build as a model for mine and I was laying my Trex board like yours and about to lay the hardibacker board to cover the bottom of the island, then realized I could just cover the entire bottom with Trex with only 6 more pieces and there would be no need to cover bottom with cement board. The Trex has gaps in the studs that allow water to go under. Any reason u didn't do that or why is shouldn't. Thanks


That sounds like a good idea. I never thought about doing it that way. I just figured with the cement bard on the bottom, it would create a barrier to keep out bugs. But it sounds like your way will work just fine


David.
 
I'm about 1/2 way done with the framing for mine. Looking for lighting ideas now. What did you use?

I was thinking of doing stucco on the side but will have to see if I can find a deal like you got on the stone.
I am also planning on doing a concrete counter top. I agree - you can make it custom and with DIY you can save a couple thousand on it. My kids and I have collected a few cool stones to add to the custom counter.

My wife and I love our countertop, and I get a lot of compliments on it. And no two are alike. I am sure the stones you choose will highlight that.


The lights and where i got them:
I used these led light strips Amazon
http://www.amazon.com/White-Strip-l...id=1407457295&sr=8-1&keywords=led+light+strip

Since the strip was 16' long I used 8' under the counter on one side if my bbq, and 3' on the other side. I used the remaining lights to add accent and clearance lights. You will need to solder them if you plan on using lights in more than two places, and then heat shrink the connections. Super easy but takes a little time.


This is the transformer i have powering the lights:http://www.amazon.com/Ledwholesaler..._sim_hg_4?ie=UTF8&refRID=1B66ZFZ7BCPJAMEYY8XG
You will need low voltage wire:http://www.amazon.com/20awg-Extensi..._sim_hg_6?ie=UTF8&refRID=1G5W7JXPZC3069RKV0RR


I put an in-line controller for the lights as well, also purchased from Amazon: it turns the lights on and off and also dims them.
http://www.amazon.com/Controller-Dimmer-Wireless-Control-R106/dp/B00AHU2U7O/ref=pd_bxgy_hi_img_z

I found this route to be cost effective, but I have probably a few days of labor into soldering and waterproofing the connections


Any other questions just ask! Good luck!
David
 
just to verify the led light connection order lights-->transformer-->dimmer switch.

Yes. I am assuming that you already have low voltage wire. The dimmer switch is optional. You could just plug in the transformer to an outlet and the lights would come on. Then unplug it to turn them off. But the in line controller dimmer switch makes all that unnecessary. If you plan on using the lights in multiple places on your island, I would invest in a soldering iron if you don't already have one. You can you tube how to solder and waterproof led light connections and there are tons of tutorials there.

David
 

Enjoying this content?

Support TFP with a donation.

Give Support
I think it's transformer to dimmer to light.

How did you hide the wire under the counter?
They stick and stay on well?

I was going to order led lights that are $20each so this would save me about $200. I just want to make sure it's reliable and mounting is secure.

Yes. I am assuming that you already have low voltage wire. The dimmer switch is optional. You could just plug in the transformer to an outlet and the lights would come on. Then unplug it to turn them off. But the in line controller dimmer switch makes all that unnecessary. If you plan on using the lights in multiple places on your island, I would invest in a soldering iron if you don't already have one. You can you tube how to solder and waterproof led light connections and there are tons of tutorials there.

David
 
Hi David, How is your barbecue island holding up? I cam upon your posting while I was researching possibly doing a DIY concrete countertop. I'm impressed with your work. So how is it holding up? BTW, I also live in Sacramento (North Highland/Antelope area), and my name is Dave. Hope you get this reply and can find time to reply back.

Cheers,
Dave
 
Thread Status
Hello , This thread has been inactive for over 60 days. New postings here are unlikely to be seen or responded to by other members. For better visibility, consider Starting A New Thread.