Pool renovation- Melbourne, Australia

Kwikee

0
Feb 13, 2013
102
Melbourne, Australia
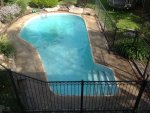
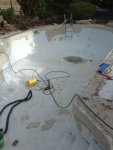
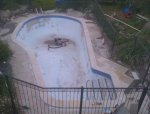
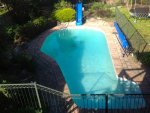
Here in Melbourne we are in the better end of Winter, Spring around the corner so it's time to get this pool sorted. We moved into this house at the end of last year (2012) and the pool appears to have been pretty unloved for the last 20 years! It's a marble sheen surfaced concrete pool, about 42000L, 9.5m x 4.5m (2.5m at the narrow end) and just over 5' at the deepest point.
[attachment=2:2uu6gh9q]IMG_0674.jpg[/attachment:2uu6gh9q]
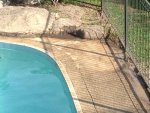
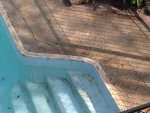
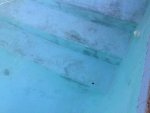
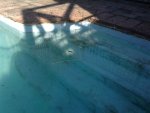
The surface is pretty badly worn, looks very patchy and has areas where the concrete is showing through.
[attachment=0:2uu6gh9q]IMG_0677.jpg[/attachment:2uu6gh9q]
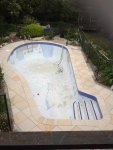
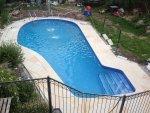
The plan is to empty the pool, prep and coat the surface with a pool specific epoxy, from here http://www.poolpaint.com.au, it's Epotec epoxy and will be the Pacific colour. From looking at their pics, it looks great and I like the idea of the smooth surface and the DIY ease. The waterline tiles will be replaced with a glass mosaic in some sort of blue, and the surrounding coping/paving replaced with sandstone, most likely.
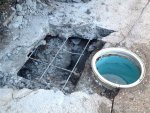
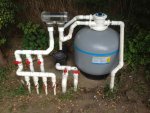
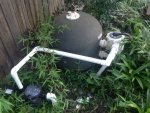
There will also be a summerhouse/store/pumphouse built at the top left of the first pic, and all the pump/filter/SWG moved there. The current setup is very simple:
[attachment=1:2uu6gh9q]IMG_0675.jpg[/attachment:2uu6gh9q]
We'll probably re-use these as they are still going fine, the SWG will be new, along with a solar set-up. I had looked into heat pumps but to get a decent sized one is quite expensive to a) buy and b) run, and electricity isn't getting any cheaper!
So stay tuned and we'll see how it goes! A fair amount will be made up as we go, and I will be doing most of the work myself. I'm looking forward to it, even though it will be a sizeable job.
 

Attachments

  • IMG_0674.jpg
    IMG_0674.jpg
    67.6 KB · Views: 529
  • IMG_0675.jpg
    IMG_0675.jpg
    82.7 KB · Views: 526
  • IMG_0677.jpg
    IMG_0677.jpg
    32.6 KB · Views: 527
You can see around the edges, the coping (not true coping, just pavers which are quite abrasive when you climb out of the pool) has been laid on a sand/cement base on top of tile coping. It might have looked good years ago but not these days!
[attachment=0:a9j8fje4]IMG_0678.jpg[/attachment:a9j8fje4]
There's pebblecrete concrete under it all around the pool, so at least it's a solid base. They had no expansion allowances anywhere, so not surprisingly the paving has moved and cracked up over the years. I'll have to remove areas of the pebblecrete to re-plumb, I'll just replace it with normal concrete.
 

Attachments

  • IMG_0678.jpg
    IMG_0678.jpg
    41.8 KB · Views: 523
Regardless of brand, pool paint is not particularly durable. From many, many reports here on the forum, 2-3 years seems to be the point where it starts not looking so good.

If re-plaster is out of the budget, so be it, but it is FAR superior approach to a remodel.
 
Is that all coatings, or pool paint per se? I know the rubberised coatings don't last long, but this stuff is a thick gel two part epoxy, not a paint. I know epoxy coatings are used for a wide range of chemical resistant purposes, including tank linings, so surely a pool would be fine? The manufacturer estimates 10-12 years before re coating required. You don't think so? My biggest concern is fading, since it will be a dark blue, however I believe the product is UV stabilised so shouldn't be too bad. I'm new to all of this so if anyone knows otherwise, please say!
 
Time for an update. I have been busy designing a pool house and finding a draftsman for this, demolition of an existing building on the block and a proposed extension to the house. Since the weather is on the up, it's time to get cracking on the pool. So moving forward, I have removed the old concrete pavers from the pool surrounds to expose the original paving and ceramic coping tiles.
[attachment=2:1mwfgmyw]IMG_0688.jpg[/attachment:1mwfgmyw]
Needless to say, I can see why they paved over it! It has been poured over the pool wall without any expansion/cracking joint and has cracked exactly where you would expect. It appears solid and the paving was all pretty level so I think it should be a good base to pave onto. I will probably saw cut the cracks to be straighter, put some concrete back in the bad bits and tool a joint there. Then I will place control joints in the new sandstone that will go over it. It appears there has been a pipe repair in the return pipe at some stage and the concrete repair is quite different to the old paving.
[attachment=1:1mwfgmyw]IMG_0690.jpg[/attachment:1mwfgmyw]
Next step will be to remove the old coper tiles and waterline tiles and drain the pool, I suppose. We've pretty much settled on a nice sandstone bullnose coper and paver, a dark blue glass waterline tile and most probably the epoxy coating for the pool itself. They offer a 5yr warranty when their installers do it, so they have a fair amount of faith in the integrity of the product itself. I'm getting quotes on alternatives, but I think this will be hard to beat.
The old copers and waterline:
[attachment=0:1mwfgmyw]IMG_0689.jpg[/attachment:1mwfgmyw]
Lots of work ahead, but at least it's a start!
 

Attachments

  • IMG_0688.jpg
    IMG_0688.jpg
    468.7 KB · Views: 398
  • IMG_0690.jpg
    IMG_0690.jpg
    253.2 KB · Views: 397
  • IMG_0689.jpg
    IMG_0689.jpg
    261.8 KB · Views: 398
Ok, started to jack hammer out the concrete behind the skimmer box (as good a place to start as any!) and to my surprise found a void about a cubic foot in size behind the skimmer, exposing a pipe bend. Turns out this bend is the cause of my return water air bubbles. The 90* bend has a leak to the top end of the join, as arrowed.
[attachment=0:39g7dmq9]3.9.13 skimmer void.jpg[/attachment:39g7dmq9]
[attachment=1:39g7dmq9]3.9.13 skimmer pipe.jpg[/attachment:39g7dmq9]
My next question is where does the pipe go? The flow comes from the left of the pic, and exits to the top, but I can't figure why the pipe would go so far left when the skimmer is just there. I have dug back to the edge where you can see, and there is no other join there, so it obviously goes further. I will try again when I have light again, but I thought I would find it right there. Is it usual to have a wide run to the skimmer? I am close to the depth of the bottom of the basket but can't see where the pipe actually connects to it yet. I'll post more tomorrow.
 

Attachments

  • 3.9.13 skimmer pipe.jpg
    3.9.13 skimmer pipe.jpg
    510.2 KB · Views: 363
  • 3.9.13 skimmer void.jpg
    3.9.13 skimmer void.jpg
    329.3 KB · Views: 361
I've dug further and found the bend but I have no idea why this would be plumbed like this? It heads straight out from the skimmer away from the pool, 90* up, 90* straight back at the pool, then 90* parallel with the pool wall and around to the pump.
[attachment=0:2g9mboyf]4.9.13 skimmer pipe.jpg[/attachment:2g9mboyf]
I was just going to re-plumb it by cutting off the old pipe out about 6 inches or so, then 90* back parallel with the wall and back to the pump. Would there be a problem with that?
 

Attachments

  • 4.9.13 skimmer pipe.jpg
    4.9.13 skimmer pipe.jpg
    278.8 KB · Views: 348
Ok, bit of an update. In the past few weeks I have found all the existing pump lines, broken concrete and dug holes ready for the new trenches, dug trenches (through what appears to be all the original house construction waste!), emptied the water out of the pool, laid a slab for the filter and pump, moved the filter (which is just outrageously heavy, even with no water in it, just the sand) and pump to the new slab, laid pipe to the return jets, the waste (going to the old waste line since it works and to fit a new one would take a massive hole to get to the stormwater line), and almost to the skimmer.
Here's a pic of the pump and filter with new plumbing:
[attachment=0:2hc27mb7]New pump station.jpg[/attachment:2hc27mb7]
Just needs the SWG cell (when it all arrives) and power and we're good to go.
I'm pretty happy with where it's at so far. I've got a hole corer coming during the week hopefully to core a hole for the second return, and also two suction and one return line for the solar which will be a separate system to the filtration system. Once they are done, and the pipes fitted, time to pressure wash, acid wash and redo the lining.
On this, I was going to use epoxy, despite all that is said about it, I still think the right type could be fine. In saying that, I came across exactly the type of product I was originally looking for in a DIY product, called Sider-Crete. It's a roll-on, trowel out self-applied acrylic/cement based plaster. For all intents it looks like the ideal product. I am going to see the importer in a few days to make up my mind, but if we go with this product, it is about $200 cheaper than epoxy, and under $2000. They say 7-10 yrs is about the usual lifespan, for $2k I'd be happy with that!
I'll update as more progress happens!
 

Attachments

  • New pump station.jpg
    New pump station.jpg
    118.9 KB · Views: 298

Enjoying this content?

Support TFP with a donation.

Give Support
Thanks, but this is only the beginnning and there's plenty more to come!

An interesting thing I fond but forgot to post, is that I've had trouble with air bubbles from the return jets that I couldn't fix, and turned out I had a leaking bend in the skimmer plumbing. Well further to that, the pipe that came from the skimmer (see the pics above with the elongated piping that returns back on itself) I cut off about 8" out from the socket and when I went to give it a sand prior to priming for glue, it felt like it was a bit loose. A bit more wiggling and feeling and it popped out of the skimmer! So not only was there a leaking joint in the plumbing, the pipe wasn't glued in properly either and was probably also leaking!
Anyway, needless to say there will be a new pipe in there soon, primed and glued properly with pressure pipe glue, not the standard blue stuff like the rest of it was.
It's been fun so far, hard work but gratifying. Can't wait to get the waterline tile samples and see this surface coating. Then we're really getting somewhere!
 
The water removed, the true state of the pool plaster was revealed. Famous last words- "the existing plaster looks ok". Well as it turns out, not so good. The old plaster has a very blotchy appearance, and the original blue has long since faded to a patchy white.
[attachment=2:3bm20dau]plaster_untouched.jpg[/attachment:3bm20dau]
[attachment=1:3bm20dau]plaster_untouched close.jpg[/attachment:3bm20dau]
You can see the patchiness, the darker areas seem to be more solid than the whiter areas, and overall the blotchy pattern almost follows the contours of the surface itself, which is not great. There are humps on the surface of up to 10mm.
The patchy areas will also crumble a bit and lose some of the aggregate (quartz) if rubbed:
[attachment=0:3bm20dau]plaster_untouched brushed.jpg[/attachment:3bm20dau]
 

Attachments

  • plaster_untouched.jpg
    plaster_untouched.jpg
    228.5 KB · Views: 240
  • plaster_untouched close.jpg
    plaster_untouched close.jpg
    311.5 KB · Views: 239
  • plaster_untouched brushed.jpg
    plaster_untouched brushed.jpg
    355 KB · Views: 240
This crumbly area, when pressure cleaned, reveals quite a bit of decay, to the extent that it is visibly deep, and certainly feels very uneven to touch.
[attachment=1:1aqjq9rn]plaster_pressure cleaned.jpg[/attachment:1aqjq9rn]
The depth varies, but some go right through to the underlying concrete shell and as such the repair requires all the unsound material to be removed. The easiest and fastest way to do this is with a grinder and abrasive disc, I am using either a diamond segmented cup disc or a carbide impregnated buffing disc. The cup grinder is great for flattening the surface but the other side of this is that it is not much good on curves. The carbide disc is great in the curves, is not a lot slower on the heavy stuff, and is better for removing the coarse grinder marks. When ground out, the decayed area looks like this:
[attachment=0:1aqjq9rn]plaster_ground out.jpg[/attachment:1aqjq9rn]
You can see here that the sound plaster is actually very blue and of uniform colour. The roughness of the grinding will be a perfect key for the patching compound, and later for the plaster itself. It will be a big job, but I plan to prep the whole pool surface like this to give it the best chance of success.
 

Attachments

  • plaster_pressure cleaned.jpg
    plaster_pressure cleaned.jpg
    361.2 KB · Views: 237
  • plaster_ground out.jpg
    plaster_ground out.jpg
    296.8 KB · Views: 237
ok, it's been a while but I'm still here! Time for some updates, I'll backtrack a bit first then bring the thread up to date.
From the pics above, I had to grind the whole pool surface and patch these bad areas, finding new patches along the way. I also removed the light blue waterline tiles and patched that surface to prepare for the new waterline tiles.
[attachment=2:18lntl7m]surface prep.jpg[/attachment:18lntl7m]
You can see the new tiles on the right hand side.
The we jump to the waterline tiles already done and grouted, and the copers cut and fitted. This wasn't actually as hard to do as I thought and turned out very well. This pic also shows the first of the pavers being fitted also. (sorry for the poor picture quality!)
[attachment=1:18lntl7m]waterline done.jpg[/attachment:18lntl7m]
The next shot shows the paving pretty much up to where it is now, the tiles done and ready for the application of the Sider Crete. You can see on the right side there are now three extra points, 2 x suctions and 1 return for the solar which will be fitted in the next week or two. The LED light is also fitted in the back wall. At this stage I was also experimenting with a grout colour for the sandstone which ended up too white.
[attachment=0:18lntl7m]ready for plaster.jpg[/attachment:18lntl7m]
Now waiting for the right weather and conditions to plaster.
 

Attachments

  • surface prep.jpg
    surface prep.jpg
    210.1 KB · Views: 160
  • waterline done.jpg
    waterline done.jpg
    47.5 KB · Views: 160
  • ready for plaster.jpg
    ready for plaster.jpg
    318 KB · Views: 161
The Sider Crete was done with mixed results. I am still in two minds about this product, and am not sure I would chose it again. The finished product looks good, but was not without issue. I will discuss this elsewhere. You can also see here I have removed 2 of the very large pieces of granite that were at the ladder end. These were about a metre and a half across (5') each way, and about 600mm (2') thick! No easy job to remove given I have limited access to the backyard and couldn't get any machine in to help. So jack hammer, drill and splitting wedges, along with a bicep/ab workout and they are gone! The deckjets are also a great addition, my kids were blown away since they didn't really understand what the deckjets did.
[attachment=0:rrxhpzub]Full!.jpg[/attachment:rrxhpzub]
This pic was taken this afternoon, and as you can see, a lot has been done with a lot to go! I have fencing to go along the back (it's sitting there in that pic), glass fencing to go along the side and front and the rest of the sandstone to lay.
Then the rest of the yard to landscape, a deck and pool house in the back left corner, and so on, and so on....
It's certainly been a learning experience, given I have done 99% of the work myself, with a bit of help here and there from my nephews. I'll post again when the fence is done.
 

Attachments

  • Full!.jpg
    Full!.jpg
    443.8 KB · Views: 160
One of the many issues I came across during this was my filter. I relocated all the pumping gear from the side boundary fence to the rear, to avoid any noise as well as opening up the area where it was for extra yard space/access. Looking back, I should have emptied it of sand before moving it (yeah, seems logical now...)but I didn't and obviously damaged it along the way unknowingly. I then replumbed it all to suit the old filter and found that when I restarted the other day, it ran for a bit then blasted high pressure sandy water out from underneath!
Either it was damaged, or simply the sand had compacted and didn't let the water flow through, although there was flow through the returns briefly. So just as I'm needing to get my water circulating, I have to now race around and find a suitable filter in stock, fit it and get it going.
Turns out it the new one works much better than the old one did, but it was an expense I din't need!
[attachment=0:ubv2gz2y]New filter.jpg[/attachment:ubv2gz2y]
 

Attachments

  • New filter.jpg
    New filter.jpg
    405.2 KB · Views: 130

Enjoying this content?

Support TFP with a donation.

Give Support
Thread Status
Hello , This thread has been inactive for over 60 days. New postings here are unlikely to be seen or responded to by other members. For better visibility, consider Starting A New Thread.