Hayward Skimmer on Intex

unkyjoe

0
LifeTime Supporter
Jun 24, 2013
208
Seguin TX
Greetings,

Just wanted to show off my install of the Hayward Skimmer on our Intex pool.

Here we go.

[attachment=2:3azh0xzk]skim-1.jpg[/attachment:3azh0xzk]

With the cover off showing the weir lowering to let water in.

[attachment=1:3azh0xzk]skim-2.jpg[/attachment:3azh0xzk]

And from across the pool.

[attachment=0:3azh0xzk]skim-3.jpg[/attachment:3azh0xzk]

I used the existing Intex hoses, if you slip back the grey ring you will find that the fitting slips onto a standard 1 1/2 smooth fitting, IT WILL NO WORK WITH A BARBED CONNECTION!!! Then put on a 2 inch hose clamp and you are golden.
 

Attachments

  • skim-1.jpg
    skim-1.jpg
    40.5 KB · Views: 603
  • skim-2.jpg
    skim-2.jpg
    36.6 KB · Views: 591
  • skim-3.jpg
    skim-3.jpg
    112.3 KB · Views: 589
There are some issues, for example the existing valve that is on the filter has been out in the sun for a few years and is simply worn out. In this picture you can see the drip drip dripping of water from around the valve, so I ordered a 1 1/2 inch smooth stub from Amazon that is actually made to go onto the bottom of the Hayward Skimmer, I will replace the shut off valve with this connector and hopefully the leak will stop.

[attachment=1:127pv5of]filter-con-1.jpg[/attachment:127pv5of]

Now here is the other problem, on the connector from the pump to the filter, I have double wrapped teflon tape on this connector as per the manufacturers specs and it leaked like crazy, so I removed it and wrapped it about 5 times and put it back in, however it still weeps a little around the threads of the connector, mind you... this is a very small leak, but can someone tell me what I am doing wrong here to get the leak to stop?
[attachment=0:127pv5of]pump-con-1.jpg[/attachment:127pv5of]

Thanks in advance
 

Attachments

  • filter-con-1.jpg
    filter-con-1.jpg
    94.8 KB · Views: 580
  • pump-con-1.jpg
    pump-con-1.jpg
    119.5 KB · Views: 577
Hi, we just added our Hayward 1hp pump yesterday and we also have a small leak after taking it off and rewinding. My husband justs wants to leave it alone but I am not so sure about that. Sorry I can't help answer, but I do have a question about your skimmer. I have the same one on order and want to install it on my vinyl Intex pool but wondered if I need to reinforce the liner any. My husband thinks that it is not a good idea to cut into the liner. Also did you just block the old outlet to the pump with a plug? Thanks for any help.
 
I would be more than happy to help.

No I did not re-enforce the sidewall of the pool. Nor has anyone else here who installed this skimmer that I am aware of.

I am going to outline EXACTLY how I installed the skimmer and if you follow these instructions you should be good.

1: Drain the water below where the bottom of the skimmer will be.
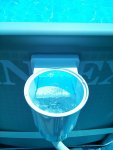
2: Place the faceplate for the skimmer inside the pool and position it where you want. I put mine just below the grey seam.
[attachment=2:2yfvcl4t]skim1.jpg[/attachment:2yfvcl4t]

3: Hold the faceplate and with a marker make marks for all the holes in the faceplate.
4: Poke two holes in the liner with an awl or screwdriver a little bit smaller than the holes on the faceplate. I used the two top outer holes to start with.
5: while holding the skimmer on the outside of the liner, install the top two screws through the faceplate and into the body of the skimmer, I tightened them enough to hold the body of the skimmer.
6: Now continue poking the rest of the screwholes through the faceplate and the liner and one by one install all 10 screws and snug them down.. Dont overtighten them!!!!!
7: Once all the screws are in, and tight enough to hold the skimmer body and faceplate together, take a small exacto knife and trim out the liner by following the faceplate ring.
8: Now dis-assemble the faceplate from the skimmer again, remove all the screws carefully while supporting the skimmer box.

Keep in mind these screws are hard to screw in and out, this is normal.

9: Once you have the skimmer and the faceplate out of the pool, take the butterfly gasket "BUT DO NOT CUT IT" separate the gasket by gently pulling it apart, you will see that the middle section is joined together. Place the gasket in the newly cut opening, one side of the gasket goes on the inside of the liner, and the other on the outside of the liner.

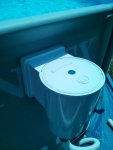
10: Once you have the gasket in place, replace the faceplate, and the skimmer body together and start the two top screws, screw them in until they pull the faceplate and skimmer body together but leave them a little loose.

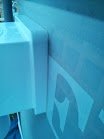
11: Install all the other screws and get them close but DO NOT TIGHTEN them all of the way. Once all the screws are installed you can then snug them up, DO NOT OVERTIGHTEN the screws, go in a cross pattern on your final tightening of the screws until the skimmer and faceplate are snug together. Remember you can always come back and snug them up a little more if they seem loose to you BUT DO NOT OVERTIGHTEN them or you will have a leak.
[attachment=0:2yfvcl4t]skim3.jpg[/attachment:2yfvcl4t]


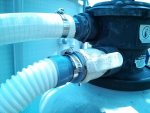
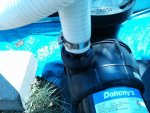
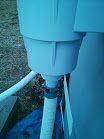
12: Install the stub on the bottom of the skimmer after wrapping the threads a couple of times with teflon tape, place your hose on this stub and tighten down the hose clamp.
[attachment=1:2yfvcl4t]skim2.jpg[/attachment:2yfvcl4t]

13: Fill the pool back up with water, checking for leaks around the gasket as the water makes its way back up the side of the pool. Chances are you will have no leaks, I keep my water level about halfway up the front of the skimmer. If you notice a leak, gently snug up the screws near the leak but do not overtighten!!!!

The BIG warning, dont be scared of this install or cutting the liner, take your time, make sure you follow these instructions to the letter, and DO NOT OVERTIGHTEN the screws and you should be fine, REMEMBER you are trying to bring the faceplate and skimmer body together WITHOUT squeezing the HECK out of that gasket. Keep in mind also that those screws are hard to turn and this is normal, use a HAND screwdriver and not a screwgun or drill.

As for the other outlet, I just left the Intex valve in place and closed it off. I will make a return out of it next season.

Hope this was helpful.
 

Attachments

  • skim1.jpg
    skim1.jpg
    4.4 KB · Views: 525
  • skim2.jpg
    skim2.jpg
    4.5 KB · Views: 522
  • skim3.jpg
    skim3.jpg
    3.1 KB · Views: 519
Wow thanks so much for all the info. I think I will be doing this myself as my husband thinks I should just leave it as it is. I had already intended to drain down the water level even though some people had done the install without doing that. Did you find that the weight of the water pulled the liner down after you cut it and before you installed the gasket? Also where did you find was the best place to put the skimmer? I still have the small return to the pool and intend to replace it with the larger one. I am hoping that the 1 hp pump won't be too strong and pull the water out of the skimmer like some have said. I am going to wait until it is time to close the pool down before I attempt this. Thanks again.
 
You should be fine, I think most people are speaking about draining the pool completely.

I just drained it below where the skimmer would go as I did not want water spilling out at my feet :lol:

If you look at my pictures you can see where I placed the skimmer, basically between the pool return on the left, and the intake on the right hand side, right at the Intex logo.

My only fear will be when I drain the pool the fall and take it down to re-level. I don't know whether I will remove the skimmer at that time or leave it connected and just be careful when moving the pool.

I did not replace the return and here is why. If you look at the Intex return and compare it to the one that comes with the skimmer you will find the Intex return is much larger, so I opted to keep it. You can also keep your Intex hoses as I did, if you slip back the nut on the hoses you will find that the gray end of the Intex hose will slip over the end of the skimmer outlet snuggly and you can use a hose clamp to secure it. Same way with the return hose, it will slip over the end of the filter return and you can secure it with a hose clamp.

I am not going to hard plump either, because of the movement of the pool when people are in it, I like the flexible hoses better so they can move.

P.S I was told in the Pumping Station forum to go with a 3/4hp pump for that sized pool, I have not had an issue with the skimmer starving for water, however make sure you keep your water level at least up to the middle of the face of the skimmer to assure it does not starve for water. I think you will be fine with the 1hp pump.
 
The reason I was going to replace the return to the pool is that I have the small return that came with the pool for 1 1/4 hoses and had to use an adapter to use my 1 1/2 hoses that were on the salt water system I had been using,( which by the way I loved until it stopped working like all of the Intex systems seem to do). So I had to buy a new pump and filter and after reading all the reviews decided to get this one. I am going to use Chlorine tabs at least until I close it this year. I never had one iota of trouble keeping my pool levels right and had a sparkling pool using the salt system. I use to have a 24ft. round years ago and used chlorine tabs then and I thought it was more work then. Anyway it is what it is. I don't want to have to buy a new salt system every year. Thanks for all the tips.
 
Bama,

I would just use bleach for that size pool, I add about 4 cups per day and have a sparkling clear pool, I opted not to do SWG as I heard the horror stories on the board.

Keep in mind the tabs will up your CYA VERY quickly... Bleach is cheap and easy and frankly is the ONLY thing I have had to my pool all year. Your mileage may vary.

And yes if you have the smaller Intex return eyeball then I would replace it with the Hayward one, in my case the Hayward return is SMALLER than the Intex one on my 16ft pool, in fact the hole in the side of the pool was larger than the Hayward eyeball return, that is why I opted to stay with the Intex one. Yours apparently is different.

P.S Read the Pool School and the warnings about using Tabs, it will not take long to Jack up your CYA causing you to use MORE and MORE chlorine to keep the algae at bay. I would stay AWAY from the tabs and use bleach.
 
Yes I too have read the horror stories but I did not have that experience. I believe that some people thought that you just plugged it in and it would take care of everything without checking any levels. WRONG, but anyway that besides the point now. Unfortunately I have already ordered the tabs so guess I am stuck for the time being. The larger return fitting I have is too big for the hole the old one is in so if I decide to use it I will have to cut the hole bigger. I am going to wait and see what see the skimmer return fitting is first. Also I am not sure about the plunger valve fitting on this larger return. The large return and outlet return came with the over the side skimmer basket that Intex sells.
 

Enjoying this content?

Support TFP with a donation.

Give Support
Bamagram - Not sure if you are within the time frame, but the Intex SWG has a 2 year warranty. I bought mine at the start of last season and a few weeks ago I noticed leaking from the cell. The housing was all cracked around it. I placed a warranty claim and they sent me a whole new unit. So if your unit is less than 2 years old definitely place a claim.
 
Actually this was a replacement for one I bought last year that worked all season, then this second one they sent me after I filed a warranty claim worked about a month and then nothing! Wouldn't turn on at all. We checked if it was getting power etc. and it was but still nothing so you can't file a claim after you receive a replacement under warranty. Be aware! Just decided it was way too much and wasn't going to keep buying a new one like some do. Thanks for your reply anyway.
 
Oh just thought I would mention that I had a filter and pump combo not just the SWG by itself. Tried to just run the pump alone but couldn't, We now have it in a shop and going to see if they can rig something up using the two units. Worth a try, if not I still have a great pump and filter to use now.
 
Thread Status
Hello , This thread has been inactive for over 60 days. New postings here are unlikely to be seen or responded to by other members. For better visibility, consider Starting A New Thread.