Thru Wall Skimmer Install. Above Seam & With Intex Hoses

Jul 20, 2009
157
S. California
Hello All!

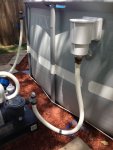
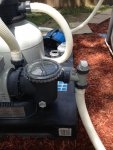
Thanks to your excellent inspiration I installed my Hayward skimmer this morning. It went superb, and I was really pleased with how it all turned out.

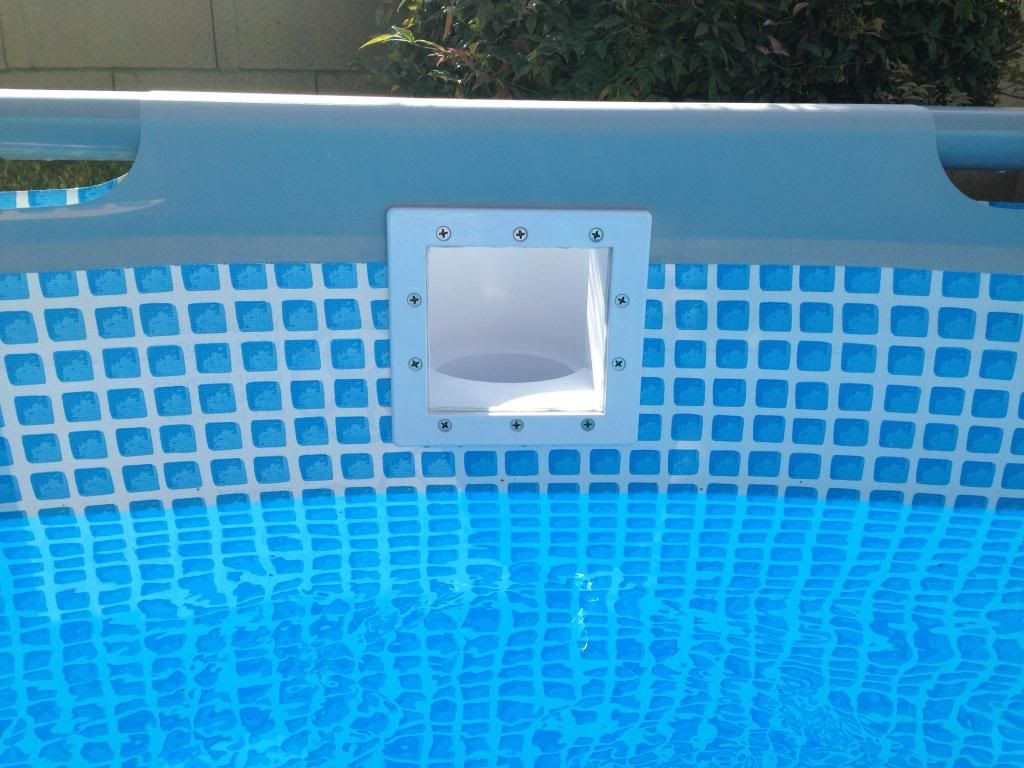
For my install I decided to go higher up the wall to preserve my water depth. I also adapted the skimmer to my stock Intex hoses because I take the pool down every fall.

Here are a few pictures:
image_zps0850c386.jpg


image_zpsd3f49536.jpg


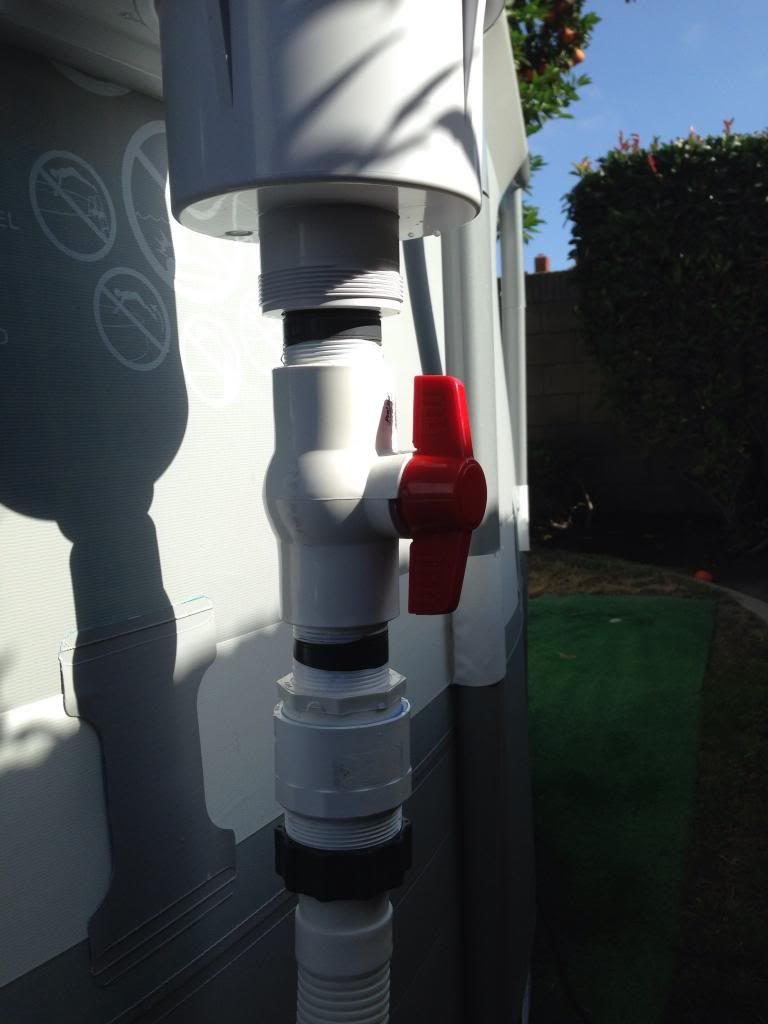
In the process of adapting to the threaded coupler on the Intex hose I discovered that it would attach to a standard 2" PVC male adapter which made the connection a simple screw on deal and will be simple to take it apart and store later. Also, because I forgot to order some extra Intex rubber gaskets for the connection I was forced to find a work-around at Home Depot.

To my delight I found a rubber "Bath Shoe Washer" that is made for the drain outlet of your home bathtub. The inside diameter was perfect, but the outside diameter needed to be trimmed with scissors to fit inside the Intex coupling. I stacked two on top of each other so they would be thick enough.

It worked super well and not even a drop of water has leaked after running the pump all day.

I couldn't be more pleased watching the leaves and bugs getting sucked into the new skimmer :whoot:
 
  • Like
Reactions: TexasCoolPool
Re: Thru Wall Skimmer Install. Above Seam

Looks great!!!

I am considering the same for our 20' Ultra. Is there a reason you went with the standard skimmer, and not a widemouth? I have the same concerns on the lower water level, and have considered above the seam with a widemouth.

I have also considered the Intex skimmer like we had on our 18' easy set, but need the new style frame bracket since ours has the old style pre-Ultra frame pools. I know the downside is it takes away swim area, but we have always kept it right by the ladder (or the ladder right by the skimmer) so didn't notice the loss.

TY & again, looks great!
Chris
 
Hi Chris

I chose the standard skimmer because I was uncertain about if the circumference of my pool would be an issue for a wide mouth. Specifically if the sides would be too rounded to comfortably accommodate it. However, it seems that it's probably not an issue, especially for a 20' Ultra.

I saw how great the Intex wall hung skimmer worked, and it's pretty small. So I really wasn't concerned about the standard version being too small either.

My kids were too crazy with the intex skimmer and essentially destroyed it with their whirlpools and rough play!

Good luck with whatever you decide!

Jim
 
The install looks great and that water looks even better! :mrgreen:
 
-Looks great I did the same thing with my pool on Saturday. Although I rigged my hose to the skimmer and it is trying to leak a little bit. I wish you could tell me all the exact parts you used so that you could screw the hose on. Mine is just shoved on really tight. Kinda makes me worried....

-You really should install the hayward outlet that came with the skimmer. The flow is sooooo much better. I just had to saw the little screw part in half so that the intex valve would screw onto it.
 
  • Like
Reactions: chi-chi
Where did you find an Ultra Frame that has both the little sleeves that hold the legs and the built-in rope around the feet? Everything I've seen makes it seem as though you got either the old through-the-belt legs and the bottom rope or the sleeves (which I have) without the rope. We had to add 1" ratcheting straps to the bottom of ours.

Can't wait to try your 2" PVC trick for the Intex hose coupling.
 
thedarktitan said:
...I wish you could tell me all the exact parts you used so that you could screw the hose on...

OK, here ya go. The list will be in order starting at the 1.5" female threaded outlet on the bottom of the skimmer:

1.5" x 2" PVC SCH80 nipple
1.5" FIP x FIP threaded PVC ball valve
1.5" x 2" PVC SCH80 nipple
2" x 1.5" Slip x FIP SCH40 PVC bushing (get it from a real plumbing supply house or order online)
2" PVC SCH40 male adapter

The key pieces are the last two. Especially the 2" male adapter that has the exact same threads as the Intex hose coupling. However, the male adapter has tapered threads that tend to tighten up before it is all the way seated against the intex rubber washer. That is why I put two washers in there. It worked perfect the first time with not even a drop leaked. I was soooo relieved!
 

Enjoying this content?

Support TFP with a donation.

Give Support
CeeElGee said:
Where did you find an Ultra Frame that has both the little sleeves that hold the legs and the built-in rope around the feet?

I bought it from Sears about a month ago and the manufacture date on some of the items inside was December 2012. My particular kit also came with the new style 1600 sand sand filter and shut-off valves (pictured), but did not include a maintenance kit which I thought was weird :scratch:

My instructions did say the the rope was "optional", so I was pleased to get one.
 
thedarktitan said:
..You really should install the hayward outlet that came with the skimmer. The flow is sooooo much better. I just had to saw the little screw part in half so that the intex valve would screw onto it.


Hmmmmm. Ya got me wondering now. I'll take a look at it. The reason I didn't install the Hayward return was because the Intex eyeball shoots the water half way across the pool (when above the waterline), and my water is visibly circulating (my rubber ducky is making circles!).

Thanks for the tip about how to adapt the Intex valve. I'll check it out.

Jim
 
-Thank you for the detailed list! I put some plumbers putty around where it was leaking yesterday evening before i saw your post. I know I know I'm not happy with it, but if it starts leaking again I will do exactly what you did. I've been looking for someone to post an install of the skimmer with the intex hoses.

-As far as the intex outlet it seems that your content with it so that's all that matters. Although I did put the intex outlet back on after I tried the hayward outlet just to see the difference and the hayward won hands down. I only have the 1600 sand filter.
 
Couple of questions, I see the pool is sitting on turf that is surrounded by border wall blocks ,is that correct? If so did you fill the area inside the border wall with something and then put the turf on top of that?...and are there pavers under the turf?
 
drg said:
Couple of questions, I see the pool is sitting on turf that is surrounded by border wall blocks ,is that correct? If so did you fill the area inside the border wall with something and then put the turf on top of that?...and are there pavers under the turf?

Hi there!

What you are seeing is a concrete landscaping break between our grass and planters. It was there when we moved in and had nothing to do with the pool installation.

I have nothing under the pool except the well compacted earth from having a pool in the same spot for 4 summers. On top of that I set down the Intex provided tarp, and then some artificial grass on top of that which is touching the pool bottom.

I did not use pavers under any of the legs and after about two weeks none of them are sinking. Time will tell though.

Jim
 
Jim,

TY for the reply! I understand the kids & whirlpools, as we have twin boys who will be 10 next week. Probably doesn't help when they have me in there helping as well! :cool:

As for the standard/widemouth skimmer, I thought from the looks of it the wide mouth would allow for the water to be a little deeper. Though it may not be much different to matter.

TY again, and the install looks great!

Chris
 
-here are a few shots of mine that i did this weekend too. I did not use any other parts than the parts that came with the hayward skimmer. Excuse the skimmer hooked to the intex hose. I am not proud of it how the plumbers putty and rubber leak seal turned out.... Also shows how i used my intex valve on the hayward outlet.

-The way i mounted my skimmer was as follows:
1. Lowered the water level just below where the skimmer would be
2. Installed the skimmer without the butterfly gasket.
3. Cut my liner square
4. Took off the skimmer
5. Put on the butterfly gasket
6. Re-installed the skimmer
 

Attachments

  • photo7.JPG
    photo7.JPG
    138.9 KB · Views: 1,098
  • photo6.JPG
    photo6.JPG
    155.3 KB · Views: 993
  • photo5.JPG
    photo5.JPG
    121.9 KB · Views: 985

Enjoying this content?

Support TFP with a donation.

Give Support
Thread Status
Hello , This thread has been inactive for over 60 days. New postings here are unlikely to be seen or responded to by other members. For better visibility, consider Starting A New Thread.