Replacing 3-way suction valve

Titanium

0
LifeTime Supporter
Jun 26, 2007
439
SF Bay Area
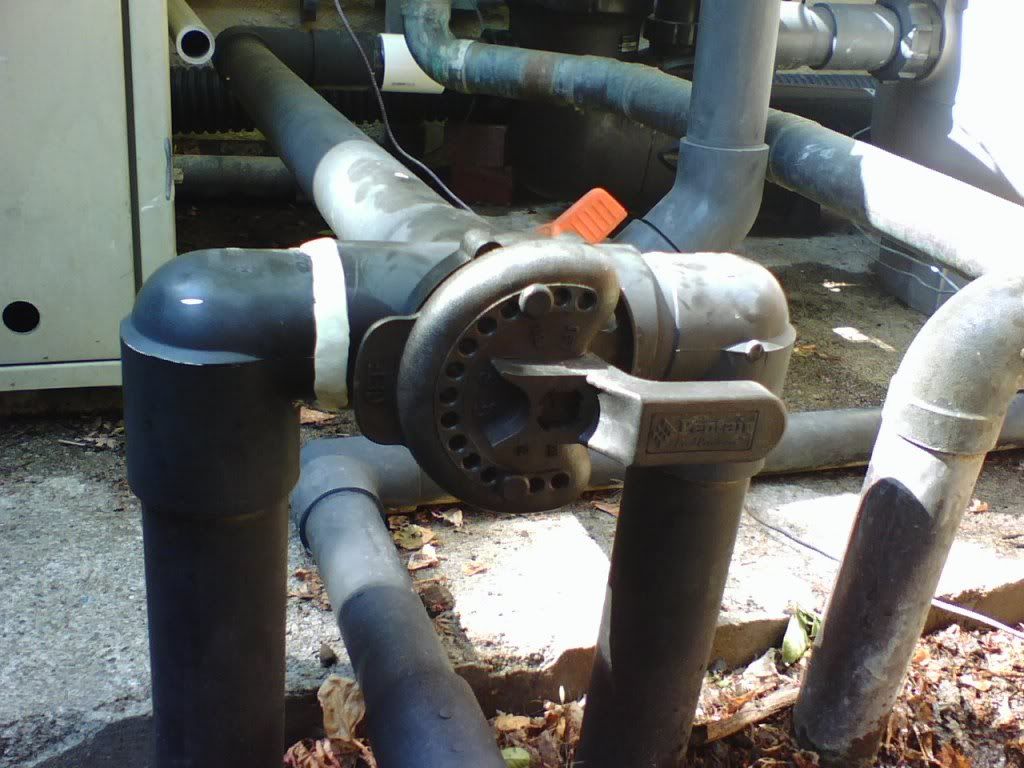
I have been fighting an air leak that is showing up as bubbles in the filter basket. The valve in the picture is a 2-inch Ortega valve, but it looks different because I have attached a adapter kit so I could install a motorized valve actuator. You can see a white section of pipe in the background where I had to slightly modify the piping in order to install the new Hayward Tri-Star pump/motor (came as part of the Ikeric variable speed system).

I knew from last season that I had an air leak on the spa suction side (left vertical pipe in the picture) and I attempted a temporary fix by applying an epoxy resin. As expected, the epoxy resin temporary fix did not really work. This week I replaced the gasket inside the Ortega valve and that dramatically reduced the air bubbles while in pool suction mode. While in spa suction mode, the amount of air bubbles is 10-100 times greater.

My thinking now is that I really can't be sure - even with the new Ortega valve gasket - that I am not getting air from the spa side of the valve leaking on into the pool side of the valve while in pool suction mode. So I guess it is time to bite the bullet and replace my venerable Ortega valve (wish I hadn't just spent $20 on a new gasket - oh well, it is now a spare for the Ortega 3-way return valve).

So what do I replace the 2-inch Ortega 3-way valve with? A Jandy 2.5"/2" 3-way NeverLube valve?

I have roughly 9 inches center-to-center between the two vertical pipes coming from the spa/pool. Good idea to install unions on either side of the new valve? Do I even have enough room for unions?

Thanks for any thoughts or comments.

Titanium


0526081600.jpg
 
Jandy valves are great.

There is no way you have enough space for unions. To replace that valve you will probably need to cut below the 90s and replace them as well. The easiest way to approach it would probably be to do the two verticals at the same time and then use a slip fitting on the horizontal pipe to finish it off.
 
Jason,

Thanks for your reply. You have been one busy dude with the insane amount of posts coming in lately.

Yes, I do agree that the 90's will have to be replaced - that is where the external air leak is happening on the left 90 (spa suction). Would you replace all of the horizontal pipe to the pump inlet? The pump inlet is connected with the union that came with the Hayward pump, so I will probably have to buy the part of the union that is glued into the horizontal pipe.

Does it seem plausible that the Ortega valve gasket - even with a new gasket - could be leaking air from the spa suction pipe through the gasket into the pool suction pipe? I guess for this to happen there would had to have been wear or erosion in the plastic body of the Ortega valve that the new gasket could not compensate for?

Since this plastic body of the Ortega valve appears to be original equipment, it is on the order of 25 years old, so I can't be too upset with the prospect of replacing this valve.

I went ahead last night and ordered a Jandy 4715 NeverLube 3-way valve from eBay for $47.84 delivered. The local Leslies's wanted $80, which would have wound up being nearly $87 with tax. :shock: :shock:
http://cgi.ebay.com/JANDY-NEVERLUBE-3-P ... 18Q2el1247

Thanks again for your help.

Titanium
 
Yes, it is plausible that a 25 year old valve could be leaking even with a new gasket.

If the union is working alright I would not replace the horizontal all the way to the union. Given the union there, the fix is simpler, you can use a regular pipe coupling, instead of a slip coupling. With the union disassembled the horizontal can be done first. Measure at least three times, keep track of the amount of pipe that goes into the fitting and push them all the way in each time remembering that they won't go all the way in until they have glue on them.
 
Jason,

Thanks for your reply.

OK, so the 25 year old valve is a possible suspect for air leaks - even separate from the known external air leak where the elbow is glued into the valve.

you can use a regular pipe coupling instead of a slip coupling

I'm feeling a little dumb here - what is the difference between a "regular pipe coupling" and a "slip coupling". I thought a slip coupling is a coupling that fits on the outside of the pipe?

On a separate note, I had never really looked at at the existing elbows going into the valve very closely. Evidently they are 2 inch, spigot on one end and socket on the other. I bet I won't find these at Home Depot or Lowes !!

Thanks again.

Titanium
 
A slip coupling can slide freely over a piece of pipe. You put it on the pipe, put glue on the section to be connected and then slide the coupling into place. A standard straight coupling requires each piece of pipe to be pushed in from it's respective side and the pipe will only go in so far and then stops.
 
Actually you should be able to find the fittings you mention at Home Depot. They are called street 90's. I just got some there the other day. Not sure they carry them at every store but they do at mine.

Jason's post has me a little confused. Never heard of slip fitting that slides freely over the pipe. Don't know how you'd get glue on the fitting and the pipe. Perhaps I'm not understanding what he is describing. I use a coupling as you described. Called slip X slip as pipe is glued into each end of the coupler. Sold at Home Depot also.

Titanium said:
Jason,

Thanks for your reply.

OK, so the 25 year old valve is a possible suspect for air leaks - even separate from the known external air leak where the elbow is glued into the valve.

you can use a regular pipe coupling instead of a slip coupling

I'm feeling a little dumb here - what is the difference between a "regular pipe coupling" and a "slip coupling". I thought a slip coupling is a coupling that fits on the outside of the pipe?

On a separate note, I had never really looked at at the existing elbows going into the valve very closely. Evidently they are 2 inch, spigot on one end and socket on the other. I bet I won't find these at Home Depot or Lowes !!

Thanks again.

Titanium
 
JasonLion and Denali,

Thanks for your replies.

Actually you should be able to find the fittings you mention at Home Depot. They are called street 90's

Thanks for the heads-up that the fittings I needed are called "street ells". This forum is great - I learn something new all of the time. No joy at finding them at Home Depot, though. I even struck out at the plumbing supply store in the next town. FINALLY found them 15 miles away.

Then I discovered a problem. Even with the street ells, it appears that my center--to-center dimensions of the Jandy valve with the street ells is going to be 9 3/4 inches (and this is with cutting/grinding off 1/8" - 3/16" on each street ell so that the street ell's shoulder will fully seat in the Jandy valve). My existing spa/pool suction lines coming out of the ground are 9 inches center-to-center. Evidently the 2"/2.5" Jandy valve (the 1/5"/2" Jandy has identical dimensions) is larger than the old Ortega valve.

[RANT ON]
A pox on pool builders/plumbers who install the piping with no thought or care of future repair or maintenance.
[RANT OFF]

I see only three options at this point.

1. See if each existing suction pipe can be "coaxed" over 3/8 inch. Moving each pipe 3/8 inch will make up for the 3/4 inch discrepancy.

2. Install a Jandy "space saver" valve. Jandy technical service says this is a good valve, but that it is not of the NeverLube type.

3. Install a "looop" with two additional 90's, probably on the spa suction line since that will be used less often than the pool suction line, such that more room will be created to install the Jandy 3-way NeverLube valve. It will look stupid and will create more head, but it would work.

Thoughts?

Titanium

P.S. I also asked Jandy which glue they recommended to glue their CPVC valve to PVC piping. The particular guy I talked with said to use CPVC glue. When I quizzed him on whether he meant the Oatey all-purpose cement (which lists both CPVC and PVC on the label) or the Oatey orange CPVC glue, he confirmed he was talking about the Oatey orange. JasonLion has previously recommended the Oatey all-purpose cement, which made a ton of sense given what the label says. I was surprised at Jandy's recommendation - I may yet go with the Oatey all-purpose cement in spite of Jandy.
 
You can put two 45s on one of the verticals to move it off to the side to get yourself more room. Of course you are then offset from the horizontal pipe, so you need another two 45s on the other side as well to keep it symmetrical.

Even if you can push the pipes far enough apart to fit the valve, I doubt that you could hold them apart and parallel and glue both joints at the same time without running into problems.

PVC is so easy, anyone can do a bad job. Truly great PVC plumbing is an art form which is sadly under appreciated.
 
Jason,

Thanks for your thoughts on my plumbing mess.

Of course you are then offset from the horizontal pipe, so you need another two 45s on the other side as well to keep it symmetrical.

I'm not sure if I understand what you are saying here. What do you mean that I would be "offset from the horizontal pipe"? Are you saying that the second set of two 45's would be for symmetrical purposes only?

Am I correct in understanding that you would recommend the two (or four) 45's over the option of using the Jandy Space Saver 3-way valve? http://shop.solardirect.com/product_inf ... cts_id=130

Thanks again.

Titanium
 

Enjoying this content?

Support TFP with a donation.

Give Support
I have the same situation as you. Replacing an Ortega valve with the Jandy and the Jandy being to big to fit in the location the Ortega was.

I thought of using the space saver valve but I wanted the Never lube so I'm just adjusting the piping. You can use the space saver but I thought you already had the never lube valve.

I am moving my valve back from where the pipes come out of the ground. In your picture it would be back toward the equipment. The extra foot or so allows me to use 90's to get the width I need. For me, the right pipe is the spa side so I'm going directly right with the first 90 and then another 90 turn toward the equipment. Finally another 90 back toward the new valve location.

It is probably hard to follow without a diagram but I am keeping the pipes on the same plane and not looping up with the plumbing.

Hope this gives you some ideas.
 
You can use the spacesaver, but I figure the neverlube is worth a little extra plumbing. That isn't a total clear cut choice, since you will lose a little flow making the offsets. Really it could go either way.

If you take the regular jandy valve and put it in with one of the verticals where it is now the horizontal outlet will be offset from where the pipe is now. Think of it this way, say you imagine fitting the valve to the existing vertical pipe, it will then push the 90s over. If you shift the valve to let one of the 90s stay where it is, you are putting stress on the horizontal. You might have enough give in what looks like a fairly long horizontal pipe to make up that offset, but it will never fit quite right unless you move both verticals away from the center.
 
Thanks for the comments and thoughts.

you can use the space saver but I thought you already had the never lube valve.
I do have the NeverLube valve, but I figured that if I decided to go with the Space Saver valve that it would not be a disaster to have a spare NeverLube in my pool parts inventory.

It is probably hard to follow without a diagram but I am keeping the pipes on the same plane and not looping up with the plumbing.
Nope, I am following your excellent description quite well. Of course, pictures of your valve replacement are always looked forward to on the forum. [I will leave it up to the psychiatrists to determine why we get so excited over PVC pipe plumbing on this forum :shock: ]

You might have enough give in what looks like a fairly long horizontal pipe to make up that offset, but it will never fit quite right unless you move both verticals away from the center.

It is not apparent from the photo, but my long horizontal run is not run exactly square in the first place. I will have to measure and do some thinking, but it may well turn out that the slight offset you are talking about will turn out no worse looking that what is already existing - and it might even turn out to leave the horizontal pipe more "square" than it is now.

I will post pictures of which way I end up going. Thanks for all of the great ideas.

Titanium
 
Thread Status
Hello , This thread has been inactive for over 60 days. New postings here are unlikely to be seen or responded to by other members. For better visibility, consider Starting A New Thread.