New Pool in Chandler, AZ

I really like your pool shape. I don't often see a combination of geometric and freeform styles. It works very well here. For me the the straight lines give it a feeling of being grounded and very structural, but the freeform part ties in well with the landscaping that will eventually surround it. BTW - Why is it that when you see people that have artist conception drawings done, they never have anyone living next to them!! It's like everyone has a 1,000 acre ranch.
 
bigdav160 said:
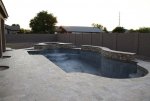
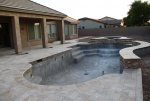
That's a fantastic looking pool. I love the geometric design. I'm glad you resisted the temptation to place a bunch of fake boulders around the pool (a "look" that, IMHO, is overdone)
bmoreswim said:
I really like your pool shape. I don't often see a combination of geometric and freeform styles. It works very well here. For me the the straight lines give it a feeling of being grounded and very structural, but the freeform part ties in well with the landscaping that will eventually surround it.
Thank you! Our house is more of a tuscan style of house both inside and out so we wanted a tuscan/mediteranean style of pool. Our designer listened to what we wanted and said he was going to design a mediteranean oasis and we think he did that for us. We didn't want a natural style or "hawaii" type of pool, so there weren't going to be any boulders, waterfalls, or grottos. A lot of pools in AZ have these and we wanted something different. We wanted a geometric pool but didn't know exactly what the shape would be. One of the things I like about California Pools is that they have a certain "design language" that they use in most of their pools. They use a lot of radius edges to soften it up and that appealed to us. The first time we saw this design we said "wow"!

Some of the other builders/designers had very sharp and straight edges that still looked nice but didn't have the "wow" factor for us. The back wall would be straight with columns at different heights with woks on them. It looked nice, but a lot of Arizona pools have this look, especially if they are geometric. In other words, they looked like every other pool we had seen and weren't very creative or original.

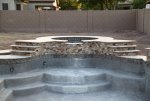
He came up with that original shape and we stayed with it because we loved it. I think the "S" wall softens it up and is a good balance against the straight lines and anchor points of the rest of the pool. He told us no one else had this design (at least from them) as he created it from scratch, but put it in his archive of pool shapes for later use because he liked it so much. We made many changes to the placement of the pool in the yard, decking, and a few things here and there but the orignal shape stayed.

bmoreswim said:
BTW - Why is it that when you see people that have artist conception drawings done, they never have anyone living next to them!! It's like everyone has a 1,000 acre ranch.
Lol, we said the same thing when we saw it. I wish I had that view over my block wall! Although our neighbor directly behind us has about 2 acres, so there isn't really anything over that back wall to look at.

But I will say, one of the other builders showed us a design that had no landscaping or anything around the pool. Literally just the 3D pool in the yard. It looked so flat and dead that even if the design had been amazing it wouldn't wow us like this one did. I had another design that did show houses around us like a typical AZ home would have, but it was also kind of funny because it looked nothing like our view. They can't win either way. :)
 
It's nice to hear "the rest of the story" regarding the pool design. I'd be hard-pressed to say you'll be the last people to use that design.
 
They have started the stacked stone and travertine caps this week. We are trying to get used to the way the stone looks. It has a lot more rust and orange in it then we were expecting based on the small sample we saw. We still think it looks nice and like it, but just not what were expecting it to look like. We are also going to have to wait until the pebble is in to see how the waterline tile looks with everything. It looks kind of off to us with the gray of the gunite. That was the hardest part of the process - trying to choose colors based on small samples.

[attachment=2:39gxoj85]IMG_1850.JPG[/attachment:39gxoj85]
[attachment=1:39gxoj85]IMG_1854.JPG[/attachment:39gxoj85]
[attachment=0:39gxoj85]IMG_1857.JPG[/attachment:39gxoj85]
 

Attachments

  • IMG_1850.JPG
    IMG_1850.JPG
    218.3 KB · Views: 295
  • IMG_1854.JPG
    IMG_1854.JPG
    162.7 KB · Views: 290
  • IMG_1857.JPG
    IMG_1857.JPG
    173.7 KB · Views: 289

Enjoying this content?

Support TFP with a donation.

Give Support
More pics

[attachment=0:2739697a]IMG_1859.JPG[/attachment:2739697a]

The travertine caps aren't secured in place yet, just cut to size and ready for the thin set.
[attachment=1:2739697a]IMG_1856.JPG[/attachment:2739697a]
 

Attachments

  • IMG_1856.JPG
    IMG_1856.JPG
    164.2 KB · Views: 286
  • IMG_1859.JPG
    IMG_1859.JPG
    177.5 KB · Views: 285
The pool is basically ready for the final Pebble Plus finish. We failed our final inspection today because the electricians didn't have a grounding wire on the Clear O3 Ozone system, plus it was mounted right next to my exhaust for my gas fireplace in the house. We have had multiple issues with the electricians as they just seem to do their own thing and come out whenever they feel like it. They are the only subs that I haven't been impressed with.

However, we did pass all of the safety barrier tests so we are good to go there. Should still be able to finish the pool by the end of this week or early next week.

We love the way the travertine tile on the patio turned out. It's slightly different than the pavers for the decking, but it looks really good. Once we put out our furniture and area rugs it will be hard to tell the difference.

From the back corner of the yard looking back towards the house
[attachment=2:1de4wm64]IMG_1925.JPG[/attachment:1de4wm64]

Another from the side
[attachment=1:1de4wm64]IMG_1927.JPG[/attachment:1de4wm64]

From the BBQ grill area
[attachment=0:1de4wm64]IMG_1933.JPG[/attachment:1de4wm64]
 

Attachments

  • IMG_1925.JPG
    IMG_1925.JPG
    177.8 KB · Views: 268
  • IMG_1927.JPG
    IMG_1927.JPG
    201.5 KB · Views: 268
  • IMG_1933.JPG
    IMG_1933.JPG
    160.8 KB · Views: 268
More pics

[attachment=2:1yy1309g]IMG_1928.JPG[/attachment:1yy1309g]
[attachment=1:1yy1309g]IMG_1934.JPG[/attachment:1yy1309g]
[attachment=0:1yy1309g]IMG_1936.JPG[/attachment:1yy1309g]
 

Attachments

  • IMG_1928.JPG
    IMG_1928.JPG
    163.6 KB · Views: 267
  • IMG_1934.JPG
    IMG_1934.JPG
    190 KB · Views: 270
  • IMG_1936.JPG
    IMG_1936.JPG
    208.7 KB · Views: 266
A close up of the spa
[attachment=2:2mdbicqt]IMG_1949.JPG[/attachment:2mdbicqt]

We really like the little step. It's a small detail but they did it well! We will have chairs around a wood burning fire pit on this pad.
[attachment=1:2mdbicqt]IMG_1950.JPG[/attachment:2mdbicqt]

I found this little guy hanging out in the pool. I don't think he'll like it when it is full of water.
[attachment=0:2mdbicqt]IMG_1947.JPG[/attachment:2mdbicqt]
 

Attachments

  • IMG_1949.JPG
    IMG_1949.JPG
    208.2 KB · Views: 266
  • IMG_1950.JPG
    IMG_1950.JPG
    206.4 KB · Views: 262
  • IMG_1947.JPG
    IMG_1947.JPG
    250.9 KB · Views: 261
The BBQ grill is almost done. Just needs some painting and gas hook up!

[attachment=2:sx6j26li]IMG_1929.JPG[/attachment:sx6j26li]
[attachment=1:sx6j26li]IMG_1930.JPG[/attachment:sx6j26li]
[attachment=0:sx6j26li]IMG_1941.JPG[/attachment:sx6j26li]
 

Attachments

  • IMG_1929.JPG
    IMG_1929.JPG
    178.2 KB · Views: 261
  • IMG_1930.JPG
    IMG_1930.JPG
    165.6 KB · Views: 259
  • IMG_1941.JPG
    IMG_1941.JPG
    182.5 KB · Views: 260
Pool layout was on 3/19 and excavation started on 3/22. So we are at about 8 weeks right now which is what they told us it would take.

For the patio, we were originally going to do some acrylic that they said didn't look like cool decking. Once we saw a sample it looked just like cool decking so we were going to cancel that and just wait and do something with it later. They suggested we could do a travertine tile to match the pavers. The cost wasn't that much more than the acrylic decking so we went ahead and did it. We are glad we did as it didn't look good with the patio remaining concrete and everything else travertine.
 

Enjoying this content?

Support TFP with a donation.

Give Support
Thread Status
Hello , This thread has been inactive for over 60 days. New postings here are unlikely to be seen or responded to by other members. For better visibility, consider Starting A New Thread.