Intex Pool w/DIY Skimmer Question

mpizzi

0
Apr 15, 2013
1
I saw someone used something similar to this http://www.amazon.com/Hayward-SP1091LX- ... PDKIKX0DER and cut the liner.

I saw the forum post but all the pictures are dead and I can not see them any longer,

I wanted to know what distance from the top of the pool you would install this at, also, I wanted to use the larger outlets on this pool and wanted to know about cutting the existing small hole from the 10x30 intex to the larger one.

I am just tired of the in pool skimmer the kids think its a toy, and it also takes up swimming space.
 
There are a few threads about people installing a standard thru the wall skimmer in an Intex pool. The largest one is the one with the picture links broken.

There was a thread where someone installed it above the welded seam of the overlap and used thick gaskets to makeup the difference and it worked well. That's the highest I recall seeing anyone install one. Normally it gets intalled with the top lip of the skimmer right under the welded seam.

Here's one thread. It's a rectangular pool but the steps are the same.

Just use the Google search at the bottom left of the page and search for wall skimmer intex and you'll find plenty of examples with pictures.
 
I actually bought that very model and installed it yesterday. It was pretty simple. From the outside of the pool, I took the trim ring and traced the interior outline (the part that would be cut out) onto the pool. I was lucky enough to have the sun facing me, so I was able to see where the shadow of the welded seam stopped. I placed the top of the trim ring about an inch down from that shadow line and made my marks. The rest is as simple as following the instructions in the manual. If you'd like, I can take pictures when I get home from work and post them.
 
@ Williamshelton1972, I'd love to see the pics of your skimmer. Can you tell me how you hooked it up to your pump? What size pvc did you get? Etc. Thanks and I look forward to seeing your pics.
 
My skimmer arrived yesterday and I'm planning on installing it this weekend. My dilemma is this... I want to use the butterfly gasket as intended, however I'm worried that if I just cut a hole by tracing the pattern, the geometry of that hole will change due to the weight of the water pulling down once the cut is made. The alternative seems to be to basically install the whole device on the wall first, (bisecting the gasket into to separate pieces) screwing the plate through the wall THEN cutting out the hole and leaving things alone..
Did you just cut the hole then assemble? Did the shape of the hole distort much? How close to the bottom of the hole was your water level? Thank you!
 
My husband went ahead and installed ours yesterday. He traced the
interior of the gasket and he made the cut. After cutting it, he inserted the gasket in between front & back of liner. The screws were very hard to get into the skimmer that hangs on outside of pool but we did it and it is working really well. We love it.
 
@laracohran, apologies for not replying sooner. I kept forgetting to check for replies to my post in this thread. I read that you've already got yours installed, but I'll get some pics posted here in a few minutes anyway. I patterned my plumbing after fast1971chevelle.

http://s1332.photobucket.com/user/willi ... %20Skimmer

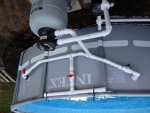
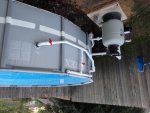
@Khaphora, I had my pool full up to about 2 inches below where I wanted to put the skimmer, which made the side of the pool completely rigid. I also didn't cut my butterfly gasket into two pieces so that if I ended up being a little off on my hole, I wouldn't have to worry about getting things lined up exactly. As you can see in one of the pictures above, my initial position was a bit high...and would have led to the trim ring being installed on the vinyl weld on the inside of the pool. I was also a big concerned about the weight of the skimmer(with water) distorting the side of the pool, but so far that has not been the case. The piping seems to be rigid enough to prevent any issues, although if it does become an issue in the coming years I can simply add a support below the skimmer piping. Also, all pipe used is 1 1/2 inch, with the exception of the fountain which was stepped down to 1 inch.

As a testament to the salt-water system, notice the awesome shade of green has disappeared. My daughter has even braved the cooler waters to swim a little already, although it's still a bit too frigid for my liking. Next on the agenda is coming up with some sort of heating method.
 
Thank you. I'm going to try it like you, without installing the skimmer prior to cutting. I've read several reports of people doing it that way with the round pools without the hole distorting. The one I saw that did distort was a rectangular pool. I'll do a horizontal test cut to check for downward pull/distortion and then go for it if nothing seems out of the ordinary. I just like the idea of using the butterfly gasket as intended, reducing the potential leak "zones" from four to two, and keeping the exposed fibers in the cut liner from constant water exposure.. Perhaps a bit paranoid, but hey... :)
 

Enjoying this content?

Support TFP with a donation.

Give Support
@laracohran, pretty much. I had some leaf debris in there early on, before I had the skimmer connected and working. After I got the debris cleared out and the bottom vacuumed I put the SWG on the boost cycle a few times, which as I understand it, is like a typical pool shock treatment. I've been running everything normally though and havent' added any chemicals, although towards the end of the month I'll take a sample to the local pool store and have it tested.
 
Ok that was easy and painless. Ill post pictures later but the skimmer install was a snap. There was no distortion at all when cutting the hole. I'm plumbing it all back together now (essentially from scratch as my intakes and outlets are changing positions) will post a separate thread later. Thank you for the tips and pics.
 
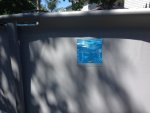
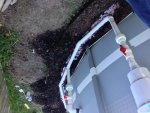
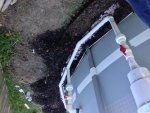
Here are a few pics. The intake plumbing will be hidden under the mulch. There is one ball valve upside down due to salvaging the part. Nothing is glued yet; that's why the fountain is strapped and low. Oh, I added a second intake. This second hole was below the water line. Lesson: don't use water based marker to trace your circle if water will be gushing out once a cut is made.. I stuffed it with a Walmart bag, traced again and cut out the circle and put the intake in quickly once the cut was finished.
 

Attachments

  • image.jpg
    image.jpg
    71.5 KB · Views: 638
  • image.jpg
    image.jpg
    124.6 KB · Views: 635
  • image.jpg
    image.jpg
    101.9 KB · Views: 633

Enjoying this content?

Support TFP with a donation.

Give Support
Thread Status
Hello , This thread has been inactive for over 60 days. New postings here are unlikely to be seen or responded to by other members. For better visibility, consider Starting A New Thread.