- May 30, 2012
- 16
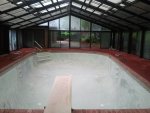
I've been researching TFP and other sites for quite some time but thought I should give my first post to help others. I've been working on renovating an older pool (~1984) that I purchased with a foreclosure. The pool was left with water and the copper in the heater stained the plaster. Afterwards, the bank drained the pool and left it empty for 3yrs while the house was being sold. I had a leak test done and plaster inspected, prior to purchase. Now that we have the background out of the way...onto the fun stuff and lesson's learned.
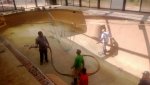
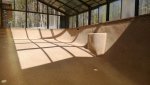
We had two swim-outs built into either side of the pool. This is actually quite easy and now that I know how its done, the pool shape can be altered by the homeowner if done before plastering. Basically, you drill rebar into the pool walls, form the shape, and fill with concrete. The plastering is what makes it water-tight, but keep in mind that the plaster is only .25" thick on the walls, so whatever shape your forms have, the plaster will contour. I mention this because we debated making an island or other swim-outs ourselves.
For plastering, we settled on the StoneScape regular pebble with glass beads. For contractors, if you are in the metro-Atlanta area, PM me for recommendations as I went through most of the large pool builders before settling. I am pleased with how the replastering turned out.
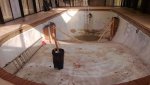
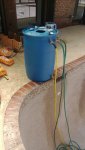
We also did the bicarb startup method. I built the 55-gallon drum per spec and convinced the plaster crew to allow me to fill the next day and use the bicard startup method. Lesson learned here is that the input hose should be closer to bottom than midway as described. This will help stir the baking soda and aid in dissolving. Also, there needs to be more air getting to the output hoses to help with drainage. I used the drum as the fill for about a 1/4 of fill, then just went with hoses wrapped in towels for remainder as most of baking soda was dissolve. I also went a little high on the baking soda and wished I didn't. It takes way too much muriatic acid to lower. Overall, the bicarb method worked well although a PITA to setup/lower TA.
I also pre-purchased my chemicals and mechanicals, ordering most over the internet with free shipping. The bleach and baking soda came from Sam's Club, the muriatic acid from Lowe's. I love my Jandy Stealth pump...it is so quiet.
Lessons learned on plumbing/electrical/mechanicals? First, a certified master electrician doesn't know much about pools. However, working together we were able to ensure the light niche was bonded to the pool rebar (uninsulated #8) and the light itself is bonded to the mechanicals (must use insulated #8 wire). For timers, we have one digital and one manual. Getting the timers working to control a 2speed pump, a SWG, and a booster pump took some more thinking. Overall, it was harder than I thought but everything is now operational and bonded appropriately. For light and niche - don't lose that brass screw. It is an odd shape and is used to ground the light to the niche. Also, be sure to put the plastic cover over the niche prior to replastering.
For plumbing, use clear glue & cleaner for the piping. The clear just looks better. Also try to avoid turns as much as possible. We also added a spigot to the top to help with priming and release pressure to make opening the pump basket easier. For sand filter, use sand. the zeolite stuff seems to break down over time and make a gunky mess.
We had two swim-outs built into either side of the pool. This is actually quite easy and now that I know how its done, the pool shape can be altered by the homeowner if done before plastering. Basically, you drill rebar into the pool walls, form the shape, and fill with concrete. The plastering is what makes it water-tight, but keep in mind that the plaster is only .25" thick on the walls, so whatever shape your forms have, the plaster will contour. I mention this because we debated making an island or other swim-outs ourselves.
For plastering, we settled on the StoneScape regular pebble with glass beads. For contractors, if you are in the metro-Atlanta area, PM me for recommendations as I went through most of the large pool builders before settling. I am pleased with how the replastering turned out.
We also did the bicarb startup method. I built the 55-gallon drum per spec and convinced the plaster crew to allow me to fill the next day and use the bicard startup method. Lesson learned here is that the input hose should be closer to bottom than midway as described. This will help stir the baking soda and aid in dissolving. Also, there needs to be more air getting to the output hoses to help with drainage. I used the drum as the fill for about a 1/4 of fill, then just went with hoses wrapped in towels for remainder as most of baking soda was dissolve. I also went a little high on the baking soda and wished I didn't. It takes way too much muriatic acid to lower. Overall, the bicarb method worked well although a PITA to setup/lower TA.
I also pre-purchased my chemicals and mechanicals, ordering most over the internet with free shipping. The bleach and baking soda came from Sam's Club, the muriatic acid from Lowe's. I love my Jandy Stealth pump...it is so quiet.
Lessons learned on plumbing/electrical/mechanicals? First, a certified master electrician doesn't know much about pools. However, working together we were able to ensure the light niche was bonded to the pool rebar (uninsulated #8) and the light itself is bonded to the mechanicals (must use insulated #8 wire). For timers, we have one digital and one manual. Getting the timers working to control a 2speed pump, a SWG, and a booster pump took some more thinking. Overall, it was harder than I thought but everything is now operational and bonded appropriately. For light and niche - don't lose that brass screw. It is an odd shape and is used to ground the light to the niche. Also, be sure to put the plastic cover over the niche prior to replastering.
For plumbing, use clear glue & cleaner for the piping. The clear just looks better. Also try to avoid turns as much as possible. We also added a spigot to the top to help with priming and release pressure to make opening the pump basket easier. For sand filter, use sand. the zeolite stuff seems to break down over time and make a gunky mess.