How to fix a cracked pump housing

carli

0
Mar 16, 2013
17
San Juan, Puerto Rico
This is what I did today. There was a crack line in my Hayward pump housing. Epoxies and other bonding
products won't work with this type of plastic and in this high pressure environment. I was not feeling like
spending $180 to replace the housing so using plastic molding technique with a soldering iron I took care
of the problem. " This tool needs to be 60 watts minimum because you will be working on hard plastic". You need to take
out the motor because the crack need to be fix on both sides. Look at the photos. Wear a mask, dangerous fumes.
 

Attachments

  • IMG_0359_2.JPG
    IMG_0359_2.JPG
    47.6 KB · Views: 2,059
  • IMG_0353_2.JPG
    IMG_0353_2.JPG
    53.1 KB · Views: 1,458
  • IMG_0351_2.JPG
    IMG_0351_2.JPG
    49.7 KB · Views: 1,394
What model housing do you have? I just ordered a new one because I'm going to 2" which will leave me with my old one spx 1600aa. If your repair doesn't work I'll be more than happy to work with you if you need it before it goes to the land of ebay
 
I know you said epoxy don't work, but have you tried JB Weld? This stuff is a miracle worker. My ex repaired a hole in his car radiator with it and it lasted another 2 years. No kidding. And I fixed our washing machine tub that got holes in it from a necklace that scraped the sides until it wore it down. That was, Oh gosh, probably 15 years ago and I'm STILL using that machine. But, I don't recommend the "4 hour set" kind. I would go with the one that requires atleast 24 hours.
 
mommabeans said:
I know you said epoxy don't work, but have you tried JB Weld? This stuff is a miracle worker. My ex repaired a hole in his car radiator with it and it lasted another 2 years. No kidding. And I fixed our washing machine tub that got holes in it from a necklace that scraped the sides until it wore it down. That was, Oh gosh, probably 15 years ago and I'm STILL using that machine. But, I don't recommend the "4 hour set" kind. I would go with the one that requires atleast 24 hours.

I tried the JB water weld without success maybe is the extreme pressure of water that eventually pulls it off. I guess you can try but after I did the plastic welding with soldering Iron I fix it and is working fine now.
 
carli said:
This is what I did today. There was a crack line in my Hayward pump housing. Epoxies and other bonding
products won't work with this type of plastic and in this high pressure environment. I was not feeling like
spending $180 to replace the housing so using plastic molding technique with a soldering iron I took care
of the problem. " This tool needs to be 60 watts minimum because you will be working on hard plastic". You need to take
out the motor because the crack need to be fix on both sides. Look at the photos. Wear a mask, dangerous fumes.


are you saying you just melted the crack together, did not use any other plastic , just melted the inside and the outside together????
how does that stand up to water pressure, isn't the rest of the housing more thick than the resulting repair line.

it looks like I could do that, but I am not sure what other stuff you used or exactly what the term "using plastic molding technique" means."
I don't want it to explode on me when I am done :)
confused.
 
trash said:
are you saying you just melted the crack together, did not use any other plastic , just melted the inside and the outside together????
how does that stand up to water pressure, isn't the rest of the housing more thick than the resulting repair line.

it looks like I could do that, but I am not sure what other stuff you used or exactly what the term "using plastic molding technique" means."
I don't want it to explode on me when I am done :)
confused.


Yes, I just melted the crack together with the soldering iron without using any other plastic. In the first photo you can see
the first step. Melt that line crack, the plastic will melt to the sides, then melt each side again to the inside of the crack. You need to work both sides of the crack. I did this six months ago and the housing is still working perfectly.

Don't waste your time with epoxies and other stuff this is the only way because of the pressure. I did this really quick and believe me it is a super strong bond.
 

Enjoying this content?

Support TFP with a donation.

Give Support
Urethane Supply company makes a produce called Fiberflex that will bond with most plastics and can bring the strength back to a broken piece if your worried. I use there plastic welder with it, but I works and works well.

The main advantage is that after you push existing plastic together (like Carli did) you can then add material on the outside to ensure permanent fix.

Carli, great job, this should give many people confidence to do this repair themselves and save lots and lots of money.

An alternative to this "self" repair would be to take the empty plastic shell to their local auto body shop or specifically anyone who repairs bumpers. This is basic plastic bumper repair 101.

Bob E.
 
I had a crack in my pump housing and fixed it with JB Weld AND a strip of fiberglass cloth on the inside of the housing. I applied a bit of JB Weld around the crack (after carefully sanding off the white "crust" on the inside of the pump housing) and then laid the fiberglass strip in place, making certain that it extended at least a half-inch beyond the crack in every direction. Then I added another thin layer of JB Weld, so that the fiberglass cloth was fully saturated. It's been working for a year or so. :)

I had previously tried just using JB Weld on the outside of the crack, but the pressure would spread the crack and split the JB Weld in just a couple of days. :shock:
 
Bump to say a great big thank you to Carli for starting this thread. Based on his original post above, I tried the same plastic welding technique for an almost identical housing crack. I'm happy to say I also got the same results as Carli: my pump is working again! A little elbow grease, pvc work and basic welding and about $30 in materials, I can avoid or at least postpone having to splash out hundreds of dollars on a new pump.

For the benefit of others who may face similar situation in the future, I'll add a few photos and comments.

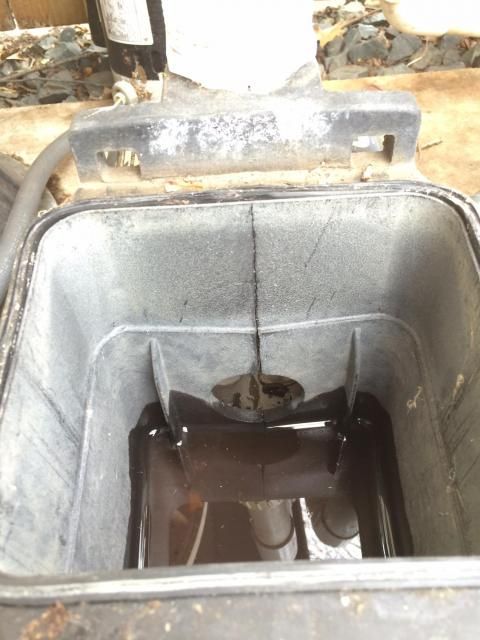
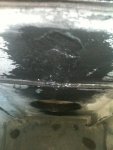
My pump would not prime when the pool store folks came to open the pool last week, and a cracked pump housing was discovered.

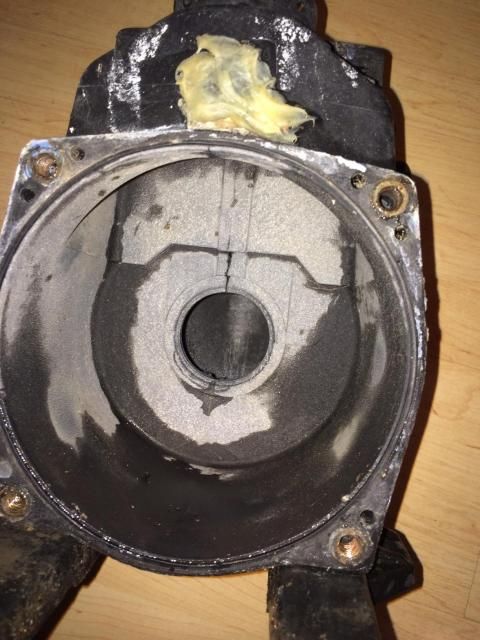
Before photos, from the front and from the back:


photo6_zps0c3c22d3.jpg


photo7_zpsdd6ff007.jpg


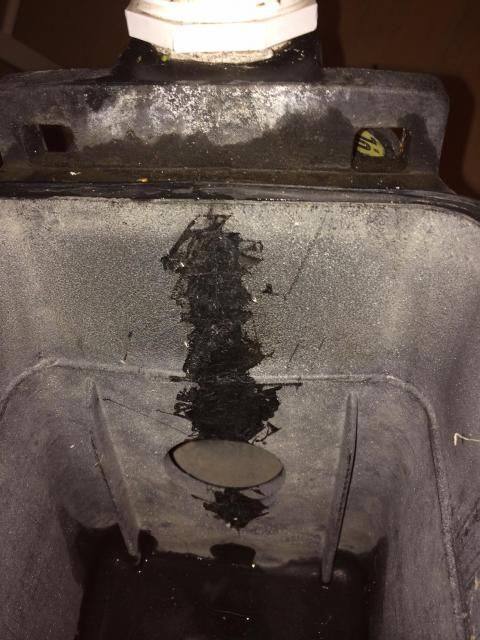
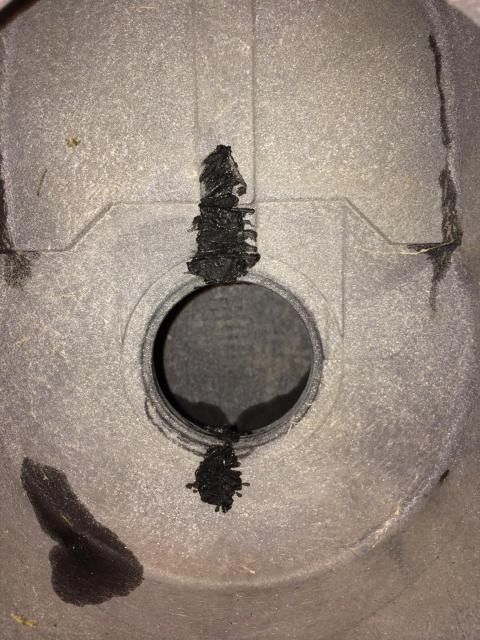
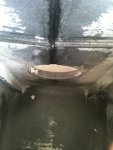
And the "after" photos:

photo8_zps2a6bdee5.jpg


photo9_zpsf91f8209.jpg


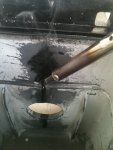
To do this, I bought a cheap welding iron from Harbor Freight for just over $15, and first tried just welding from the front only with the pump in place still connected to the plumbing. I did this because I am no longer young and flexible enough to contort my body in such a way as to reach the inside of the back of the pump to weld, even after the motor had been removed. The front weld seemed to work at first but then after a few minutes it gave out, so I decided that I might as well cut the pvc plumbing lines and remove the pump to access the back, especially since I would need to change the plumbing anyways if I had to replace the pump.

Once I cut the pipes and disconnected the pump housing (without motor), I was able to position things somewhere that I could comfortably access and weld both front & back. The hardest part was reassembling the new plumbing, but that was going to have to happen regardless, so I figured I had nothing to lose by trying the welding. Worst case scenario was it wouldn't work and I would be out the cost of the welding iron and the time and effort invested.

Fortunately for me, it did work. My pump is back to working normally, and the cost of supplies was less than $30, which I much prefer to the $1,200+ quote from the pool company for a new variable speed pump. I may well get a new pump sometime soon anyway, but I won't have to do so in a rush and under a time crunch.

Thanks again, Carli. You da man! :party:
 
This sounds much like my problem. I can't see the cracks on the bottom of the housing but when it's slightly picked up, I can see the water come out in what looks like spider cracks. I have the pump bolted down. Does epoxy not work at all or will it buy me some time? Also, I can't see the pictures Carli has posted. Anyway to view them in case I decide to try this route out?
 
I didn't try the epoxy, because (1) I heard from several sources it wouldn't work with the pressure; and (2) it wasn't hard at all to just try welding the plastic. If welding works, it's superior to epoxy.

You will no doubt need to unbolt the pump and be able to disconnect the plumbing so that you can access the pump and do any welds/repairs necessary. Even if that doesn't work, you'll need to remove the old pump anyways, to replace it, so give it a go. Don't fret it. You have nothing to lose. You can always try epoxy later if you want.

Good luck.

P.S. Not sure why Carli's photos wouldn't be showing for you. I can sure see them. In any event, they look much like mine so don't sweat it.
 
Hate to rain on your parade, and I hope your repair works but do realize that you simply did surface repair and the structural damage is still there and the pressure still exists, and the vibration.....so it is a matter of time before it cracks again, as in the first place there was a reason for the crack to develop. And, the crack that still is there under the repair will go further.

I hope I am wrong on this one, but be prepared.
 
Thanks for sharing as I have the same problem and I will try this method as I already have soldering iron.

clubjesek, there is no additional plastic welding material. They just re-heat the pump material to melt and re-join again as I understood.
 
I know this is an old thread, but this helped me out a lot. So, much that I made an account to tell you about it. I did a couple of searches on how to repair my pool strainer casing and found next to nothing on any cheap repairs. Everyone suggest to just replace anything broken. My issue was a crack around the inlet pipe to the strainer basket right before the pump inlet. So it wasn't on the pump itself, but the strainer basket housing. The crack wasn't created from normal usage, but from external forces applied to it.

I was able to pull the the pipe back and squeeze in some JB Kwik into the crack. I had to do this quick because JB Kwik has a 15 min work time. JB Weld has a longer work time but, takes a 24 hour dry time. The pieces have to be pressed together and held in place for drying, so the regular JB Weld wouldn't do, unless you can clamp it in place.

Once the JB Kwik was applied, I pressed the crack together and wiped down the excess on both sides. With the crack still pressed together and a cleaner surface, I used the soldering iron to surface weld sections of the crack. The soldering iron welds held the crack together as the JB Kwik finished drying. I continued to soldering iron weld the crack as the JB Kwik was still drying. Welding the plastic crack together while the JB Kwik is dried or not, didn't make a difference to me.

I had 2 soldering irons on hand, but found that the one with a 3 prong plug from Home Depot was hotter and worked better than the 2 prong plug one I bought from Harbor Frieght. So I ended up just using the 3 prong soldering iron. I used a regular pointed tip and had paper towels on hand that I folded down a couple of times to wipe down the soldering iron tip. I welded it outside, in a well ventilated area and had to blow the smoke away from my face frequently.

The welding technique is easy and by the end of it, I had a technique that work well and went over the areas I first started on. I just pressed the soldering iron onto the crack to melt it, then rub both sides of the same area and melt the sides as well. Then spread the melted plastic over the crack to cover it. The work area is about 1/2 an inch at a time. The melting depth is around the thickness of a penny. The casing is very thick, so melting in deep wasn't a problem and makes the weld stronger. You don't add any outside materials at all, like you would in metal welding or plastic welding. You're basically just melting the 2 pieces back together and filling in the crack.
 

Enjoying this content?

Support TFP with a donation.

Give Support
Thread Status
Hello , This thread has been inactive for over 60 days. New postings here are unlikely to be seen or responded to by other members. For better visibility, consider Starting A New Thread.