One other thing - I'd probably order an extra bag if your cutting it close on the number of bags for your square footage. The first and second coat are supposed to be the same thickness, but I used more on my second coat and I was trying to keep it as thin as possible. I think it just stuck a little better to the first coat than the original plaster. Otherwise, the estimate that they give you (70 sq.ft per bag for two coats) was pretty spot on.

Sider-Proof FF-PR Roll On Plaster
- Thread starter mauk
- Start date
You are using an out of date browser. It may not display this or other websites correctly.
You should upgrade or use an alternative browser.
You should upgrade or use an alternative browser.
Couldn't agree with you more, dried up little boogers can play havoc on a smooth finish.
- Sep 30, 2013
- 2
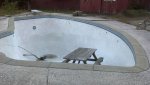
Ok, here is my pool and pictures.
Pool dimension: gunite pool, free form, length 30', width 15', low dept 4', high depth 10', guessing and using Sider Crete calculation, about 1000sq feet.
1. I used 4.5" angle grinder and sanding disc 40/80 grit from Lowes/Home depot. At first I used $100 diamond blade something but the blades came out quickly. I spent $300 of them. Wasted my money. Anyway, I ended by the $9.99 sanding disc 40/80 grits I think. I used about 5 of them.
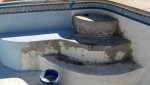
2. I removed all the paint and the pool look it has plaster in it.
3. I used Sider Crete repair, I used almost a whole bag to repair the steps.
4. I ordered 12 kits sider crete proof.
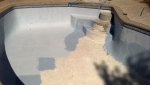
5. I painted the whole thing by myself from 7am to 5pm, 1 hr lunch break. I managed to use up 6 kits. The outcome was ugly. I can't smooth it. It was thick, and didn't have enough time to roll them.
6. I waited 3 days later, put on second coat, spent time smooth it out using a sponge. Hmmm that's better and somewhat acceptable.
7. I ordered 5 more kits since I was wasting too much cement I guess. Anyway, I will post the final product once I get it done, hopefully this weekend.
------------------
8. I then ordered a mesh cover (industrial grade lasts for 30 yrs, woohooo) for $1200 from a local pool. I just measured the pool and sent out to them. Will take a pic once I have that cover in too.
------------
Comment: I only paint once year helping friends here and there so I can't paint very good. Oh well....saving 15k i guess.
Tool: 1 angle grinder, $150 or something, 3 diamond blade (wasted $300), 40 or 50 hours removed the paint. 1 day paint 1st coat, 1 day second coat... and waiting to do next coat maybe or just to fix the ugly spot.
Paint: $1800 from Sider Crete.
So total about ~$2500 max vs 15K minimum from any pool company.
Pool dimension: gunite pool, free form, length 30', width 15', low dept 4', high depth 10', guessing and using Sider Crete calculation, about 1000sq feet.
1. I used 4.5" angle grinder and sanding disc 40/80 grit from Lowes/Home depot. At first I used $100 diamond blade something but the blades came out quickly. I spent $300 of them. Wasted my money. Anyway, I ended by the $9.99 sanding disc 40/80 grits I think. I used about 5 of them.
2. I removed all the paint and the pool look it has plaster in it.
3. I used Sider Crete repair, I used almost a whole bag to repair the steps.
4. I ordered 12 kits sider crete proof.
5. I painted the whole thing by myself from 7am to 5pm, 1 hr lunch break. I managed to use up 6 kits. The outcome was ugly. I can't smooth it. It was thick, and didn't have enough time to roll them.
6. I waited 3 days later, put on second coat, spent time smooth it out using a sponge. Hmmm that's better and somewhat acceptable.
7. I ordered 5 more kits since I was wasting too much cement I guess. Anyway, I will post the final product once I get it done, hopefully this weekend.
------------------
8. I then ordered a mesh cover (industrial grade lasts for 30 yrs, woohooo) for $1200 from a local pool. I just measured the pool and sent out to them. Will take a pic once I have that cover in too.
------------
Comment: I only paint once year helping friends here and there so I can't paint very good. Oh well....saving 15k i guess.
Tool: 1 angle grinder, $150 or something, 3 diamond blade (wasted $300), 40 or 50 hours removed the paint. 1 day paint 1st coat, 1 day second coat... and waiting to do next coat maybe or just to fix the ugly spot.
Paint: $1800 from Sider Crete.
So total about ~$2500 max vs 15K minimum from any pool company.
Attachments
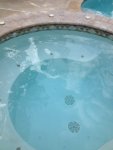
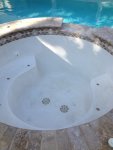
I finished doing an attached spillway spa to my pool with Sider-Proof FF-PR roll on plaster. Here is what I learned:
First, for a spa project and small areas, mixing an entire bag was too much to work in the allotted time (about an hour at 70 degrees). Mixing 1/4 bags and 1/8 bags by weight, e.g. 10 lbs of powder to 42 ounces of resin, worked great for me and I had no problems blending the edges of adjacent work areas. Second, I switched to a 4" roller instead of a full size paint roller. Third, a spray bottle with water was THE KEY to getting a smoother finish for me. Roll it on kinda of thick, clean the magic trowel with a sponge in a rectangular bucket to keep the trowel in, hit the area with a few mists of water from the bottle, and then trowel it smooth. You can get too much water on the surface, but that comes off with a grout sponge way easier and looked better than having it too dry and creating bumps/humps. Fourth, 6" sanding discs, 80 grit medium and 120 grit fine, with my air orbital sander worked better than manual labor and the sanding sponge option. Fifth, get a 2 gallon bucket and use a smaller mixing attachment for your drill for smaller quantities. Sixth, for bullnose corners on steps/seats, I took a 6" plastic trowel and heated it with a heat gun, then folded/rounded it down the center in line with the handle into a 90 degree bullnose trowel. Worked perfect for applying a thick amount of product to the edge.
Overall, after day one, I thought I was in big trouble. Did an entire bag, product became too firm by the time I got to the end of the spa (80" diameter and about 48" deep with a bench seat and jets, tile insets, drains, etc). For the second and third days, I broke it down into smaller, more manageable areas, and had more time to smooth. Project now goes from a 4 out of 10 after day one to a 9 out of 10 after day five. Getting the finish as smooth as a professional (mainly because my delivery method is a roller instead of spraying it on - thickness varies during application) is not a problem with the product, but with me as my lack of experience showed early on. By then end of the project, I was able to apply and smooth the product that would rival the pros. I feel the ideal "team" would be three people: One to apply the product and keep about 4 square feet ahead of the second person who smooths the finish, with the third person mixing ahead if you are doing large areas and making sure you have clean water for your tools.
In summary, I'm very pleased. Color is white and uniform. To do a "skin-coat" from the plaster guy was going to be $1,000 and this ran about $300 and I now have total control over being able to work on/fix any future plaster issues. I would recommend this product but would also say that this borders on a 10 of 10 on the difficulty scale (for a spa anyway).
Attachments
Kwikee
0
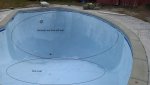
Looks good. Are the darker areas the primer?
I will be doing mine in the next few weeks, just patching up after the grind/chip/waterline tile removal, then new waterline tiles and Sider crete! I've got a bag to have a play with first, it's around $128 a kit here and I'll ultimately need 11 or 12. This first bag I'll use around the stairs, gives a bit of extra thickness to allow for wear and lets me mess around knowing it will be covered later. I've gone with Caribbean blue, bit lighter than I wanted but it will do. I'll post my results!
I will be doing mine in the next few weeks, just patching up after the grind/chip/waterline tile removal, then new waterline tiles and Sider crete! I've got a bag to have a play with first, it's around $128 a kit here and I'll ultimately need 11 or 12. This first bag I'll use around the stairs, gives a bit of extra thickness to allow for wear and lets me mess around knowing it will be covered later. I've gone with Caribbean blue, bit lighter than I wanted but it will do. I'll post my results!
- Sep 30, 2013
- 2


Hello NinjaMustang. Just an FYI for bullnose corners on steps:
For bullnose corners on steps/seats, I took a 6" plastic trowel and heated it with a heat gun, then folded/rounded it down the center in line with the handle into a 90 degree bullnose trowel. Worked perfect for applying a thick amount of product to the edge. I did the edge first, then came back and put product on the top and sides of the steps.
For bullnose corners on steps/seats, I took a 6" plastic trowel and heated it with a heat gun, then folded/rounded it down the center in line with the handle into a 90 degree bullnose trowel. Worked perfect for applying a thick amount of product to the edge. I did the edge first, then came back and put product on the top and sides of the steps.
- Jan 2, 2014
- 2
dispeggy -
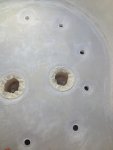
Nice job! Could you give more details and insight as to how you did the tile inserts on the bench of the spa? Were they already there or did you add them?
My pool and spa both have blue decorative small tiles along the edges of the seats and steps. Would I need to chip these out and put new? Just cover them up with the sider crete? Or just work around them? (Would prefer to leave them).
Advice is much appreciated!
Thanks!
Hi awl57. Is the end of March 2014. I was wondering how you finish has held up. Would you still recommend the Sider-Proof today?
I ground around mine with a grinder and added new ones because I had extra tiles. I could have just left them there. Just grind next to them, just as you do along the tiles at the waterline and smooth the Sider-crete right up over them and the wipe them smooth with a sponge later.
I ground around mine with a grinder and added new ones because I had extra tiles. I could have just left them there. Just grind next to them, just as you do along the tiles at the waterline and smooth the Sider-crete right up over them and the wipe them smooth with a sponge later.
Would you use this product again and do you have any photos of the finished product? I'm considering using this but was hoping to hear some feedback first.
Thanks in advance.
-Ken
Have any of you applied sidercrete and had it rain before the 24 hour drying period elapsed?
Two years later if you are still monitoring this thread I am wondering how the product is holding up? I'm considering it.
Two years later if you are still monitoring this thread I am wondering how the product is holding up? I'm considering it.
Any update on how it is holding up?
- Jun 18, 2015
- 712
- Pool Size
- 11000
- Surface
- Plaster
- Chlorine
- Salt Water Generator
- SWG Type
- Pentair Intellichlor IC-40
Would love to know the outcomes of these projects! Anyone?
Sent from my iPhone using Tapatalk
Sent from my iPhone using Tapatalk
Would love to know the outcomes of these projects! Anyone?
Sent from my iPhone using Tapatalk
Following.
Can anybody send pictures of the finished projects?
Thanks!
Should we assume it’s not doing too great? There seems to be little to no comments or information on long term performance.
ggoodman
0
Looking at buying a house that needs a ton of love one piece of which is a 700 sq foot kidney shaped pool in desprate need of some rehab. a replaster was quoted as 15k how is the side crete holding up?
I’d like to know the answer to that question too!how is the side crete holding up?
I’ve asked a couple people on the forums, but I can’t ever seem to get an answer beyond just after the job was done. Please do share some after-install experiences, I’m thinking of taking the same DIY plunge with Sider myself.
Thread Status
Hello , This thread has been inactive for over 60 days. New postings here are unlikely to be seen or responded to by other members. For better visibility, consider Starting A New Thread.
Similar threads
- Replies
- 7
- Views
- 195
- Replies
- 26
- Views
- 545
- Replies
- 101
- Views
- 1K
- Replies
- 4
- Views
- 207