Replacing Waterline Tile and Coping S. Florida

bradmc

0
Mar 14, 2013
7
South Florida
Finding a lot of great info here so thanks to all that have posted and added input.

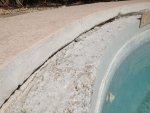
I am replacing the waterline tile and coping on my IG pool in South Florida. The new tile will be 3/4 x 3/4 glass mosaic and the new coping will be 4x8x1.5 cast concrete bullnose pavers.

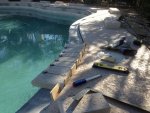
So far, I have removed the old coping & 2" mud bed from the beam, the old ceramic tile & thinset, and hacked/sawed/chipped my way around the pool to separate the poured concrete deck from the pool beam. I will install 1/2" Deck-o-foam and Deck-o-seal to serve as an expansion joint between the deck and pool wall/coping. It looked as though the original PB (or someone else) added concrete between the pool wall and deck to fuse them together. Lack of an expansion joint was popping off the old coping and tile.

The 2 pool renovators that came out to quote this project before I decided to do it myself both said that an expansion joint isn't necessary. I disagree... while there's no frost here in sunny South Fla, I imagine that concrete anywhere will expand and contract to a certain degree and require this expansion joint. Proof is the old coping and tile that were cracked and popped off.

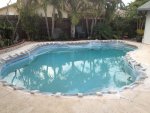
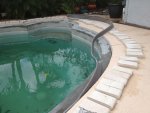
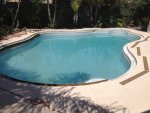
Here's what it looks like now:
[attachment=2:1mn2ctmd]IMG_2539.jpg[/attachment:1mn2ctmd]

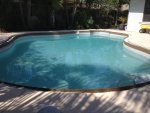
Here's a detail of the top of the beam and pool deck:
[attachment=0:1mn2ctmd]IMG_2541.jpg[/attachment:1mn2ctmd]

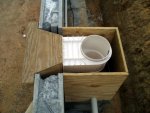
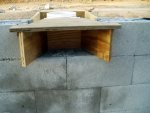
My next steps are to put up temporary masonite forms around the whole pool to install the mud bed for the coping and coping pavers; waterproof the tile area and install tiles; caulk between tile top and coping bottom, patch some minor damage to the diamondbrite with EZ Pool Patch, repair and re-paint concrete deck and install Deck-o-seal around pool joint.

I have two questions if someone more knowledgeable than I can provide the answers. I realize there are several different ways to accomplish the same task, especially when it comes to masonry and construction.

1. The coping mud bed - I plan to cover the top of the pool beam with bonding agent, lay down a 1/4" layer of Megaflex thinset followed by a dry Portland cement/sand/acrylic mixture at the same time (going over the thinset before it sets. My question is should I allow this mud bed to cure before adding the coping later, or would it be possible to back butter the coping pavers with thinset at the same time and lay them right on top of the mud bed as I go along? The mud bed will be about 2.5 inches at it's deepest point, but about an inch in most places. And if the pavers go in at the same time is it possible to wet cure everything?

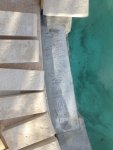
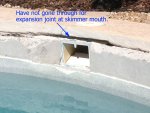
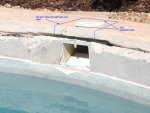
2. I did not separate the pool deck from the pool wall at the skimmer mouth. Should I leave this as is, or hack through this area as well? Here's a photo of what I'm referring to:
[attachment=1:1mn2ctmd]skimmermouth.jpg[/attachment:1mn2ctmd]

Thanks so much for any input!
 

Attachments

  • IMG_2539.jpg
    IMG_2539.jpg
    214.1 KB · Views: 743
  • skimmermouth.jpg
    skimmermouth.jpg
    220.5 KB · Views: 740
  • IMG_2541.jpg
    IMG_2541.jpg
    226.5 KB · Views: 740
Your post indicates you probably have more masonry knowledge and skills than I do but I'll still toss out my thinking.....

1. I would do the mud bed 1st and then let it cure/set up. Then come back and set the coping into place with a second layer of thinset. I think it will be easier to get the coping on a nice, even plane than if you tried to do it all at once.

2. I would break it loose at the skimmer as well unless there is some extraordinary effort involved.

I also agree with you than even in Florida there is some movement between those two surfaces and separation is necessary.
 
Thanks so much for your reply!

I'm going to take your advice and let the mud bed set up rather than trying to do 4 things at once.

Taking another look today... The skimmer is essentially attached to the pool wall and the concrete deck so I'm still not sure if I should cut the concrete there. Any movement would put stress on the skimmer. I'd rather fix cracks than replace a skimmer. The coping stones at that point will be fixed to a stainless steel lintel anyway.

I attached all the forms today and put in the Deck-o-foam. Tomorrow, I'll do the mud bed.
 
I think you can see how I did mine.
I placed tarpaper on the pool wall and concrete around the skimmer that I finished flush to the top of the pool wall. Then poured the deck on top of that. The only place they "touch" is at the round top of the skimmer and I tried to leave a little gap around that for movement when I poured the deck.[attachment=2:10t8d9x1]tem_skimmer1.jpg[/attachment:10t8d9x1][attachment=1:10t8d9x1]tem_skimmer2.jpg[/attachment:10t8d9x1][attachment=0:10t8d9x1]tem_skimmer3.jpg[/attachment:10t8d9x1]
 

Attachments

  • tem_skimmer1.jpg
    tem_skimmer1.jpg
    70.7 KB · Views: 684
  • tem_skimmer2.jpg
    tem_skimmer2.jpg
    70.7 KB · Views: 679
  • tem_skimmer3.jpg
    tem_skimmer3.jpg
    74.6 KB · Views: 675
I think bmoreswim's skimmers are identical to mine. The body of the skimmer protrudes about 1" above the pool wall. Then a "collar" fits over that 1" protrusion to come up through the decking or you could simply finish off the decking nice and round to form the skimmer cleanout body. I finished mine by hand and I would prefer you not look at them too closely if you come to visit!! :mrgreen: :mrgreen:
 
I wish I could rebuild it like the photos above... time, money, yeah yeah.

I don't think the skimmer that I am working with was installed properly for expansion considerations as the whole unit seems to be attached to both the pool wall and the concrete deck in one big block of concrete. I'm too nervous to start cutting and chiseling at that location under the pool deck. The PB added a "faux" expansion joint which I suspect doesn't do anything. How about cutting the concrete deck around the skimmer and making an expansion joint so it moves with the pool? Like this:

[attachment=2:2u6zi8qb]skim_exp.jpg[/attachment:2u6zi8qb]

I've built the forms and am adding the dry pack base on the beam today. I wound up using Tapcons for the boards after a frustrating morning trying to use masonry nails. I opted not to use a powder gun since I was afraid that removing the nails would cause a lot of problems.

[attachment=1:2u6zi8qb]install_forms.jpg[/attachment:2u6zi8qb]

Done!

[attachment=0:2u6zi8qb]forms_done.jpg[/attachment:2u6zi8qb]
 

Attachments

  • skim_exp.jpg
    skim_exp.jpg
    201.9 KB · Views: 655
  • install_forms.jpg
    install_forms.jpg
    185.6 KB · Views: 655
  • forms_done.jpg
    forms_done.jpg
    181.5 KB · Views: 656
How about cutting the concrete deck around the skimmer and making an expansion joint so it moves with the pool? Like this:
Yeah, that would surely work. You could probably get by with saw-cutting that neatly and simply filling back in with polyurethane caulk. Even if you cant get the saw into the corners to break the bond neatly, any break should occur within that saw-cut joint. Too bad the decking wasn't poured separately but you have to deal with what you have......I would do what you are doing.

I used tapcons throughout as well. Too much banging and breaking with masonry nails or a .22 cal gun

(Your work looks very neat and impressive :lol: )
 

Enjoying this content?

Support TFP with a donation.

Give Support
Got a bit delayed on this project and updating here, but I'm continuing now.

The waterline tiles were fairly easy to remove, but you have to cut around the bottom of them the entire length of the pool with a diamond blade and angle grinder so you don't start taking off the plaster/Diamondbrite, etc. (Unless you're planning on doing that too.) Go very slow and level and it'll work fine. Once the coping was taken off the top and the bottom of the tiles were cut, I just knocked the tiles off the pool wall with a masonry chisel and hammer. Then I ground off all the old thinset with a diamond cup wheel on a grinder with a dust shroud hooked to the Shop Vac. That was probably the hardest and most time consuming job of getting the tile off. I managed to nick the Diamondbrite in a few spots, but I plan of patching that up with EZ Patch. I'm sure it won't be perfect, but probably not all that noticeable, and worth not having to drain and re-do the entire pool.

Curing the dry pack:

[attachment=1:piuyd0l6]concretepacked.jpg[/attachment:piuyd0l6]

I would recommend using 1/4" Masonite board for the forms instead of the 1/8" I used. It became flimsy in a lot of spots and didn't hold its shape very well. I let the bed cure for 7 days under the plastic.

Now I'm starting to dry fit and cut the coping:

[attachment=0:piuyd0l6]startcoping.jpg[/attachment:piuyd0l6]

I will take some pics of the stainless lintel I put over the skimmer today and post them here as well.
 

Attachments

  • concretepacked.jpg
    concretepacked.jpg
    234.3 KB · Views: 589
  • startcoping.jpg
    startcoping.jpg
    230.7 KB · Views: 586
I used 3 parts sand and 1 part Portland cement mixed with 50/50 water and additive (Sika bonding agent and acrylic in one). I also put down a half inch of Flexbond thinset a few feet ahead of the drypack so the drypack went over the wet thinset to bond better to the top of the beam. Advice I found somewhere else on-line. Mixing up thinset and the cement at the same time was a lot of work, but the result seems extremely solid and well bonded.

Here's a couple photos of the lintel that I put over the skimmer. It's attached with epoxy and screws.

[attachment=2:1otfgcnm]lintel_top.jpg[/attachment:1otfgcnm]

[attachment=1:1otfgcnm]lintel_side.jpg[/attachment:1otfgcnm]

I've finished all the cuts on the coping to curve around the pool and am now installing it using Laticrete 954 platinum thinset. I wound up buying the new Ridgid 4030 wet saw with a segmented paver blade to cut the coping pavers and it worked wonderfully. First I tried to cut them with a hand-held angle grinder and diamond blade, which worked, but was hardly accurate and very time consuming. Then I tried a Dewalt metal chop saw with a 14" diamond blade. It made the cuts, but took a good sized chunk out of the pavers right where it completed the cut. Also very dusty. HD rents a paver wet saw for $100 per day. The Ridgid saw is $300 so it was well worth buying it. My pool is curved so about 80% of the pavers needed to be cut at an angle on both sides.

Here's the Deck-o-foam going back in and all the pavers cut for installation.

[attachment=0:1otfgcnm]foam.jpg[/attachment:1otfgcnm]
 

Attachments

  • lintel_top.jpg
    lintel_top.jpg
    196.9 KB · Views: 533
  • lintel_side.jpg
    lintel_side.jpg
    198.3 KB · Views: 534
  • foam.jpg
    foam.jpg
    194.6 KB · Views: 533
How did it turn out?
What did you use to waterproof behind the tiles?
What did you use to install the tiles?
You posts were very helpful for my pool remodel situation. I'm sure there are more than one way of doing things, but yours seem well thought out. I'm thinking about hiring someone to finish my remodel. I'm at the steps you did, but also having it replastered.
 
Yes, I finally finished this project. Sorry for the long delay between posts.

I used Laticrete Hydroban behind the tiles, 254 Platnium for thinset and Spectralock for grout. I also caulked around the top of the tile where they meet the coping with Laticrete's matching caulk. So far, everything has held up beautifully, but it's only been several weeks.

I just used the grout to fill in between the bottom of the tile where it met the cut I made in the wall plaster. It looks fine when the pool is full. The only way you could see the small imperfections between the plaster and tile is to drain the water below that line and look very closely at it.

Here's the final result:

[attachment=1:2e6i6qeq]done1.jpg[/attachment:2e6i6qeq]

[attachment=0:2e6i6qeq]done2.jpg[/attachment:2e6i6qeq]
 

Attachments

  • done1.jpg
    done1.jpg
    142 KB · Views: 417
  • done2.jpg
    done2.jpg
    145.3 KB · Views: 413
Oh, I also opted to use SikaFlex on the joint between the coping and concrete deck - huge mistake! Spend the extra money and use Deck-o-seal. I bought 5 big tubes of SikaFlex from HD all of which were 3 years past the expiration. When I finally went to the 4th HD I found some current tubes, but most of it came out runny in some spots like it wasn't properly mixed. Now bugs and other debris get stuck in it every day even though it's had weeks to cure. I might wind up getting all of it out of there and using Deck-o-seal.
 
Bradmc... it looks beautiful. I love the simplicity. I forgot you were using glass tiles. I picked out 3" ceramic. I've never seen that kind of coping. I like it...wished I had seen that option. I purchased the "old fashioned" safety grip in a alabaster color, ie off white. 24" pieces X 12" X around 2". I like it, but now I can't find anyone who can install it...seems no one uses that kind of coping any more around here. I live in Las Vegas, but ordered the stones from CA. Actually I'm getting different opinions on how to install it---some say thinset, other say full mortar bed. "Install the tile first. Install coping first. Bond coat done wrong--has to be removed, no need for waterproof behind the tiles as old thinset is still there under the new browncoat that is delaminated, no need for isolation joint since I'm using pavers as decking." These are comments from guys in the trade who are bidding on the job.

The bond coat did fail. I don't know why.

There was no curing. (this was May 8 in Las Vegas...maybe it doesn't need to cure?) The tile guy was planning to install the coping stones that same afternoon, and the tile. He was going to use thinset but the coping manufacturer recommended full mortar bed. The precast concrete coping stones vary almost 1/2" at the ends. So I don't think I can use thinset to install the pavers. The job has stalled since then as I wanted to do it right, not over.

I think I have seen enough posts on this forum and others, and some opinions of others in the trade who have nothing to gain from giving me advice, that I know how I want it done if I can get a skilled craftsman to do the work, someone with experience in masonry. I want to build up the bond beam to almost level to top of skimmer, then mud the coping stones in about 1" of mud, using string line on the straight sides, and good guessing on the two curved ends (Roman shaped pool). Or put up a masonite level all the way around where coping will sit on top for install in mud bed. Once removed, then brown coat (with what?) below the coping where the tiles will go. Bradmc said he ground out the old, and cut under them, but my installer just put the coat (that failed) on top of the old. The plaster was sandblasted and some chip out. I think more chip out is needed below the tile line to feather the new plaster up to the new tiles.

Does anyone feel like commenting on my thinking? Good or Bad...
 
bradmc, if you are around, what waterline tile did you use? I LOVE how it looks!!! What is your pool surface? We are doing a reno and I want a low contrast look between the waterline tile and pool surface, where they blend into each other.
 

Enjoying this content?

Support TFP with a donation.

Give Support
Thread Status
Hello , This thread has been inactive for over 60 days. New postings here are unlikely to be seen or responded to by other members. For better visibility, consider Starting A New Thread.