Pool Build - Baltimore

I'm glad you had a pretty good experience with them. We've talked with Browning and Catalina so far, with River over the phone. I'll have to give Vista Pro a call (they're on my list), although if they only do shotcrete/gunnite, I'm coming to the realization that it may not be in our budget. It is amazing how complicated this is, even worse than shopping for a new car - more money and more stress. That's why I'm thankful for these forums!

As for the heater, that's a good point. I'd be interested to see if there is a way to do a glass roof, or something that the sun can go through, but I think either way, we might need to end up with a heater. Spending this much money on something, I'd like to enjoy it as much as possible.

Elsa
 
On heater vs the auto cover.... I would say the two don't have to be mutually exclusive, heater can still be a nice complement, but I'm at amazement on how awesome the auto cover is with keeping the warm temps and heating up the pool in cool sunny days. We've had a crazy cold August so far here in Maryland with temps is the 70s to low 80s and whereas most of my friends with pools and no heaters have the temps in the 70s, our pool is still constant 85-87 degrees. All I can say is auto cover rocks and worth every penny!!!


Sent from my iPad using Tapawhat?
 
We are sadly into the latter portion of the swimming season here in Baltimore already but we have put the pool to good use even with the cool summer. We've planned not to do a heater for a few seasons if at all. I can say also that our cover has been great for a summer with only two weeks of real hot weather and some nights in the upper 50's. I've found that we aren't crazy about swimming with cool air temps, especially with a breeze. I'm thinking that just a cover may be a good choice for us. But the first few years will tell for sure.
 
I can 100% agree. Not too big on swimming when it's too cool outside, but just the point that with the cover you still
Have that options without the heater is very nice, so all I was told before about the auto cover extending the swimming season is def. true. Bottom line heater not needed if you the auto cover.


Sent from my iPhone using Tapatalk
 
Thank you and I expect to get a lengthy life out of our plaster with diligent water quality management. Sometimes I think plaster gets short changed regarding it's projected lifespan based on those who do not have trouble free pools.
 
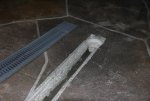
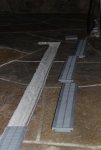
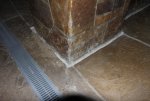
One area that we were a little frustrated with on the project was the drainage on the upper side of the decking. There is a 4" drain line under the deck and there were 4 - 4" circle drains that fed it. The problem was that the concrete was not sloped perfectly towards them. Which left some standing water up to a 1/2" deep in places. These areas were all in the general line of the underground pipe thankfully.

As a first attempted fix, the PB used a grinder to create new joint lines in the concrete, which I then extended and deepened. This was somewhat successful but still left some standing water. It also drained very slowly after pooling somewhat. This was a problem if there is any dirt or dust type of debris that had to be sprayed down. Since the water pooled first then slowly drained away, it would leave much of the dust type of debris remaining on the surface.

I had a meeting with our pool builder at some point over the summer about what he would do to alleviate this. He agreed to install a channel drain roughly 50' long to fix the issue. I accepted. I was not exactly clear how he was going to get this installed to look and work correctly after the fact. The day before he too began second-guessing his method which was to be cutting a slot the same width as the drain all the way through the decking to slip the channel drain into. His new Plan A was to grind a channel in the concrete with ledges on both sides and deeper in the middle. The drain sections (not the channel sections) would sit in the ledges. This ended up working really well and the pictures of this are below. The drains just sit there and are not attached. They do move just a bit but overall I'm really pleased with the solution. Interestingly I had thought about that exact solution that day, then he called me the evening before and suggested doing just that same process.

[attachment=0:382ozkhv]IMG_8137 TFP.jpg[/attachment:382ozkhv]

[attachment=1:382ozkhv]IMG_8136 TFP.jpg[/attachment:382ozkhv]
 

Attachments

  • IMG_8136 TFP.jpg
    IMG_8136 TFP.jpg
    125.6 KB · Views: 1,756
  • IMG_8137 TFP.jpg
    IMG_8137 TFP.jpg
    88 KB · Views: 1,744
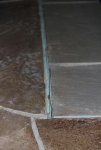
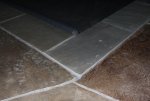
Today we had the pool coping/decking joint caulked along with the control joints and decking to table/wall joints.

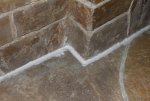
Here are the pics of the coping/decking joint before and after...

[attachment=1:1nt0tpmj]IMG_8133 TFP.jpg[/attachment:1nt0tpmj]

[attachment=0:1nt0tpmj]IMG_8140 TFP.jpg[/attachment:1nt0tpmj]
 

Attachments

  • IMG_8133 TFP.jpg
    IMG_8133 TFP.jpg
    87.7 KB · Views: 1,734
  • IMG_8140 TFP.jpg
    IMG_8140 TFP.jpg
    111.3 KB · Views: 1,729
And here are the before and after for caulking the decking to wall/table joint...

Very pleased with the results. It wasn't cheap because we had about 180' to caulk at $4.75/ft. But it really gives it a finished appearance and functional too of course. I did do some grinding of the areas to be caulked in preparation because the foam, especially around the wall/tables, was not consistent. So I essentially created a joint to be caulked by going down about a 1/2" into the decking in several stretches. Glad I did that as the look is very consistent now.

Below is something I posted in someone else's thread on the topic of our caulk guy...

Here is a website from the guy I'm going to use to caulk my new pool and other joints around the pool deck. After talking with several pool builders, they feel this is the highest quality way to fill these gaps. It's a non-sag (i.e. non-self-leveling) caulk and they also use a professional grade urethane sealant on it.

http://www.caulking-unlimited.com/

[attachment=0:2x4cyhvb]IMG_8130 TFP.jpg[/attachment:2x4cyhvb]

[attachment=1:2x4cyhvb]IMG_8138 TFP.jpg[/attachment:2x4cyhvb]

Next up, mesh winter cover installation and closing next week.
 

Attachments

  • IMG_8138 TFP.jpg
    IMG_8138 TFP.jpg
    151.7 KB · Views: 1,727
  • IMG_8130 TFP.jpg
    IMG_8130 TFP.jpg
    136.6 KB · Views: 1,719
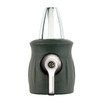
Pool is being closed Friday. I will bring it up to shock level maybe tomorrow, do an OCLT and then let it slide down some. Our pH is still rising with the new pool surface so I'll take the pH down to 7.0 where it will certainly rise from. I may pull back the cover periodically to check the pH and could add some MA and circulate with our autocover pump. This past weekend I took the filter cartridges out and rinsed them down. The $2.98 nozzle from Lowe's below worked well. I spent at least an hour on the task but felt it did a good job. They looked very good after I was finished. I noticed no oily film on them after just one season, so I opted not to do the overnight TSP soak. I'll probably begin that next year. I had cleaned them once earlier after some of the plaster dust had accumulated. (Which was after the filter debacle from installation where a boogered up filter was installed - which did capture a lot of dust before exploding the cartridges.) I feel sure that I will be able to get away with just a pre-closing cartridge rinse with our setup. The filter is not huge, though oversized, but we have a clean environment and an autocover. There was a pressure increase of less than 25% over the course of the season. Water temp is 53 and the salt cell is still generating. I expect it would stop soon but we normally won't have it still running this late. We just had some finishing touches to get taken care of before closing.

[attachment=0:14vcpdlb]034411123065sm.jpg[/attachment:14vcpdlb]
 

Attachments

  • 034411123065sm.jpg
    034411123065sm.jpg
    2.2 KB · Views: 1,658

Enjoying this content?

Support TFP with a donation.

Give Support
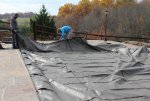
Well we (and by we, I mean someone else) finally closed the pool, well past the end of swim season in MD. There were a few last build details to attend to so that pushed us back a bit. The autocover once again showed it's usefulness by keeping the fall leaves out of the pool over the last month. The winter cover installers also used it to keep the new cover afloat while they were getting it installed - saying it was a nice help to not have the cover wanting to take on water while doing so. We went with a SmartMesh cover by Merlin in tan. So we are all buttoned up and ready for a hopefully snowy winter.

Thanks to all for your information and advice over the past year. It made the process go much smoother and also made it more enjoyable to document the progress.

Prepping the winter cover...

[attachment=2:w02iel77]IMG_8150 - TFP.jpg[/attachment:w02iel77]

New winter cover installed...

[attachment=1:w02iel77]IMG_8152 - TFP.jpg[/attachment:w02iel77]

View from the driveway...

[attachment=0:w02iel77]IMG_8167 - TFP.jpg[/attachment:w02iel77]
 

Attachments

  • IMG_8150 - TFP.jpg
    IMG_8150 - TFP.jpg
    159.3 KB · Views: 1,753
  • IMG_8152 - TFP.jpg
    IMG_8152 - TFP.jpg
    265.4 KB · Views: 1,774
  • IMG_8167 - TFP.jpg
    IMG_8167 - TFP.jpg
    303.7 KB · Views: 1,759
Thank you. They are Leyland Cypress spaced 8' on center and planted 14 years ago when we built the house. They were 1-gallon sized specimens at that time and the tips touched in 5 years. They have averaged 2'+ per year in growth.
 
Thank you. We are very pleased with the overall look and how it came together.
 
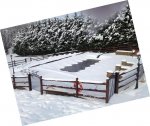
And here is the snow I was hoping for... a nice 8" on Sunday (then ice) followed by 4" on Tuesday.

Wasn't sure how the mesh cover would behave with snow loads. People tend not to post many such pictures here. But I love the winter pics as much as the summer ones. I checked out the Merlin cover docs and it said to not lower the water level to more than 18" below the coping surface. Ours was about 15-16" below right before the snow (pool closer didn't lower it that much but then it rained a couple of inches and I checked it - 1/2" below tile - and I lowered more than originally - to 8 1/2" below the tile).

Now I expect with lows in the low teens this week and highs in the mid 20's, that the cover may freeze to the ever rising water surface. The water had not frozen prior to the snow. Our winters always allow for snow to melt at some point, usually within a week unless its a blizzard. Just fun to watch the off-season personality of a northern pool.

[attachment=0:3m3b6gil]IMG_1043_mod - TFP.JPG[/attachment:3m3b6gil]
 

Attachments

  • IMG_1043_mod - TFP.JPG
    IMG_1043_mod - TFP.JPG
    91 KB · Views: 1,666
bmoreswim - Do you have an auto pump under your mesh cover to lower your water? Or have you just been checking the level periodically?

We are north of you in PA, and this is our first winter with pool and mesh cover. I'm curious how others handle monitoring and lowering their water level over the winter.

Thanks!
 
Thanks HV - good idea!

Melshall - Good question as I'm determining my own process this year as well. I do not keep the autocover pump in the pool under the mesh cover. I thought about it but decided that since it's a little finicky about running sometimes, I would just manually pop the corner of the cover and check the water level occasionally. I also didn't really want the pump and metal hose fitting sitting in the salt water all winter subjecting them to corrosion. I also, also didn't like the way my 3/4" hose lifted up the cover above the coping allowing more debris scoot under the cover. I also (3) tend to mentally keep track of how much rain/liquid precip. equivalent we get so I can have a decent idea where the water level is and therefore about when to check. I know with the snow/freezing rain/snow of this week, the level (once it all melts) will probably go from 8 1/2" below the tile (my critical measurement) to about 6 1/2" below the tile. So after another 4" of liquid equivalent precip. I'll check the water level. Does your cover look like ours with the snow as far as dropping down to the waterline?

My only small concern is that when it's time to pump some water out, that the ice could potentially be somewhat thick (this varies drastically here in MD from often none to a decent ice thickness).

I was thinking about pushing the snow into the middle with the pool brush, making it melt faster and allowing the cover to return to it's resting state sooner. I suppose though it's more of the springs having expanded/stretched versus the fabric and straps...or some of both. Anyway, just musings of a first year pool owner.
 
Yep our cover looks the same with this snow. I like your plan to mentally keep track of the amount of precipitation and check the level and drain as the water creeps up.

I'm already anxious for the winter to be over so we can reopen the pool this Spring!

Thanks for your thoughts and advice - here's hoping for another mild winter!
 

Enjoying this content?

Support TFP with a donation.

Give Support
Thread Status
Hello , This thread has been inactive for over 60 days. New postings here are unlikely to be seen or responded to by other members. For better visibility, consider Starting A New Thread.