Hi everyone!
I've been lurking on this site for 14 months, and now I'd like to post. I'm hoping to draw some opinions on my restoration project.
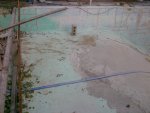
For better or worse, I have decided to resurrect my in-ground, cinder block (plastered) pool and restore it to working order. I have a general plan to go on, but I am still pandering on some of the details, because I want to do the best I can in order to minimize future repairs.
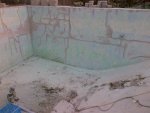
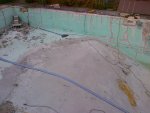
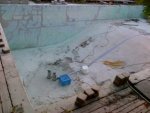
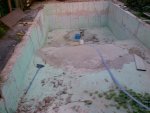
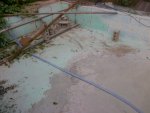
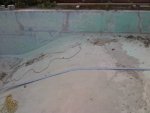
My pool is a very typical 16' x 32' geometry, deep end is about 6.5' deep, shallow is just under 2.5', with a slope between them. The floor is no good, I plan to pour a new one on top. The walls are riddled with cracks, some spots worse than others. The worst cracking is in the the shallow end wall, in addition to there, one side wall is cracked at the bottom (in shallow area) because two courses of cinder blocks have separated due to the top portion shifting slightly inward under pressure from the surrounding earth (this seems to be just above the winter low-water line, one of the jets is set low).
To me, it looks as if most of the other cracks have been caused by seepage coming down from the tops of the walls; they have never been sealed properly, and they have been perforated extensively because the coping installed was 2" x 12" pressure treated lumber secured directly to the concrete that was poured into the block tops. I believe water seeped in and over the course of many freeze-thaw cycles caused the cracking. The crack distribution seems to support this theory (i.e. starting mostly at the top)
My general plan:
- pour a new end wall two feet (give or take) from the existing shallow-end wall, where the worst cracking is
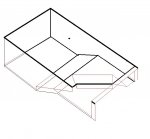
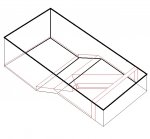
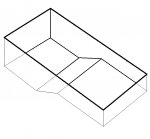
- in the process, i'd like to cut a corner (drawing to follow) off of the shallow end to reclaim some deck space, since the corner of the pool is within ten feet of my house there
- from the corner, i'd like to create a sloped entry, bypassing the need for stairs
- i need to replace the skimmer
- i need to move one jet, since it is in the shallow end wall to be replaced
- i have no main drain, which makes emptying the pool a real hassle, so i'd like to add one (or two since the parts kit I bought includes 2)
- fill and patch all of the cracks, which I have now ground out to 'V' shape
- seal the cold seam all the way around the bottom corner (floor to walls) and at the two corners where my new wall meets the old ones
- pour a new floor, which will also cover most of the crack that has developed due to earth pressure from outside
- on pouring the new floor, i'd like to extend the shallow end slightly, and increase the slope so I don't use too much deep-end space, possibly with a vertical drop at the bottom of the slope
- prime with a high build submersible primer and paint with epoxy submersible paint
- install masonry coping
- pour new deck
- raise existing wooden deck that is at one end to match deck height throughout
What I am not sure about (a lot of things)...
- best crack securing/sealing strategy
- best cold seam sealing strategy
- how best to incorporate new (larger) skimmer into existing wall
- if there is any point in installing both main drains, since i only really want them for draining
- best jet locations, how to tie onto existing 1 1/2" threaded pipe embedded in walls
- how much rebar to put in my floor
- whether i need to break up existing floor, or pour right onto it
- how much rebar to put in my wall
- how best to accomplish the sloped entry, should I have a small step, then slope, or is a slope directly from the deck height ok as long as a crown it
- best concrete mix(es) to use
- the best order to do the work in
- several more items I can't think of right now...
The pool has been empty for 3 seasons, and the condition of the structure hasn't changed, I believe that barring future infiltration of water the cracking shouldn't progress too much further. Of course, I know I will have more repairs to do while it finds equilibrium, but I believe I can stay on top of it. Also, the pool walls have been drying out. I know they have water inside, because in some areas wet spots begin to appear at the cracks when I grind them out and expose bare cement. Most have stopped doing so, the most recently ground out cracks still show some wetness, but it is diminishing.
Thanks in advance for any comments, or advice on my project. I appreciate any input.
I've been lurking on this site for 14 months, and now I'd like to post. I'm hoping to draw some opinions on my restoration project.
For better or worse, I have decided to resurrect my in-ground, cinder block (plastered) pool and restore it to working order. I have a general plan to go on, but I am still pandering on some of the details, because I want to do the best I can in order to minimize future repairs.
My pool is a very typical 16' x 32' geometry, deep end is about 6.5' deep, shallow is just under 2.5', with a slope between them. The floor is no good, I plan to pour a new one on top. The walls are riddled with cracks, some spots worse than others. The worst cracking is in the the shallow end wall, in addition to there, one side wall is cracked at the bottom (in shallow area) because two courses of cinder blocks have separated due to the top portion shifting slightly inward under pressure from the surrounding earth (this seems to be just above the winter low-water line, one of the jets is set low).
To me, it looks as if most of the other cracks have been caused by seepage coming down from the tops of the walls; they have never been sealed properly, and they have been perforated extensively because the coping installed was 2" x 12" pressure treated lumber secured directly to the concrete that was poured into the block tops. I believe water seeped in and over the course of many freeze-thaw cycles caused the cracking. The crack distribution seems to support this theory (i.e. starting mostly at the top)
My general plan:
- pour a new end wall two feet (give or take) from the existing shallow-end wall, where the worst cracking is
- in the process, i'd like to cut a corner (drawing to follow) off of the shallow end to reclaim some deck space, since the corner of the pool is within ten feet of my house there
- from the corner, i'd like to create a sloped entry, bypassing the need for stairs
- i need to replace the skimmer
- i need to move one jet, since it is in the shallow end wall to be replaced
- i have no main drain, which makes emptying the pool a real hassle, so i'd like to add one (or two since the parts kit I bought includes 2)
- fill and patch all of the cracks, which I have now ground out to 'V' shape
- seal the cold seam all the way around the bottom corner (floor to walls) and at the two corners where my new wall meets the old ones
- pour a new floor, which will also cover most of the crack that has developed due to earth pressure from outside
- on pouring the new floor, i'd like to extend the shallow end slightly, and increase the slope so I don't use too much deep-end space, possibly with a vertical drop at the bottom of the slope
- prime with a high build submersible primer and paint with epoxy submersible paint
- install masonry coping
- pour new deck
- raise existing wooden deck that is at one end to match deck height throughout
What I am not sure about (a lot of things)...
- best crack securing/sealing strategy
- best cold seam sealing strategy
- how best to incorporate new (larger) skimmer into existing wall
- if there is any point in installing both main drains, since i only really want them for draining
- best jet locations, how to tie onto existing 1 1/2" threaded pipe embedded in walls
- how much rebar to put in my floor
- whether i need to break up existing floor, or pour right onto it
- how much rebar to put in my wall
- how best to accomplish the sloped entry, should I have a small step, then slope, or is a slope directly from the deck height ok as long as a crown it
- best concrete mix(es) to use
- the best order to do the work in
- several more items I can't think of right now...
The pool has been empty for 3 seasons, and the condition of the structure hasn't changed, I believe that barring future infiltration of water the cracking shouldn't progress too much further. Of course, I know I will have more repairs to do while it finds equilibrium, but I believe I can stay on top of it. Also, the pool walls have been drying out. I know they have water inside, because in some areas wet spots begin to appear at the cracks when I grind them out and expose bare cement. Most have stopped doing so, the most recently ground out cracks still show some wetness, but it is diminishing.
Thanks in advance for any comments, or advice on my project. I appreciate any input.