Pool Light Panel Upside Down

bigfry

0
Jul 4, 2011
8
Ok, well lets just get one thing out of the way yes it appears I am a moron.

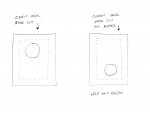
I installed the pool light panel upside down which was pointed out to me after the pool deck contractor noticed it. The question is should I dig out the panel, bust out the foundation concrete and flip the panel? or should I just leave it alone?

The top of the light is about at the bottom of the skimmer BTW.

If I leave it will it look horrible? thanks.
 
Welcome to TFP!!

I had a pool down in Va. that had the same problem. I carefully jackhammered out the offending panel, removed the bolts that hold the panel, flipped it over and tightened the bolts (once the panels were properly aligned) and poured fresh concrete onto the fix - I also used the extra concrete to pour an equipment pad :cool:

The problem with the way your panel is currently set is that the light requires a certain (~18") amount of water above it to keep from overheating (according to the manufacturer :| ) if the light isn't installed deep enough, the warranty is void :evil:

Like I said, I had to do this before - if you need any help, just let me know. :cheers:

Happy Independence Day!!!!
 
I was afraid you where going to say that. I went and looked at the pool light instructions and there it was written in cartoon. so I guess I am shoveling out the backfill, I guess the good news is we figured it out before it was too late.


Thanks for the info. and Happy 4th.
 
Ok, so I just finished building my pool and did the same thing: (! Here is the deal, the reason a pool light is usually 18" below the surface has nothing to do with heat...a five hundred watt light, much less a led light is not going to overheat in 15000 plus gallons of water irregardless of depth.

The 18" rule is straight from the NEC and it was implemented so that when a person was hanging from the side of the pool, arms on the deck, that the light would not be at chest/heart level in case of some freak electrical mishap/stray current that could potentially stop a persons heart...not sure if frying ones organs a little further south is any better but that's a different discussion.

Haywards led lighting is UL listed for installation 4" below the surface if you don't want to change things. Already had my intellibrites, not approved for 4" installation.

I chose to cut new holes and patch the old ones. Truthfully I didn't like where the lights were laid out to begin with. I used the template that came with the niches and carefully cut out new holes and then used the metal removed to ill in the old holes. I used a product called panel bond ( jb weld on steroids...used to hold pickup truck boxes together-get it at an automotive paint supply house) and then smoothed things out with some bondo...can't see or feel a thing now. I had some galanized roofing that I used to back up the repair. Jb weld should also work fine.

I had backfilled to plumbing grade so digging down to do the work was a bit of a pain but I still only had a few hours into the project.
 
I really don't think it would look horrible but It would be more effective lower, and you'll always be mad that you did not fix it right.
I agree with Bryantch that you could more easily repair your panel than jackhammer and re pour.
Personally I prefer screws to the epoxy but you could use both.
I would carefully cut your new light hole then use the metal as a patch for the old hole. You would need to back it up with an equally thick piece of galvanized steel that could be screwed to the panel. It should overlap at least 2" all around the hole and be secured with 4 rows of #10 countersunk screws (2 rows inside the original hole and two outside) at about 1 inch spacing.

Best of luck,
John
 
I started digging I think I am going to try to do what you said and cut out a new hole instead of messing with the foundation thanks for the advice, and I found out it is a violation of the electrical code so it has to be fixed one way or another.
 
Sounds good. :goodjob:
I used a sawzall on mine but it originally did not cut as tight a radius as needed so I had to modify the blade to be thinner like a jigsaw blade.

Best of luck,
John
 
Hi,

I have not done anything like this for a pool but I have done custom body work on cars and have done this on a smaller scale but it should work for this.
If you are going to cut the panel, cut the panel so you can use the original hole for the light. Cut the panel so as to keep the integrity of the light hole and also be able to just flip the piece you cut out and weld it back into the hole you just cut. Now the light hole will be in the correct location and the integrity of the light hole is intact. Just weld and finish and your done.
Please look at the attachment for a better understanding.
Hope this helps.
:cheers:
 

Attachments

  • light.jpg
    light.jpg
    191.6 KB · Views: 136

Enjoying this content?

Support TFP with a donation.

Give Support
This is a novel approach for me (not 2 guys hugging, I almost work in Olgonquit Me. :p ) - the cutting and welding of the panel. If it's not a perfect rectangle, how would it fit back in? How much would the weld protrude behind the liner? And would teh weld hold the force of the water?

I could see cutting a new light hole in the panel, at the proper depth (and can give advice on doing so - I've had to cut holes in 'un-holed' panels a number of times) and riveting a patch on the original hole, but I've never seen a welded patch on a liner pool.
 
Thread Status
Hello , This thread has been inactive for over 60 days. New postings here are unlikely to be seen or responded to by other members. For better visibility, consider Starting A New Thread.