
Intex SWG hard plumbing install
If you have purchased the Intex SWG and want to install it to a non intex pool that has hard plumbing then here is what i have found works, i found this out the hard way. first of all, i could not find a way to make the flex line work with any adapter though there are many modifications out there that folks have done. first the parts needed then a quick rundown on the install.
Parts needed for 1 1/2" hard plumbing install using all sch40:
Please note your prices and/or description may differ from this info, my prices at the store we a little bit higher. This info is from the Lowes website where I purchased all of these items. If you dont have a lowes, your local Home depot or hardware store should have this. Google these numbers for pictures and more info.
These parts are to do one side of the SWG so double the qty if you need to do both sides.
LOWES:
[*] 2" PVC Female Adapter Item #: 115923 | Model #:E942JRL = $0.97
[*] 2" x 1-1/2" PVC Bushing Item #: 23310 | Model # VC 00107 1000 = $0.84
[*] 1-1/2" x 2' PVC Schedule 40 Pipe Item #: 256098 | Model #VC 07112 0200 = $2.80
(you wont need this if you have some 1 1/2" pvc sch 40 laying around)
[*] AMERICAN VALVE 1 1/2" PVC Union SCH40 Socket Item #: 188223 | Model #240S 1 1/2 = $6.47
[*] Oatey 1 Oz. Pipe Joint Compound Item #:23502 | Model #:31229D = $2.03
(this is the magic stuff, this stopped my small drip leak)
[*] Teflon tape - was at Lowes for $1 but I cant find it on their site. You may have this already.
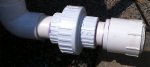
See picture for assembled product.
https://picasaweb.google.com/lh/photo/X ... directlink
Basically here is the install - but first a word of wisdom. These instructions and list are for the model Intex SWG CS8110 purchased in June 2011 and for a hard plumbing system using all 1-1/2" sch 40. Also - though it may not seem to go on very easy and feels like you are going to strip the adapter, the 2"PVC thread does go onto the intex proprietary thread with care and the right process.
The instructions:
1- Mount the 2" x 1-1/2" bushing into the 2"female adapter
2- then put the appropriate size pipe you need into the 1-1/2"adapter
3- then put the union after with the rest of your plumbing following after that
4- put a nice amount (about 4 rounds of teflon tape on the intex SWG) remembering to wrap the same direction as you would thread the adapter which is clockwise if looking at the adapter straight on.
5- put a generous amount of the thread compound (tube) on top of the teflon tape and also inside the 2" female adapter. Wipe it around to get it really good.
6- screw the adapter onto the intex SWG, when it gets hard, use large pliers and continue turning. I tightened it with about 2 threads remaining (see pic)
7- the reason for the union is you can break it apart (or loosen) and continue tightening if its not tight enough. I made this mistake and had to redo all my plumbing. The union will also allow for removal of the SWG without cutting all the plumbing away.
I have successfully done this and have no leaks. Take note, my first attempt at this had leaks with the teflon tape but after adding the thread paste, the problem was solved.
Good luck everyone, this was a 3 day project looking for all types of adapters and looking at all the rigged up ways to make the intex adapter work so I am paying it forward with this post. Ripping out my pluming twice due to leaks because it was not tight enough and not having the union was a dreadful time.
HB...
If you have purchased the Intex SWG and want to install it to a non intex pool that has hard plumbing then here is what i have found works, i found this out the hard way. first of all, i could not find a way to make the flex line work with any adapter though there are many modifications out there that folks have done. first the parts needed then a quick rundown on the install.
Parts needed for 1 1/2" hard plumbing install using all sch40:
Please note your prices and/or description may differ from this info, my prices at the store we a little bit higher. This info is from the Lowes website where I purchased all of these items. If you dont have a lowes, your local Home depot or hardware store should have this. Google these numbers for pictures and more info.
These parts are to do one side of the SWG so double the qty if you need to do both sides.
LOWES:
[*] 2" PVC Female Adapter Item #: 115923 | Model #:E942JRL = $0.97
[*] 2" x 1-1/2" PVC Bushing Item #: 23310 | Model #
VC 00107 1000 = $0.84[*] 1-1/2" x 2' PVC Schedule 40 Pipe Item #: 256098 | Model #
VC 07112 0200 = $2.80(you wont need this if you have some 1 1/2" pvc sch 40 laying around)
[*] AMERICAN VALVE 1 1/2" PVC Union SCH40 Socket Item #: 188223 | Model #
240S 1 1/2 = $6.47[*] Oatey 1 Oz. Pipe Joint Compound Item #:23502 | Model #:31229D = $2.03
(this is the magic stuff, this stopped my small drip leak)
[*] Teflon tape - was at Lowes for $1 but I cant find it on their site. You may have this already.
See picture for assembled product.
https://picasaweb.google.com/lh/photo/X ... directlink
Basically here is the install - but first a word of wisdom. These instructions and list are for the model Intex SWG CS8110 purchased in June 2011 and for a hard plumbing system using all 1-1/2" sch 40. Also - though it may not seem to go on very easy and feels like you are going to strip the adapter, the 2"PVC thread does go onto the intex proprietary thread with care and the right process.
The instructions:
1- Mount the 2" x 1-1/2" bushing into the 2"female adapter
2- then put the appropriate size pipe you need into the 1-1/2"adapter
3- then put the union after with the rest of your plumbing following after that
4- put a nice amount (about 4 rounds of teflon tape on the intex SWG) remembering to wrap the same direction as you would thread the adapter which is clockwise if looking at the adapter straight on.
5- put a generous amount of the thread compound (tube) on top of the teflon tape and also inside the 2" female adapter. Wipe it around to get it really good.
6- screw the adapter onto the intex SWG, when it gets hard, use large pliers and continue turning. I tightened it with about 2 threads remaining (see pic)
7- the reason for the union is you can break it apart (or loosen) and continue tightening if its not tight enough. I made this mistake and had to redo all my plumbing. The union will also allow for removal of the SWG without cutting all the plumbing away.
I have successfully done this and have no leaks. Take note, my first attempt at this had leaks with the teflon tape but after adding the thread paste, the problem was solved.
Good luck everyone, this was a 3 day project looking for all types of adapters and looking at all the rigged up ways to make the intex adapter work so I am paying it forward with this post. Ripping out my pluming twice due to leaks because it was not tight enough and not having the union was a dreadful time.
HB...
 I did almost the same thing on my IG pool with an Intex. I just needed to use some flexpipe :grrrr: on the outlet side of the cell.