On-Ground Deck Pool dug into slope

jch

0
May 30, 2011
35
First Post. New to forum.

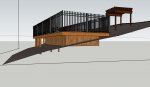
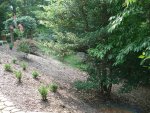
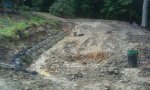
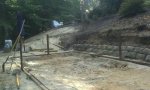
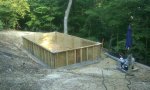
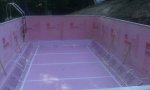
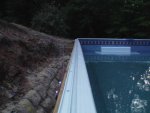
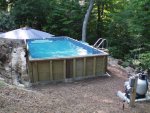
I am about to start digging for installation of an On-ground 12' X 24' rectangular pool. Since the pool location is a relatively steep slope, a full inground was not an option. I will have to rent a bobcat and dig into the slope to create a level surface for the pool. The manufacturer of the pool tells me I can backfill on the uphill side and have the dirt contact the side, but I will install a retaining wall to avoid this. The pool is made by AquaStarMI.com and will arrive in a few weeks.

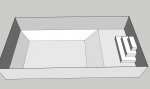
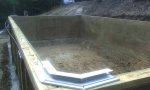
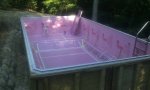
I have attached a few pics that show my rendering of the pool in the slope. I plan on doing all this myself and I have a question about the bottom prep before installing the liner. I plan on having a starting water depth of about 38" and I want to have a deeper tray that takes water depth to 52". I understand that it is common to use vermiculite to support the sides of this pan, but I'm wondering if this is necessary when my soil is a relatively heavy sand/clay mix. Can I just make sure there are no sharp objects in the sand/clay and set the liner in? The very bottom will have a sand base. Is there an alternative to vermiculite that is easy for a DIY homeowner?

Thanks,

John
 

Attachments

  • 2.jpg
    2.jpg
    91.9 KB · Views: 2,368
  • real land.jpg
    real land.jpg
    319.4 KB · Views: 2,368
  • pool liner.jpg
    pool liner.jpg
    105.3 KB · Views: 2,357
Is there anything on your upslope were you show a gazebo that you want to incorporate with your pool?? I had a similar problem and put an 12' x 24' on a raised retaining wall foundation to tie in with our existing deck. I don't know if that idea will work in your case? Good luck with your project.
 
I Like what you have done Johnnysnok. Without decking on the lower side you actually end up with the much desired infinity pool look. Ours would overlook the woods much like yours, so it would be a nice scene. It also cuts down on the amount of required fencing since the 48" wall serves as a barrier.
 
You either want sand or vermiculite/pool crete under the liner. Pool crete is easier to work with as it won't shift while the liner is being installed.

You might want to consult with a soil engineer to make sure the pool won't slide down the slope.
 
JasonLion said:
You either want sand or vermiculite/pool crete under the liner. Pool crete is easier to work with as it won't shift while the liner is being installed.

You might want to consult with a soil engineer to make sure the pool won't slide down the slope.

This is Virginia, not California. I'm very confident that the soil will not slip and send my pool down the slope. It is a heavy clay/sand composition. Sometimes I use my pressure washer to break it up before digging because the shovel won't even enter the soil.

I just got a quote from an installer for doing just the vermiculite portion of the project for $1800. This is a 2" base on the 12 X 24 rectangle with a dish that drops about 18" to give me a 52" deep end. Anybody have a feel for what it would cost in a total DIY project? Not sure I can find a local supplier of Verm..
 
As the time got closer, the quote changed up to $2400 to do the hopper. I decided to go with the 2" extruded polyethylene. I poisoned the heck out of the earth under the poly, so nothing will grow there for many years. I'm hopeful that the dry clay soil, completed darkness, and poison will hold back the dreaded nutsedge. This only cost me time and about $300 for the poly. Pictures coming soon.
 
jch said:
This is Virginia, not California. I'm very confident that the soil will not slip and send my pool down the slope.
Let's hope your right about that, and let's also hope it doesn't crash down the slope with anyone in it, you've got around 70,000 lbs of water there (pushing disproportionately against the oval sides) so make sure the site is property set for that weight - and the settling that will follow.
Also, you'll be going against all the manufacturers recommendations I've seen for AGP's, so be aware that your warranty may be compromised.

I think the the pool in the pic looks awesome, but building the site up needs to be done right.
 
cramar said:
jch said:
This is Virginia, not California. I'm very confident that the soil will not slip and send my pool down the slope.
Let's hope your right about that, and let's also hope it doesn't crash down the slope with anyone in it, you've got around 70,000 lbs of water there (pushing disproportionately against the oval sides) so make sure the site is property set for that weight - and the settling that will follow.
Also, you'll be going against all the manufacturers recommendations I've seen for AGP's, so be aware that your warranty may be compromised.

I think the the pool in the pic looks awesome, but building the site up needs to be done right.

This isn't my idea, it is all from the manufacturer. This pool is designed for slopes. It is not officially an "above ground pool". It is an "On-ground pool" and does not have oval sides. It is perfectly rectangular just like an in-ground. That was the selling point for me. You know it must be strong if they can build it rectangular. Aluminum or sheet steel pools would crumple under the stress.
 

Enjoying this content?

Support TFP with a donation.

Give Support
after clearing land and making a rip rap retaining wall out of bags of quikrete with rebar sent through to join them into a solid wall. This retaining wall method is ugly, but effective. It will all be hidden below the future deck.
 

Attachments

  • IMAG0016.jpg
    IMAG0016.jpg
    142.5 KB · Views: 1,987
bottom 4" steel "C" channels are in place. The vertical struts are also made of 4" construction grade "C" channel steel and are sunk into the ground 36". The hole for these verticals was 12" diameter and 40" deep. This was a major pain in the butt to dig using a 2 person motorized auger. The clay would actually stop the motor and yank us around. I finally discovered that spraying some water in the hole would lube things up.
 

Attachments

  • IMAG0020.jpg
    IMAG0020.jpg
    118.4 KB · Views: 1,991
One day later, the walls are up and top steel "C" channel locks everything in place. The walls are 3/4" ground contact rated pressure treated plywood. I didn't even know that someone still makes ground contact rated plywood. The manufacturer said I can backfill dirt against the walls, but I'm going to keep them high and dry so they should last forever.
 

Attachments

  • IMAG0024.jpg
    IMAG0024.jpg
    142.1 KB · Views: 1,991
Next we see a close-up of the top railing. The special "DR1" deck coping is screwed on top of a PT 2X4. So far I only have the corners set. The PT 2X4 is bolted with lag bolts from below to the top "C" channel. The spring bar you see in the distance is a steel tensioner. Before the pool is filled, I will use a car jack between the tensioner and the wall to "pre-tension" the side wall inward by 3/4". When the pool is filled, the water pressure pushes outward and it goes back to a near perfect straight wall.

In case anyone is curious, the strength is all in the way the C channels lock the 4X4's in place. The bottom square C channel has the C facing up. A 4X4 sits inside this channel every 2 feet. An upper C channel square sits on top of these 4X4's with the C facing down. This permanently locks all 4x4's in the steel frame. The 3/4" PT plywood goes up on the inside of this whole assembly and can't possibly push the 4X4's out. The steel vertical members encased in concrete lock it all together. There is also some 5/8" all-thread at 4 places to keep it pinched into a solid unit. This think can probably stand up to a tornado!
 

Attachments

  • IMAG0026.jpg
    IMAG0026.jpg
    92.9 KB · Views: 1,988
2" bottom foam and 1/4" side wall foam all added. All seams are taped with duct tape. I used spray foam to fill any voids. (Now that the pool is full I can tell that this was not the best because I have some sag points in the spray foam) The 2" foam is extruded polyethylene and can easily hold my 215 pounds standing on the ball of one foot without denting. It will easily take the 5 foot of water pressure.
 

Attachments

  • IMAG0028.jpg
    IMAG0028.jpg
    71.8 KB · Views: 1,986
  • IMAG0029.jpg
    IMAG0029.jpg
    58.7 KB · Views: 1,978
Had to work quickly at this point to install the liner and get some water in it. If it had rained, water could get under the foam and cause it to float in the hopper area. Like I said before, this is a heavy clay and it doesn't drain well.
 
Pool filling in these photos. You will notice the steel tensioner has now been tensioned for a 3/4" inward bow on the side wall. Once the tension is placed on the wall, you put in wood blocks to lock the tension in place and then remove the car jack.

Surprise surprise, the wife and I can't believe how green the water is coming from the hose. This is city drinking water. Time to change the Brita filter.
 

Attachments

  • CAM_0049.JPG
    CAM_0049.JPG
    95 KB · Views: 2,038
  • CAM_0051.JPG
    CAM_0051.JPG
    77 KB · Views: 2,023
Pool full and ready to use. The green water went clear after about 5 hours of pumping through the filter. I have mulched around it for now so we aren't dragging mud and dirt on our feet. This fall when it cools off I will begin building the deck which will mate right into the DR1 coping. Until then, we will simply enjoy the pool.
 

Attachments

  • CAM_0054.JPG
    CAM_0054.JPG
    144.6 KB · Views: 2,025
The pool came with a 1.5HP Hayward pump and filter system. I built a cement base for it that grips the mount perfectly because I set the mount 1/4" into the wet concrete. I made a stepped base that holds my Intex salt chlorine generator. This is the 2010 model that also has a copper ion cell. Seems to work perfectly. I have about 8500 gallons and run the pump and Cl- generator 5 hours a day. I have read good reviews and some bad reviews about the Intex SWG, but for $169, I just had to try. Seems the nearest competing units are all about $500-600. The PH was easily balanced after adding 2 pounds of soda ash and the Cl- is holding up well for going on 3 weeks.
 

Attachments

  • CAM_0055.JPG
    CAM_0055.JPG
    129 KB · Views: 2,014
  • CAM_0056.JPG
    CAM_0056.JPG
    155.1 KB · Views: 2,018
Total investment so far is about $10K. This was all DIY with me renting a bobcat and trencher and power auger. Yes, this is much higher than a typical above ground pool, but I would also have to say it is MUCH lower than an inground and should last for 30+ years. This pool uses a full inground liner and could have had a full 8 ft deep deep end if I had wanted one.

Once I put on the composite decking and railing, it will be one sweet looking pool on our slope that was previously unusable for any type of activity except gardening. My wife and I are asking ourselves why we waited so long to do this.
 

Enjoying this content?

Support TFP with a donation.

Give Support
Thread Status
Hello , This thread has been inactive for over 60 days. New postings here are unlikely to be seen or responded to by other members. For better visibility, consider Starting A New Thread.