The Frankenstein approach to filtering

DRoessler

0
LifeTime Supporter
Apr 22, 2011
27
So I guess I'm looking for a little reassurance ...
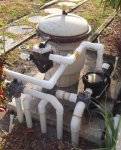
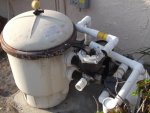
I've got a Pentair Quad 60 DE filter, An Intelliflo VS3050, several 3-way valves, and a bunch of PVC bits on the way. I've done a good bit of irrigation repair, and am comfortable around electrical repairs, but I am beginning to get a little worried on my pending filter/pump replacement.

It does not appear to be all that difficult, though I am certain the collective experience here has developed a good bit of artistic mastery for the process.

My plan is to:
1) Label all my incoming and return plumbing
2) Dry-assemble (no glue) all the bits, taking care to cut each piece as needed (measure twice - cut once)
3) Mark the locations where the joints/fittings should end up
4) disassemble, breath, pray
5) reassemble with glue, starting with the pieces requiring the most manipulation (longer runs with valves, elbows, etc.) to make a few larger sections to be installed.
6) glueing all the larger sections in place/together.

I can tell that 1.5" and 2" PVC isn't gonna want to bend much, so hopefully it will go together without too much grief (ha!)

Any pointers on what may help make this exercise more likely to succeed?
 
It can be very difficult to dry-fit Schedule 40 PVC. I prefer to measure as much as I can. Patience and make marks when pieces need to be aligned. Unions are your friend. Use them liberally.
 
JohnT said:
It can be very difficult to dry-fit Schedule 40 PVC.

No doubt, it's almost impossible to fully seat dry fitted PVC. On 2 joints I'd bet there would be at least 1/4" of additional slip when the glue lubricates/softens the pipe and fitting.
 
I find it easier to measure as I go. Dry fitting never goes together completely, so it is impossible to know if you got it exactly right during a dry fit. I lay all the fittings out inside to plan the layout but leave out the pipe, which I cut as I glue.

It is worth spending a little time thinking about where the final joint is going to be. You want a good bit of flex to get that final joint together. If you do it in the wrong place things can be too rigid and it might be difficult to get it to go together correctly. Sometimes gluing two joints at once is a way to avoid problems on the final joint. Doing two at once is much easier with a helper.
 
or put in some unions/flex fittings... unions have a little give to them, but the screw together over the outside of the pipe type connectors have a lot of give and should seal easily at pool presures (they're rated at 150psi!)
 
I have gone so far as to dry-fit using vaseline and that works pretty well. Of course you have to reprime both sides of the joint. I have also had good luck assuming the joints will bottom out to the stops if the pipe is really new and clean and you DONT let the cement get tacky....you have to be fast!
 
I agree with the others (having done a decent amount of plumbing with PVC). Measure and build as you go. Although sometimes, it does make sense to build more intricate contraptions on the bench for use as sub assembly. Two things:

1) PVC is (relatively) cheap, so get in there and go for it. You can always cut out and start over with parts that don't work.

2) Use CLEAR primer instead of purple primer. This work won't be buried, and purple primer drips give your plumbing job the look as if a JV plumber did it. Go ahead . . . ask me how I know this :)
 
PVC is both fairly easy to work with and ~somewhat forgiving :cool:

Start from the pump, put on the unions or Teflon tape and install the M/As. As this is 'retro', attach the pump to the filter (and DO use unions on both the influent and effluent sides of the pump (if room allows, leave 3" of pipe between the union and the pump fitting) ), so that you know where it has to sit.

Regular sch 40 fittings have a 1 1/4" 'slip' so dry fit any joints you are about to do and measure between the ends and add 2.5" to get the correct size. Try to keep your pipe cuts straight! If you have one that's over ~ 1/8" out of square, cut another piece (PVC is pretty cheap).

(I wish I had more time tonight to give all the 'pointers' I know, but others here know as much as I and I'll be back tomorrow @ about this time)
 

Enjoying this content?

Support TFP with a donation.

Give Support
Pardon my naivety, M/A's?

Thank you all for the pointers, and please keep'em coming! I still have a few more days to panic and call in the professionals :)

I've gotten the impression that avoiding sharp angles is desirable. The current plumbing is neat, but not horribly efficient from a routing perspective. I assume it is the product of spare parts and necessary flex. I'm ok with wasting PVC, but messing up one of the valve connections worries me a little. I will look for some clear primer, or a suitable can of PVC paint :-D
 
Sorry for my haste :(

M/As are male adapters (the threads are on the outside of the fitting, like a screw).

If you can post a pic of what you need to do, the experts here (and I :wink: ) would be better able to help you with the 'best' way to replumb your system :)
 
Sometimes, after you have glued a joint, you question whether or not the pipe ended up deep enough in the fitting. Here is a quality control tip that can help assure you that the joint you just glued is actually in deep enough.

Before gluing, measure the pipe length and mark it on the pipe. Then if you want to see how deep the pipe is in the fitting, just measure out the pipe length.

Also, when gluing PVC into plastic valves, make sure that glue does not drip into the valve.
 
OK, I don't have all the details figured out, at this time - but, how do you feel about switching the pump and filter positions? If you slide the pump to be ~ where the filter is and slide the filter over and rotate it 90* clockwise so that the pump inlet on the multi lines up with the effluent port on the pump. This will make it a quick 'up, 90 and in' to the multiport from the pump, saving you 2 90*s for getting water from the pump into the filter.

I can't see where the pipe goes behind the leaves (I suspect it wraps around only into the 3-way :? ) What's really idiotic is that the suction and return lines are intermixed :hammer:

Like I said, I don't have the full layout figured out doing that change, but wanted to run it by you.
 
waste said:
OK, I don't have all the details figured out, at this time - but, how do you feel about switching the pump and filter positions? If you slide the pump to be ~ where the filter is and slide the filter over and rotate it 90* clockwise so that the pump inlet on the multi lines up with the effluent port on the pump. This will make it a quick 'up, 90 and in' to the multiport from the pump, saving you 2 90*s for getting water from the pump into the filter.

I can't see where the pipe goes behind the leaves (I suspect it wraps around only into the 3-way :? ) What's really idiotic is that the suction and return lines are intermixed :hammer:

Like I said, I don't have the full layout figured out doing that change, but wanted to run it by you.

I'm ok with changing the layout. I assume the new multi with have the same general configuration, so with juxtaposition and a quarter turn, I count 2 90's, but that still saves one. You are correct about the return side. 2 90's to double back, into a capped tee and a second 90 to come back to a 3way. One return splits to 3 ball jets, the other to a two exit "spa like" jet feature. Not sure which line is which, but I figure I'd be ok as long as either can be shut off. I thought I'd lose the out and back from the multi by coming out to a 90, then down to a 3way. Most all of the piping above ground will be replaced with 2" except where 1.5" lines connect to valves.
 
DRoessler said:
JamesW said:
when gluing PVC into plastic valves, make sure that glue does not drip into the valve.

Hmm... Other then careful and judicious application, how can I insure I avoid glue in the valve?
Plastic valves can usually be used by gluing a pipe into the valve or by gluing a coupling to the outside of the valve.

When gluing pipe into plastic valves first apply the glue to the pipe, apply only a little glue to the inside of the valve (about 1/4 to 1/2 inch) and then hold the valve higher than the pipe so that any excess glue runs down the pipe and not into the valve.

When gluing a coupling onto the valve, use the regular amount of glue and hold the valve higher than the pipe when joining.

If priming the inside of the valve, hold the valve up so that any primer drips down away from the inside of the valve.
 

Enjoying this content?

Support TFP with a donation.

Give Support
Thread Status
Hello , This thread has been inactive for over 60 days. New postings here are unlikely to be seen or responded to by other members. For better visibility, consider Starting A New Thread.