Finished DIY build in Georgia

rv4hess

0
LifeTime Supporter
Mar 14, 2011
151
I've been reading on this site for a while just trying to get an education...finally I'm jumping in.
Thank you to all the contributors and moderators for all the information!

Even though we can't afford to build all we would want, we've decided to bite the bullet and go for it. (Don't want to go another year mooching off the neighbors).
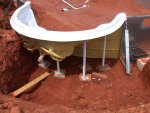
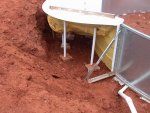
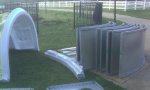
Already ordered a Royal Swimming Pools 18x36 Deer Creek, steel/liner with a play depth. Coming this week.
Opted for 2 swimout/lounge/steps w/ spa jets instead of the sit in stairs. Was recommended to go to 2" Waterco 1 1/2 hp pump and larger inlet sand filter. Aqua Plus SWG, Color Logic 4.0. Found a good used interfab slide on Craigslist for $200, (will use bolt on deck mounts).

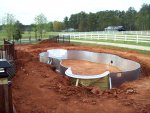
We have always preferred the swimouts available on most fiberglasspool designs but they did not offer a decent size pool in a play depth, (and are expensive), so we will put swimouts on each end of our Deer Creek. Just wondering why I have not seen others doing this?

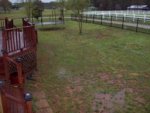
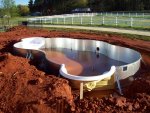
The backyard has about a 2 foot slope toward the house, with a 4' high deck. We'd like to raise the yard level instead of adding retaining walls on the far end.
Afraid we'll run into complications backfilling under the deck against vinyl siding or otherwise draining the area.
Any ideas or recommendations?

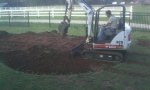
We have a great grading contractor and I plan to do Plumbing, Wiring and all else that I can.

Permit application was lengthy but straightforward, except I had never done an electrical load calculation before. Thanks to Mike Holt for the excel spreadsheet, http://www.mikeholt.com/documents/calcu ... ations.xls
--- Very cool and professional.

Existing fence transition to the deck presented some BOCA pool code problems but ended up deciding on narrow spacing for the balusters (1 1/2") to keep the deck from being climbed up on near the Pool barrier. We're hoping the permit is ready to Pick up today....

Thanks again for all the great information here, I'm sure I will have a ton of questions along the way.
John
[attachment=2:1hqrh68i]img-1.jpg[/attachment:1hqrh68i][attachment=1:1hqrh68i]Belle and Pool 059.jpg[/attachment:1hqrh68i][attachment=0:1hqrh68i]Belle and Pool 061.jpg[/attachment:1hqrh68i]
 

Attachments

  • img-1.jpg
    img-1.jpg
    16.6 KB · Views: 2,007
  • Belle and Pool 059.jpg
    Belle and Pool 059.jpg
    44.5 KB · Views: 1,053
  • Belle and Pool 061.jpg
    Belle and Pool 061.jpg
    39.2 KB · Views: 1,054
Re: Starting IG DIY build in Georgia

Welcome to TFP!

Looking forward to seeing your build progress. I'm a bit confused about the slope/retaining wall comments you made; I read it to mean you want to raise the level of the yard/pool to match the deck elevation? If so, I'm not sure that a steel wall vinyl pool can be installed that way.
 
Re: Starting IG DIY build in Georgia

Thanks Melt in the sun. I just needed to raise it somewhat up to the deck level because of the slope of our yard. I'm having trouble uploading pictures (256k max and I can't get the Photobucket link to take in the file upload box?)

Good progress today, we got the pool hole dug (except for the deeper middle part). The dirt is working out well to fill around the pool and raise the overall ground level. looks like we won't need to backfill against the house or use any retaining walls. Thanks to Scott, an excellent grading contractor.

Starting to set wall the panels. Learned it is important to be very accurate with the stake out measurements. The errors will multiply.

http://i1141.photobucket.com/albums/n60 ... 0_0970.jpg

http://i1141.photobucket.com/albums/n60 ... 0972-1.jpg\
 
Re: Starting IG DIY build in Georgia

18 x 36 Deer Creek day 3; Learned many lessons that the PBs already know. We had to back up and re-set many of the wall panels. My original layout was just sloppy. I had used a 3' piece 3/4 emt pipe to stake out for the radiii measurements and it would flex a bit when you pulled a tape from it. My first steel check measurements were up to 3" off.
We then used a short wooden stake with a finish nail and this proved to be an accurate way to lay out. Must have measured, shifted panels and measured 200 times. I finally got smart enough to take a sharpie and write the steel check measurements on the corresponding panels. I think my helper had the 20 measurements all memorized before we finished. A free form pool is definitely a bit tricky for first timers, and the directions were mainly aimed at rectangular shaped designs.. We finally got every measurement within 1/4" and most spot on. Anything better would have required manufacturing the steel to a tighter tolerance.
We're going to get some serious thunderstorms tonight so we called it a day early and just cleaned up. Tomorrow if it clears and dries enough we will pull out one panel and bring in the Bobcat to finish digging the play pool depth.
I really appreciate all the info I get from all the previous thread's contributors.
John
 

Attachments

  • 100_0978.JPG
    100_0978.JPG
    171.2 KB · Views: 1,889
  • 100_0984.JPG
    100_0984.JPG
    197.4 KB · Views: 1,883
Pool light location

I do not like the fact that our light is facing the deck and house. I'm considering relocating it to an end wall. It is a Color Logic 4.0.
As is, will it be too bright, shining in our eyes or on the house?
I really can't justify two so my only other option would be putting it on a shallow end shining across lengthwise.
TIA John
 
Rain last night

Woke up this morning to an inch or two of water in the pool. The good news is that the bottom and the walls look very level.
Were going to pump it out and then dig the deeper vee part in the middle.
 

Attachments

  • 100_0985.JPG
    100_0985.JPG
    208.3 KB · Views: 1,859
Re: Starting IG DIY build in Georgia

The "Boss" :thequeen: 
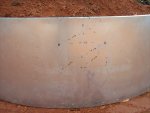
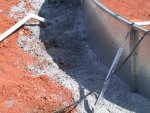
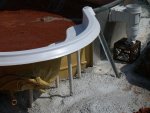
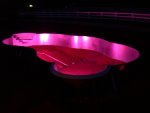
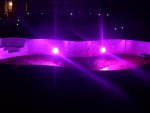
and I decided we had to move the light to face the other way. This necessitated having two lights for adequate dispersion, so we bit the bullet and bought another ColorLogic 4.0. We were able to swap out the panel with a light hole for one without. I will now have to cut two in the other side. It was not worth removing the panels to have the factory cut them.

The ground finally dried enough that we were able to make some progress today with digging the deep part vee. We took out a panel and drove a bobcat in and out carrying out the dirt. We should be able to pour the concrete collar tomorrow. :)
We're hoping to find some experienced vermiculite trowlers in an effort to finish the bottom this weekend.
 

Enjoying this content?

Support TFP with a donation.

Give Support
Re: Starting IG DIY build in Georgia

Okay, first post, (I know I need to correct my signature.) With that said, I am glad to see another DIY install! I unloaded my pool kit in the garage at 7:00 this morning.:) RV4hess, We are located in Carrollton, Ga. I will be following your thread. Keep us updated. Please post any tips or tricks you run across. I will be documenting my build as well. Good luck.
 
Re: Starting IG DIY build in Georgia

Ditto on markopolo here, thanks for posting this. I'm getting ready to do a lazy-L and seeing others doing more complex designs than mine, overcoming all the problems along the way, is reassuring as well as informative. When I finally get to building I'll post so others can learn from my mistakes too :hammer:. I know I'll be going with 2 colorlogics facing away from the house anyway :goodjob: Thanks and keep the progress updates coming.
 
Re: Starting IG DIY build in Georgia

Day 7, (but only about day 4 of work)
Spent the A.M. leveling the walls one last time, and supporting the stairs. Afternoon we poured the concrete collar around the walls, the equipment pad and main drains.
Had to try out the pair of ColorLogics....Very glad we changed locations and added one, we have a dark liner so two should be nice.
Looks awesome!! :party:
 

Attachments

  • DSCN6661.JPG
    DSCN6661.JPG
    381.2 KB · Views: 1,703
  • DSCN6663.JPG
    DSCN6663.JPG
    415.9 KB · Views: 1,699
  • DSCN6660.JPG
    DSCN6660.JPG
    385.6 KB · Views: 1,704
Re: Starting IG DIY build in Georgia

Earlier today;
Step supports, 1 1/2 PVC, shimmed with 1/4 thick Hardee concrete board, (because I had some handy).
Rebar in the base of the PVC.
Main drains, just before being concreted in place.
 

Attachments

  • DSCN6655.JPG
    DSCN6655.JPG
    394.1 KB · Views: 1,699
  • DSCN6656.JPG
    DSCN6656.JPG
    357.1 KB · Views: 1,691
  • DSCN6657.JPG
    DSCN6657.JPG
    341.5 KB · Views: 1,694
Re: Starting IG DIY build in Georgia

MajorDIYer said:
I'm getting ready to do a lazy-L and seeing others doing more complex designs than mine, overcoming all the problems along the way, is reassuring as well as informative. When I finally get to building I'll post so others can learn from my mistakes too :hammer:. I know I'll be going with 2 colorlogics facing away from the house anyway

I think an L design is the most practical for having both a play pool and diving end, but we did not have room for one.
We are hoping we don't regret not having a diving pool. The kids are almost teenagers and I know they will want to "dive in".

The extra ColorLogic was a tough pill to swallow but seeing them on (temporarily) tonight brought joy to my heart :cheers:

Thanks for sharing,
John
 
Re: Starting IG DIY build in Georgia

rv4hess said:
I think an L design is the most practical for having both a play pool and diving end, but we did not have room for one.
We are hoping we don't regret not having a diving pool. The kids are almost teenagers and I know they will want to "dive in".

The extra ColorLogic was a tough pill to swallow but seeing them on (temporarily) tonight brought joy to my heart :cheers:

Thanks for sharing,
John

L's are practical but don't look anywhere as sexy in the backyard as yours! Seeing your pics I'm already loving the ColorLogics and can't wait to see them on mine. I'm sure you'll be glad to have put in the little extra it took to get them the way you wanted. We went back and forth on the diving part too. 6' is still cannonball depth, and what more can a kid ask for!
 
Re: Starting IG DIY build in Georgia

Day 9, not much progress this weekend, I'm just lining up the next phases.
A nice local PB stopped by yesterday evening to bid on the vermiculite. (From what I had read here this is a job sometimes better left subbed out). His brother does the floors and will stop by Monday for a firm bid. If he comes in with a reasonable price, he can have it. I don't have many days off this month and would love to protect the clay bottom with vermiculite and a liner so it doesn't get eroded with rain.
This PB did say there was no hurry, he normally does the bottoms almost last after plumbing and backfilling.
I would rather get it in sooner if possible.
Monday I plan to bring in #57 stone and backfill under the steps, and add about 1 foot of dirt around the rest of the wall to make a level trench for the plumbing to the equipment pad.
This PB recommended I run the plumbing down to the footing and stay on the concrete. I would agree except, I did not smooth out the footing at all and it has some rough and ragged parts.
He says that is preferable to putting pipe on fill, and that most plumbing problems he fixes could be attributed to improperly supporting the piping.
I have a jumping jack on site and can make that 1' of clay fill as solid as a rock. Unless you experienced guys can talk me out of it, I will fill 1 foot up. This will also keep the skimmer and spa pipes level all the way to the equip pad.
 

Attachments

  • DSCN6671.JPG
    DSCN6671.JPG
    359.4 KB · Views: 1,648
  • DSCN6670.JPG
    DSCN6670.JPG
    407.2 KB · Views: 1,643
  • DSCN6669.JPG
    DSCN6669.JPG
    385.4 KB · Views: 1,644
Re: Starting IG DIY build in Georgia

What is that Step/Spa thingie? It looks like 1/2 a Spa attached to the main pool. Is there a wall that separates it from the pool when finished? Or do you just heat the whole pool to 100 degrees :)
 

Enjoying this content?

Support TFP with a donation.

Give Support
Thread Status
Hello , This thread has been inactive for over 60 days. New postings here are unlikely to be seen or responded to by other members. For better visibility, consider Starting A New Thread.