Pool Construction Tip of the Day/Week/Month

Nightmare

0
LifeTime Supporter
Jan 21, 2011
354
Riverside, CA
I'm a little over 1 month into our project. This is the first pool I have built and we hired a local company to build the pool and design the rest of the backyard.

I'm learning something new every day I watch these guys build the pool. I don't know how anyone could hire a Pool Builder and not still be home just about every day to answer the dozens of questions that come up. Along the way I'll post stupid little things that I am learning in the hope that it will save someone else some frustration.

If anyone else wants to add to the list feel free to post.

Tip #1 - Get a LONG hose and a nice spray nozel. You are going to spend a LOT of time watering down the pool, coping and concrete. I have a nice hose, but I don't know if it will survive the construction process. It was dragged over the gunite for 2 weeks, ran over by multiple bobcats and wheel barrows, pulled around dozens of steel stakes and it has a lot more to go.
 
Tip #2 - Pick out the tile for your skimmer

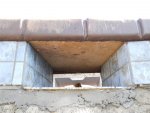
Pick out a couple 18" tiles that you like. They will become the "lid" of the inside of the skimmers (and other accessories). I watched the guys install the tiles and it just didn't click in my head. They pour the coping over the tile and it isn't comming out.
 

Attachments

  • Skimmer.JPG
    Skimmer.JPG
    96.7 KB · Views: 633
What bothers me is it looks like they used a piece of particle board which will need to be removed or it will swell when it gets wet. That was not an ideal choice. Talk to the PB about that.

I also don't see any evidence of a membrane between the bond beam and what appears to be a canter levered stamped deck. Is that the edge of the deck or is there a gap 12" back for an expansion joint? The deck and the bond beam expand at different rates. If that's just coping and not part of the deck, it's fine, otherwise there will be cracking where the edge meets the tile.

Was the PIP coping reinforced with steel?

Scott
 
That is an 18" Tile installed upside down. It appears to be either ceramic or porcelain.

I'm not 100% up to speed on my pool terminology. The pool is a Gunite Shell. The top of the pool wall is called the "Bond Beam". The back and side of the pool have a "Raised Bond Beam". The Gunite was shot on Jan 21, so it had plenty of time to cure. I believe I have a:

"Poured in Place" - Concrete was poured on site as opposed to formed somewhere else
"Canitlevered" - Overhangs the edge of the pool
"Coping" - Decorative top of the pool wall

I found the graphic attached below.

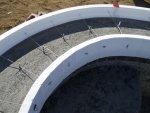
The photo shows a section of the spa Raised Bond Beam right before the concrete was poured. There is no "barrier" between the Coping and the Bond Beam. I was under the impression that the Coping should bond itself to the rest of the pool. The ONLY rebar I saw installed in the Coping was a 6-9" piece on each side of the Skimmer.

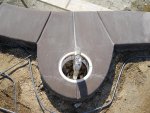
Last picture is the skimmer and Coping completed from deck level.
 

Attachments

  • Skim 2.JPG
    Skim 2.JPG
    154.4 KB · Views: 588
  • Form.JPG
    Form.JPG
    75 KB · Views: 588
  • poolfeature-shotcrete.gif
    poolfeature-shotcrete.gif
    2.8 KB · Views: 584
Scott mentioned this to someone recently earlier, and it's a tip I'd already learnt the hard way.

I wasn't around when they started to fill mine and they simply stuck the hose in a skimmer and let it sheetdown into the pool towards the deep end. Bad idea. I still haven't been able to get those stains out of the diamond brite.

So TIP on FILL DAY: Depending on your fill water quality, put some rags, tee shirts, etc... at the end of your hose. Ideally I think the fill hose's end should not even be in the skimmer.
 
The coping is fine.

Are you sure thats a tile spanning the roof of the skimmer opening? I'll assume you saw/checked... Faith.

There is an unfilled space above the skimmer mouth. That will need to be filled and closed off so an overflow doesn't get in there.

Scott
 

Enjoying this content?

Support TFP with a donation.

Give Support
That area that looks like a gap is not unfilled, just unfinished :)

I saw the tiles placed over the skimmers (all 3). I assumed it was to keep concrete off the tile and out of the skimmer. It didn't occur to me at the time that there would be no way to remove it after the concrete was poured.

The guys installing the Electrical Grounding Grid confirm that they don't usually plaster over the tile.
 
Re: Hose fill up

Nightmare, pretty much. When the pump is off and the water is still, I believe you can see the mineral/sediment stain on the freshly applied finish. The water down here is not the clearest to tell you the truth.

The PB set the hose.
 
openpool wrote:
>>wasn't around when they started to fill mine and they simply stuck the hose in a skimmer and let it ... still haven't been able to get those stains out of the diamond brite.

a simple way to avoid that is to use a pre-filter tank at fill-up time. in our area there are companies that work with the PB/replaster crews and they drop off the day before fill-up commences what appear like giant scuba dive air tanks. you hook these up to your hose and the water comes out blue and contains no minerals. the cost of the service is around 100.00 and well worth it.
 
My PB (Riverbend-Sandler) filled the pool with the end of the hose at the bottom of the deep end, covered with rags. I asked about filling it with the pool fill line (which ends in the skimmer hole). He said that doing so would cause a stain where the water ran down the side of the pool. The rags were there to keep the end of the hose from moving.
 
Tip Number # "Whatever"

The Color Chart Lie

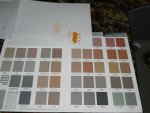
If you want to pick out a specific color don't rely on paper. We used the Davis Color brochure to pick out the colors for the Coping and the main Decking areas. We assume that the colored concrete will fade, so we tried to pick a darker tone than the final finished product we wanted.

We picked out "Kahlua" for the coping and "San Diego Buff" for the main deck area.

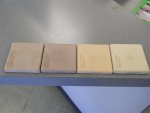
They poured the coping last friday (2/11/11) and I still have no idea what it will look like when it is done. The color of the coping looks very different when wet. When the coping is dry there are several different shades of color. We do have hard water here. I assume it will 'even out' after a short time. See Photo.

I stopped by a local paver yard yesterday to look at some pavers again. One of the sales guys had the Davis Color Samples in his office. The samples were 3"x3" concrete tiles of every color in the catalog. As soon as I saw the "San Diego Buff" sample I knew we had a problem. We are scheduled to pour the Decking today. I called the "Flat Work" guys and I am swapping out the color this morning at 6:20 am.

Take a look at the photos. We did not see the 'Orange' or 'Yellow' tones in the San Diego Buff until I saw a sample of concrete in person. If you can, look at the actual sample pieces. Catalogs may not show actual colors, same is true for the Internet and computer monitors. I'm willing to bet that even the sample piece of concrete won't be 100% accurate.

Can you guess what color I have next to the Sample Page???
 

Attachments

  • Davis Sample.JPG
    Davis Sample.JPG
    74.5 KB · Views: 417
  • Davis Cat.JPG
    Davis Cat.JPG
    75 KB · Views: 415

Enjoying this content?

Support TFP with a donation.

Give Support
Thread Status
Hello , This thread has been inactive for over 60 days. New postings here are unlikely to be seen or responded to by other members. For better visibility, consider Starting A New Thread.