Need to Redo Piping

bcool

0
Nov 29, 2010
16
Fort Erie, ON
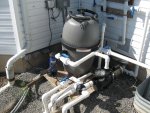
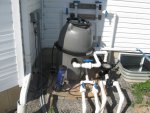
As you can see in the attached photos below, the piping installed by the pool contractor is a bit ugly and I would like to correct a few problems by redoing the piping. The main problem is that the pool heater (shell & tube heat exchanger visible on wall below the siding) is poorly accessible and impossible to drain without disassembling the piping. The other problem is that the pool drain is a hose that runs across the back of the house and onto my side lawn.

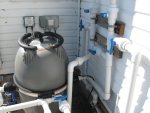
The photos show the pump & filter as assembled by the contractor. Because the pump was being installed in a different location than originally planned (long story), the contractor suggested that we pour the pad after the pump and filter were installed. To compensate for the height of the pad, he set the everything on a board and 2x4s, which made it even uglier. The pump and filter now sit on a concrete pad and I plan to put a weather enclosure around it later.

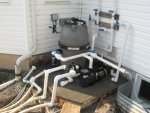
Since I have a 4" rainwater drain pipe very close to the pool filter, I want to extend a 2" pipe from the pool filter's drain connection to the 4" pipe. Although I can use an elbow at the filter, it makes more sense to me to turn the filter 90° so that the filter's inlet is in line with the pump and only one long-radius 2" elbow is used to connect them. Currently, the pump is connected with 1-1/2" piping using 3 elbows and a tee. Because the fittings were glued so close together, I can't reuse the existing tail pieces

The assembly drawings in my owner's manuals suggest that I will need the following to redo the piping:
  • PN R0461800 - Universal Half Unions (Set of 3) and Drain Plug Cap - for the filter[/*:m:3m71jo4p]
  • PN R0327301 - Tailpiece, O-ring & Union Nut (Set of 2) - for the pump discharge connection[/*:m:3m71jo4p]

Would anyone know if there is cheaper way to connect up to the filter and pump than to use the Jandy PNs? The parts are expensive for a half union and I can't really be sure that I'm getting what I want. When I called up Jandy, I got the impression that PN R0461800 was all I needed. However, in checking with some on-line pool stores, the product photo shows everything BUT what I need.

Can I use half of a union (like NIBCO PN 457-020) to connect up to the half unions on the cartridge filter and the pump?

If not, can anyone suggest what I really need and the best place to buy it?
 

Attachments

  • PoolPiping01.JPG
    PoolPiping01.JPG
    172.6 KB · Views: 246
  • PoolPiping02.JPG
    PoolPiping02.JPG
    116.4 KB · Views: 231
  • PoolPiping03.JPG
    PoolPiping03.JPG
    150.5 KB · Views: 229
Hi again :wave:

It's hard to tell from the pictures, but... if you moved the pump forward (so that the effluent port lined up with the filter's influent port, allowing for the pipe and 90*s) you could save 2 90*s and still use a 3 way valve to connect the drain pipe to your existing gutter drain.

If you reorient the entire filter, you run into 90* problems hooking back into the return side :(

There are products that can either remove the existing pipe from a fitting (I've got a 2" and an 1 1/2" 'drill bit' that does the job) or you can further reduce the diameter and use a 'pipe extender' to save the fittings you need to keep. (I'll gladly tell you more about these options, if you'd like :) )

I'm more than happy to work with you on your replumb - just give me the info I need and we'll make this work :cheers:
 
I was just planning to leave the pump in place and rotate the filter 90° so that I could use a single 2" long-radius elbow to connect the pump and filter. I also would like to use a 2" long-radius elbow to connect the filter to the heater and bypass piping behind the filter. The heat exchanger is poorly located and can only be drained by separating the pipe. There is also no means of adding a control valve on the heat exchanger. Since there is so much rework to do, I'm not too worried about saving the elbow on discharge side of the filter.

As for moving the pump forward, I think this is an option I might consider but I would like to keep every contained as much as possible over the pad so I can put an enclosure around the entire system. I was hoping to put in new tail pieces (if that's they're called) because that seemed to me to be the cleanest option. Drilling out those pieces is something that I would try to avoid if possible. I would still need a tail piece for my drain line because there is a cap on it right now.


The photo below shows the pad after after I placed the equipment back on it. The stone base was moved closer to the pad to eliminate its interference with the suction piping from the drain and skimmer. I had to move the piping on the wall up a bit so as to be able to hook up my heat exchanger. I even discovered a leak from one of the threaded connections once I got water flowing through it.
 

Attachments

  • PoolPiping04.JPG
    PoolPiping04.JPG
    146.7 KB · Views: 203
I would reverse the pump and filter locations, this puts the filter in a straight shot to the lines going up the wall and puts the pump closer to the electrical connections/switches and a better shot at the eavestrough drain pipe but requires you to swap inlet/outlet locations for your buried pipe. Good thing your pool plumbing is still above ground, not sure if you can lay the pipes over each other like that without seeing the rest of the buried pipe...probably too late now.

Cut the first 90 at the pump outlet and using a coupler you can reuse the entire outlet piping since it would be a mirror image of your current install (although this won't fix the rotation of the filter where a complete replumb is required to accomplish). That heat exchanger should be vertical not horizontal IMO and higher up on the wall unless there is a restriction on its positioning, either way higher up would be better. If it were me I would use a piece of 8" galvanized 90 to mount the heat exchanger in the line directly leading to the pool outlet splitter and anchor it to the pad, this would place it near the outer edge of the pad and allow you to insulate it if necessary and give easy access.

Thats quite a piece of plastic engineering there and directly indicates 2D thinking, there is enough 90's in that system to choke a horse...what is wrong with a split tee and some 45's? There are a million ways to do it better and only a few ways to fix it cheaply, it really depends on how many fittings you want to replace, how well the system performs as is and if you can swap the inlet/outlet piping by laying them over each other.

Looks like they are still handing out plumbers tickets in cracker jacks boxes, I feel for you man...and I thought mine was bad! Gotta love the 2X4's screwed through the siding...true professional installation practice...and not even pressure treated wood?!
 
Well, the piping guy sent out by the contractor seemed to be highly regarded by the contractor. He was a nice enough guy (a little rough around the edges) but I think his main qualification is that he took the job way back when. As with a lot of places, "you touch it - you own it".

I know there are a lot of ways to fix the piping but, since I have to open it up anyway, I thought I would also use the opportunity to upgrade everything around the pump and filter to 2" as this is Jandy's minimum recommended size. The 2" valves and fittings are a lot cheaper in the US than the local pool store so replacing everything (if necessary) isn't as bad as it could be. When the electrician took a motor load reading, he measured 5.5 (high speed) and 2.5 (low speed) Amps. Jandy specifies 6.0 & 2.3 Amps @ 230 volts. Since we have closer to 240 volts here, I would expect the high speed speed draw should be closer to 5.75 Amps and there's obviously some flow restriction in the system. Larger pipe and less elbows should get me a little bit more flow. BTW, I don't quite understand why my low speed draw was higher than the specification when the only difference was the switch to low speed.

Switching the positions of the pump and filter is something I haven't considered yet. Not knowing any better, we placed the ground conduit for the pump on the right side of pad so that the cable comes out of the concrete very close to the ground lug on the pump. There is enough grounding cable to reach the pump in either case but I was hoping to keep the appearance of the installation as clean as possible. As for the heat exchanger, I planned to orient it vertically so as to be able to drain it without removing it. My plan was that, by rotating the pipe (against the wall) 90° CW, I could reuse most of it.

The reason that I wanted to use a valved drain line at the bottom of the filter is that this would be the easiest way to drain all of the water out of the filter. Not having it would mean I would have to uncap the drain and have the water flow all over my (future) deck and possibly back into the pool. Also, I thought having a bottom drain would make it easier for me to wash out any sediment in bottom of the filter. With the top off, I could just keep spraying until all the debris was washed away. Excess water in the pool would be an opportunity to flush the accumulated sediment as well.
 
Ah... flex pipe :thumleft: This makes any pump position changes MUCH easier :cool:


I stand by my advice to move the pump to be ~ in line with the filter's in-port (if the others want to mess with the out- port of the filter, I wish them well)

Given your exposed flex pipe, you can probably make whatever changes you want :-D

Keep running your ideas by us, and we'll keep advising you on the possibilities :-D :cheers:
 
Thread Status
Hello , This thread has been inactive for over 60 days. New postings here are unlikely to be seen or responded to by other members. For better visibility, consider Starting A New Thread.