Skimmer Leak

Oct 24, 2010
10
Central Florida
Hello everyone,

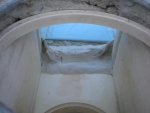
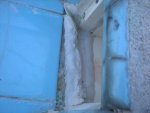
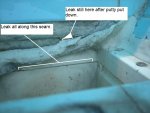
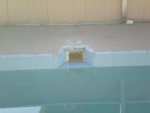
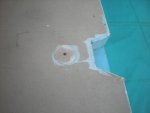
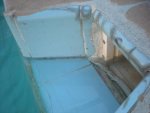
I have researched for two weeks so as to not waste our time. I finally realized that the dye test was the way to go. I found some immediate leaks where the skimmer connects. The dye went straight to the spots illustrated. I am leaking about 0.75" a day, but the leak slows down drastically after water is no longer entering the skimmer. The leaks are outlined in the pic. You will see where a pool guy already tried laying down a cord of putty, but only the cheap fix only scratched the surface. My logic tells me that I can either keep patching or rebuild the area. I am asking for and I welcome your help! I will document my journey at this portal to help the site and those coming behind me!

Thanks much.
 

Attachments

  • pool leak 2.jpg
    pool leak 2.jpg
    78.1 KB · Views: 330
A 90 degree clockwise rotation would orient the issue a bit more clearly.

Seems to me that the PB used a skimmer for a liner pool. Note the stainless screws. Skimmers for gunite don't have face plates.

I fear the gunite near where it meets the plastic is deteriorated. How much it is not going to be known. I hope you're not in a freeze/thaw location.

Are you showing 2 leaks, the second being in the plastic? If so, then combined with the leak where it meets the gunite, and that it's a liner pool skimmer suggest to me that the right way to fix this and never have it happen again is to replace the skimmer. I hope you have spare tile or are planning on retiling. I hope the deck doesn't suffer too much.

Scott
 
I hope you're not in a freeze/thaw location.
Not even close.

Are you showing 2 leaks, the second being in the plastic?
Yes, at least two leaks and in those places to start.

I have no replacement tile and did not plan on retiling..... but hey I hadn't planned on a lot of things. There a few more pics attached. I appreciate your input.
 

Attachments

  • Skimmer Setup 001.jpg
    Skimmer Setup 001.jpg
    17 KB · Views: 288
  • Skimmer Setup 003.jpg
    Skimmer Setup 003.jpg
    18.1 KB · Views: 289
  • Skimmer Setup 004.jpg
    Skimmer Setup 004.jpg
    23 KB · Views: 288
Welcome to TFP!!

Scott made a GREAT catch on seeing that it's a liner skimmer installed in a crete pool :goodjob:

There are ways to correct this, while keeping the skimmer you have - it's not optimal, but certainly less expensive than replacing the skimmer. :?

The long and short of it is that you had a liner pool skimmer installed in a crete pool :evil:

I, for one, appreciate your willingness to share your fix for anyone who might come here with a similar issue :bowdown:

We (and that means everyone who is a member of TFP) will do our, collective best to help you with this skimmer problem - you chose the right place to place your trust :!:
 
vln said:
I would scrape off all the putty and cleanly apply PVC "dope" and once that dries, caulk.
Just my left brain - logical mind says that this bandage attempt is worth a try because of the simplicity of the solution. I am a little familiar with pipe dope and will go out and get some to play around with. I will not put any on yet, but I am entertaining your solution. If you come back to this thread then let me know if there are different grades of it or if pipe dope is just pipe dope. I appreciate your input.
 
Thanks Ted. I am usually not one to entertain bandage approaches, however, these alternatives to rebuilding the skimmer section might allow me to do the long term research I need to find out how to best and most cost effectively implement the long term solution of skimmer replacement. So if the bandage approaches can buy me a year or two, then I will use that year to my advantage and not sit back and procrastinate. You guys are right on target with your help. World Series time!
 
Xpert and Dman,

I hear you. I have the these brands dope and cement in the pic. That Plastaid stuff looks like it might hold real promise. I have been watching the vids concerning it. Its on the way! I am thinking about:

1) Chipping away that roll of putty that really didn't do the job.
2) Prepping that plastic seam where the leak is using a very mild sandpaper
3) Applying one or more of these temporary solutions

This might buy me the time I need to keep the pool up and running while I research on the best way to expose (pull up) that concrete and find out a GOOD cement/pool man to place the right skimmer solidly down in there. We can rebuild it... we have the capability!

I am having drink tonite (long overdue) and will pour out a little liquor for each of you guys.
 

Attachments

  • Dope and Cement.jpg
    Dope and Cement.jpg
    26 KB · Views: 254

Enjoying this content?

Support TFP with a donation.

Give Support
I am having drink tonite (long overdue) and will pour out a little liquor for each of you guys.

Spill a double for me, please :lol:

I'd use an epoxy sealer (2 part), either putty or injectable over what I see in your pic. It's a 'band aid' but should give you the time you need to fully research your options for a more permanent fix :cool: 
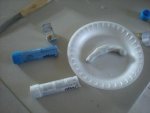
Of course prep the area by removing any loose debris and clean the surfaces, as best you can.

We are here with and for you whilst you decide on the best way for you and your pool!
 
Ted, I got loose on the Grey Goose and watched the Heat whip up on the Magic!

Here is the brand epoxy I was able to find (pic). Cures right in the water. I going to see if i can find a little literature on the particular brand but I am pretty confident working with epoxies.
 

Attachments

  • TWO PART EPOXY.jpg
    TWO PART EPOXY.jpg
    21.2 KB · Views: 230
You used the same stuff I've used A LOT of times. As long as you packed it into the cracks well and feathered the edges, it should last a couple of years :cool:

If you find yourself playing with this stuff again, I'll pass on a few tips on working with the 2 part epoxy putty (or maybe I'll just write up a little something when I have the time and proffer it up for the 'Further Reading' section of Pool School)

I hope your patch will hold while you research your permanent solution options :)
 
As long as you packed it into the cracks well and feathered the edges, it should last a couple of years.

I spent a lot of time pushing the stuff all the way down in the crevices trying to make sure there were no air pockets. I feathered the edges though its hard to tell from the pics. The stuff feathers excellent with a wet finger tip. I am most paranoid that I didn't clean the surfaces enough. This stuff sticks really well to natural surfaces, but just slid any where there was the least bit of algae build up. I figured out that the algae did not like a cap full of bleach. Lifted the algae right out and made for a sticky surface. I will let this cure overnight to be on the safe side. I will be testing for the better part of the morning.
 
The pool putty spread in the last set of photos sealed the skimmer leak. The dye just goes straight down into the water and sits their indefinitely inside all parts of the skimmer. No dye going into the outlet hole either and that is also a real relief. I couldn't be more pleased with this patchwork.

Now its on to researching the specifics of a completing a demo and rebuild of the area for the day that these patches no longer work. I will keep this thread updated.
 
Thread Status
Hello , This thread has been inactive for over 60 days. New postings here are unlikely to be seen or responded to by other members. For better visibility, consider Starting A New Thread.