Plumbing + Renovation

Little Aussie Battler

0
LifeTime Supporter
Oct 10, 2007
58
Sydney Australia
Hi
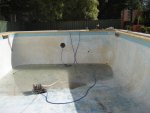
I am re plumbing our pool,DIY(me), the existing pipes are old and crappy.
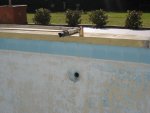
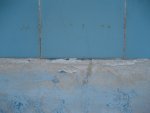
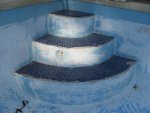
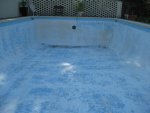
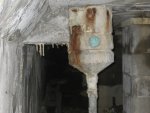
I have two existing returns, approx 30mill black rubber hoses that run under the pool. I want to connect a poolskim. It's a rectangular pool with 180mill concrete walls.

Plan to core drill concrete wall, 180mill thick, and replace existing returns with one 40mill pipe. Is core drilling easy? What size hole? Where should I locate the new return? How far under the surface? What plaster mix should I use?

Thanks Guys
 

Attachments

  • 203.JPG
    203.JPG
    260.6 KB · Views: 510
  • 198.JPG
    198.JPG
    225.4 KB · Views: 509
OK; got it. I think you should do at least two returns; I would probably do four plus a cleaner line (you could later plumb it for either suction or pressure), if the cost and trouble isn't too bad. Having only one return is just asking for trouble. As for the locations, I don't really know...hopefully someone else will help.

What is your plan for the finish?
 
Sorry for the delay in responding :oops:

As MITS said, you want at least 2 returns (located to provide a circular flow to the pool - NOT fighting each other :hammer: )

I would put one offset on a deep end corner (~ 2.5' off the side wall) down ~ 2' from the tile. The directional eyeball will be pointed so that the water doesn't ripple until 2'+ after the skimmer box, we don't want to steal floating goodies from the skimmer :mrgreen: .

The other would be in the shallow end (on the long wall) ~ as close to the shallow wall as possible and point so that the water doesn't ripple for ~3' out from the wall.

This should give you a circular flow to the pool while not trapping too much stuff against the shallow wall. If one of the skimmers habitually has much more debris trapped in it than the other, I'd put the returns on the opposite side.

HTH

Have fun with the core drill - I KNOW how much fun they are :wink:
 
Thanks waste
I certainly did have fun with the core drill, carefully balanced between my legs, a bit close for comfort.

In the deep end I'm 4ft off the side wall and 3ft down from the tile. The skimmer on the right hand side is history. I only have one skimmer now.

In the shallow end I got as close as I could to the end, anyway the photos tell the story.

I'm going to have some lunch now as I'm stuffed. Check out the brass fitting I core drilled through and the old plumbing.
 

Attachments

  • 020.JPG
    020.JPG
    224.1 KB · Views: 410
  • 018.JPG
    018.JPG
    138.9 KB · Views: 409
  • 019.JPG
    019.JPG
    198.4 KB · Views: 409

Enjoying this content?

Support TFP with a donation.

Give Support
I did something a little different....I installed an extra return fitting and plumbed it with a three way valve enabling me to swith it to either suction OR pressure. This way, I can use it as either a dedicated vacuum port, a dedicated pressure cleaner port, a fountain, OR just another return for extra flow.
 
Uncovered a few problems today.

Hairline cracks running down the sides of the pool, 8 in total, some carry on through the waterline tiles and through the coping.

Hairline crack through the middle of the floor, doesn't extend to the sides.

Plaster looks like it has turned to chalk in a number of places just under the waterline tiles.

Probably normal for a pool of this age, overall the plaster is in good condition but should I attempt to fix these problems or will I just make it worse?
 
Little Aussie Battler said:
Uncovered a few problems today.

Hairline cracks running down the sides of the pool, 8 in total, some carry on through the waterline tiles and through the coping.

Hairline crack through the middle of the floor, doesn't extend to the sides.

Plaster looks like it has turned to chalk in a number of places just under the waterline tiles.

Probably normal for a pool of this age, overall the plaster is in good condition but should I attempt to fix these problems or will I just make it worse?

Morning Guys
It's a full moon outside and I have been outside inspecting the water blasting job I did yesterday, man I got sodded :-D :hammer:

Looks like the chalk, I mentioned in the above quote, has been blasted away, so I might be able to polish out any pit marks left behind.

As for the hairline cracks. I can see that some have been repaired before and have not got any worse. I might explore further and open one up with the grinder. :mrgreen: I will post a pic later.

More water blasting today but I'll give it another hour to please the neighbours. :-D
 
Here are the pics I promised. :wave:

I highlighted the crack under the plaster with pencil. The photo shows the crack running up through the tile and the repair job below. I think the repair is standing up OK.

The other photos show the cracks un highlighted. The photo without the tile in the picture is the crack on the floor.

Should I repair these cracks? :wave:
 

Attachments

  • 002.JPG
    002.JPG
    244.3 KB · Views: 320
Little Aussie Battler said:
Here are the pics I promised. :wave:

I highlighted the crack under the plaster with pencil. The photo shows the crack running up through the tile and the repair job below. I think the repair is standing up OK.

The other photos show the cracks un highlighted. The photo without the tile in the picture is the crack on the floor.

Should I repair these cracks? :wave:
 

Attachments

  • 004.JPG
    004.JPG
    211.3 KB · Views: 320
  • 005.JPG
    005.JPG
    247.8 KB · Views: 320
After a second soaking :hammer: I gave up trying to remove any more paint with the water blaster. :idea: My tactics have now turned to angle grinding. I tried attaching wire cup wheels, masonry discs and a diamond disc wheel that had 2 rings of teeth. At 12500 rpm there is not a lot of margin for error. After some shocking attempts (electrical and visual) :x I am now waiting on delivery of a variable speed stone polisher that has a water feed. This tool looks ideal, well that's what it said on ebay. :wink: Should keep me busy for a few days. :-D
 

Enjoying this content?

Support TFP with a donation.

Give Support
Thread Status
Hello , This thread has been inactive for over 60 days. New postings here are unlikely to be seen or responded to by other members. For better visibility, consider Starting A New Thread.