Repair ropes on Coverstar autocover

If anybody has the pics on how to replace the ropes, i would love to see them.

My email is [email protected]

Both my coverstar ropes broke again. This is the third year at start up that i have broken ropes. UUGGHH!! I am getting so tired of paying $200 for every rope replacemen, over $1000 the last few years just in rope replacement. i am ready to try something different like doing it myself. There has to be a better way. I would love to see pictures on how to replace the rope. I would love to use less expensive rope, but also need to figure out how ot get the nylon web on the end of the rope. would a sewing shop be able to do it? I have an undermount system, but would love to see any pics available to see how to replace the rope. I think i can remove my rails on my own, but i do not know where or how to statr the rope.

my email is [email protected]

I live in the south suburbs of chicago, does anybody provide this service. I would be willing to pay a reasonable price to get it done right.

Thanks!
kevin
 
Sorry for the unanswered questions, I got a new computer and haven't logged in for a long time. I replaced the coverstar ropes at the beginning of last season in May 2010 and the cheap 3/8" yellow polypropolene rope is still working fine. As a reminder, the reel pulls the cover off, and the ropes pull it on. For my pool, which was a reto install off the pool deck on the shallow end, I needed ropes of 95' and 120'. If your's is under the diving board, your's should be less.

I was told by my installer that I have the "newer" type cover with sealed seams, it was installed in 2002.

Start by removing the ropes from the leading bar. You may want to loosen the tracks from the pool deck by backing out the screws 1/2 way, you will have to do this to install the new rope.

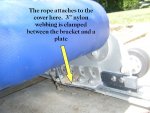
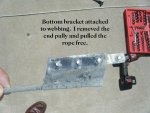
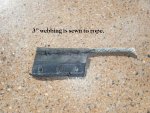
Once the rope is off the plate, either get a local shop to sew 3" webbing on your new rope or remove the webbing and sew it on yourself. I used a sewing awl from Harbor Frieght.

You will want to remove the pully from the end of the guides when youi remove and install the new rope, and clean it while it's off,

I don't have a picture of the routing of the rope, but I will add it later.
 

Attachments

  • plates.JPG
    plates.JPG
    164.6 KB · Views: 821
  • Plate 2.jpg
    Plate 2.jpg
    186.6 KB · Views: 600
  • bottme bracket.jpg
    bottme bracket.jpg
    160.5 KB · Views: 592
Hi everyone, my name is JoAnn. I have a inground pool with an automatic cover. The rope broke and I would like pictures and advice on how to fix it. At this point I can barely afford the pool much less someone to help me fix it. Step by step would greatly be appreciated. I will be the one doing it. Not sure of the brand right now but the rope guides are underneath the sides of the pool. PLEASE any advice or if you need more information ont he type of pool cover I would be very happy to provide. I hope to hear from someone soon. Thanks for all your help. My email address is [email protected]
 
kcaAka said:
gglmn said:
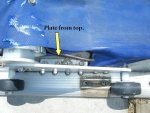
I took pictures of the process, but it will take a day or two to put it together. I have the toprail. The rope has 3" webbing sewn to the end where it attaches to the front of the cover by 3 or 4 nuts bolted to a plate. Remove the plate and detach the rope. Then remove the pully at the far end. Then loosen but don't remove the track. Remove the old rope. Sew 3: webbing to 5/16th rope. I needed a 95' and 115' length. Webbing runs in a channel on the pool side. The new rope is easy to put into the outer channel just by lifing the track and laying underneath. Run the ends through the pullyes and reattach to the drum with the screws and your done. If you have new rope with the webbing attached, it's an hour at most. If you post your email I can send pictures.

I need to replace my coverstar ropes and would love to use your pictures as a guide. Can you please send them to [email protected].

Thank You
I'm sure this will save me a big chunk of money.
 

Enjoying this content?

Support TFP with a donation.

Give Support
My Coverstar system has also failed at the same point that everyone else has posted; the nylon webbing that acts as a connection between the rope and the leading edge of the cover. The nylon webbing apparently started shearing after only a few uses, because after a few months of use (we live in the midwest and only use our pool about 4 months of each year), one side had shorn away completely. Soon thereafter the other side failed. The rope itself remains in good shape--I believe it has a Kevlar core and it is very strong. I have now repaired it twice on my own before I discovered this forum. I used heavy duty nylon webbing from a tow strap, with nylon thread and heavy duty needle designed for furniture repair. The only way I have found to do this is to stitch the rope to the webbing by hand, which is quite time-consuming. I also had to remove the tracks to execute the repair, which is also very time consuming, since the splines do not come out easily. I was driven to this self-repair nightmare by the very high quotes (over $800) from the local Coverstar distributor versus the $15 of parts I have purchased. But my initial repair effort only lasted about a year. I am looking for any additional help anyone can offer. It would be great if you could post the pictures of your repair efforts.
 
Hello all poolcover rope folks.

I'm in Tucson, and the rope in my auto pool cover broke. I will have to do the repair myself - I have read all the posts and also would love pix or video. I have a rectangular pool with under-the-ledge tracks which hold the rope.
You can email any pix or video to [email protected], or post here. and thank you. the coverpool guys were NOT helpful. according to them, the only way to fix is to put a whole new cover and metal frame in - NOT!
Thankyou!
 
I have a further update on my most recent repair. This time I ordered the replacement parts directly from Coverstar. For me, the part that keeps failing is the black nylon webbing connecting piece (about 2 in by 3 in) that connects the rope end to the leading edge assembly. You can see this part on the excellent photos posted by another member on this forum. I ordered one for each side for about $60, plus some minor parts.

This is definitely preferable to my previous process, which was to try to fabricate a similar piece on my own. The factory part has the 3 predrilled holes to connect with the leading edge assembly, plus a preformed tube to accept the rope end. I still had to sew the replacement part to the end of the rope by hand. You do this after cutting a new clean rope and and sealing that end with flame, otherwise it is too tight to make it through the tube. The sewing is difficult, and took 30 minutes per side. I used heavy gauge woven nylon thread and a needle, both from the furniture repair section at Hobby Lobby.

When you reassemble the cover and tracks, you need to check that the ropes are pulling evenly on each side. I adjusted the length all the way back at the rope reels. Also, you really need to check that there are no burrs or rough connections in the metal tracks that might be prematurely shearing the ropes or the nylon connecting piece. I used a grinder at 3 points to create a smoother track.

good luck!
 
  • Like
Reactions: poolnorthernva
It's frustrating when a company has a monopoly over a product and that company only works in the summer and they want to make a year's income in 3 months, so they charge insane prices, they need to sell wood stoves in the winter or something to keep them going in the winter months. I've seen quotes for $800+ for ropes, $3000+ to replace the cover, come on who do you think your kidding the ropes maybe cost about $100 and the cover maybe $1000 or less and those little plastic guides they charged me $80 EA. I installed them myself god knows what that would have cost if they installed them. I think the tripe charge was about $250 to come out and look at it and they wanted my credit card with a open charge, and if they have the part on the truck it might have cost me over $500 to have them do it over $700 if they had to come back :rant: So I have been trying to do it myself and here is what I have been doing. For the nylon tab's at the end rope try using a hand file (not a power tool to do it faster) take your time you don't want to damage the track or the rope $$$$$ :grrrr: file the guide just anuff to open the gap and smooth the edge to stop the chafing of the tabs don't open the gap to far (you can't fix that)and keep the outer edge of the track cleaned and sealed so it doesn't get a buildup and pinch the track gap. For changing the ropes I use a wire guild used to pull electrical wire behind walls to run the rope though the track, that way you only have to take off the end with the pulley and the guide at the spool end and use a rope that has little or no stretch to it. Set your clutch on a cold day so when you open it on a cold day it won't smoke your clutch (I don't want to know what that would cost) but you do have to check your clutch now and than because if its to tight it will break your ropes if the cover jams if it's to lose it will smoke your clutch. For hole's or tears in the cover use a vinyl glue like you use on waterbeds or air mattress and you can find the patch at your fabric store. Good luck and have a great swim
 
To remove the track on a top-flush system, you first need to remove the plastic "spline" on each side that runs the length of the track. This part appears like a bead of plastic from the top, but it is actually a plastic wedge, about 3/4 of an inch, that goes straight down. You need to find an opening or break in the spline and start lifting it straight up. It's hard to get it started, but once you get it going, it will come out OK. If your cover has not been serviced for a long time, the spline is probably pretty well set in there. Be patient; don't damage it too much. Once the spline on both sides is completely out, the top half of the track can slide over a tiny bit to that space vacated by the spline. Then it will come out too. The bottom half of the track, of course, is set in concrete. Now you can clean the track, replace the ropes, etc.
 
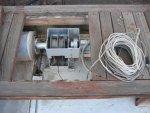
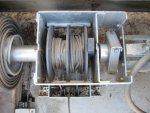
Thank you for the great description. I've got the track off. I can see that the black webbing tore on the left side only and the rope is intact. I've acquired new black webbing. While untangling the rope for the left side, I noticed that the rope for the left side wraps around the shaft in the opposite direction from the rope for the right side. Looking down at the motor with the pool stretching behind me.The rope for the left side winds over the shaft toward me while the rope for the right side winds over the shaft away from me. Are they suppose to wind in opposite directions?
 

Attachments

  • Ropes - 1 of 2.JPG
    Ropes - 1 of 2.JPG
    65.3 KB · Views: 545
  • Ropes - 2 of 2.JPG
    Ropes - 2 of 2.JPG
    62.1 KB · Views: 492

Enjoying this content?

Support TFP with a donation.

Give Support
Thread Status
Hello , This thread has been inactive for over 60 days. New postings here are unlikely to be seen or responded to by other members. For better visibility, consider Starting A New Thread.