Hi All,
So here it is as promised. I will post a before and after pic of my upgrade to my liner pool. In my previous post last fall I put what all I was going to replace and do and below is listed what I actually did and then have yet to do. Thought I would share in case others would want advice or ideas for their pool renovation. So here it goes:
1. Replaced the liner
2. Found out the bottom had no cracks but just an extremely bad trowel job on vermiculite so fixed the bad areas by chipping down the high areas and vacuming up the whole thing.
3. Replaced what I first thought was a metal line to find out that the line was not metal at all. The previous owners had used a metal screw in bushing with a reducer to direct the flow of the rather rather than to purchase a PVC ball joint which what he should of done. In that process it had rusted really bad to make it look like it. We did dig a small patch out behind the metal wall of my pool to find all this out. We found out that this 70's era pool was actually done right and had steel walls with proper cement supports, but the bottom was a concrete pad at the bottom with vermiculite all around. It was patched completely over by the previous pool owner who had the correct intentions but did not have the patience to do it properly. Took time, but the smoothing out of what we could actually looked very good. The pool professionals really did a good job of helping me in this process and said considering the age of the pool, it was really in good shape considering the weather we usually get up here.
4. The coping was left alone as I was able to fix it mostly using self leveling epoxy and then caulking where the cracks are located. All that is left is to repaint the whole patio area once the newly poured patio gets 30 days to dry out which is mid July.
5. Replaced the patio in front of the pool with new concrete. That ended up having to jack hammer it all out and replace with new which was graded properly away from the house. Very happy on how that turned out with no further issues of water running toward the house due to the drop in the old concrete. The concrete contractor put a laser on it and did everything right. We did find a void under the stairs where the two concrete pads joined up. Found out that when I used self leveling caulk , I stopped the issue, but the previous owners already created that void because of the water getting in between the joints. To solve it we packed it full of sand. That worked out very well and now I don't hear an echo when I stand on the stairs going into the pool. Those stairs are steel which I was really glad to see that they had footers poured and supported properly onto beams coming from the stairs.
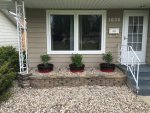
6. Front flower garden was removed and replaced with a very nice remodel. That was a mess too and found a concrete pad poured under that mess which was putting pressure on my concrete block basement wall. Once we removed it and replaced it properly with weather proofing material, the pressure was released from the wall. That turned out great as well.
7. Sand was replaced in filter with brand new laterals. 7 years old was the old sand and we did find that it did need it. I also put in a brand new pool pump as the old one was shot at the end of last season. That I did completely on my own and the pool guys were impressed as I had that all hooked up and ready to go.
8. The last thing left to do is to pay the bills, see what is left in my budget, and hope that the fire pit area can also be replaced with a paver system so that we have another seating area to enjoy the evenings. Waiting for the bills yet on above projects, but from my analysis, I should be on budget with everything. Some of this was due to helping out myself and doing what I could prior to each contractor arriving and also helping out with the pool liner installation. That saved them time which will result in less labor cost.
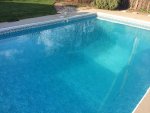
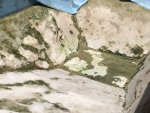
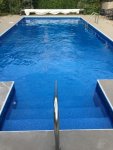
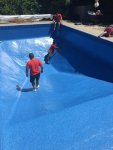
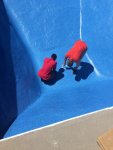
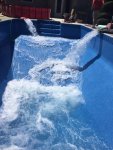
Below is the before picture with the bottom area completely white where the owner before us had screwed up and bleached the liner by not mixing chemicals in a bucket first before putting into the pool. This year the bottom was completely white on the whole area which did still give us 14 years on this liner. Rule of thumb is to take care of things and it would likely last much longer. 2nd picture is once liner was removed. 3rd picture is the result of it all including the water cleanup which only took 8 hours to fill as pool guys had 12000 gallons in a bladder system scattered above the pool during this process. I then filled the remaining 10000 gallons using 3 hoses.
All in all it turned out better than I was thinking it would and am really happy now because the liner fit like a glove and now the pool professionals have all the measurements of my liner for the next time I replace it. I do plan on asking them to send those demensions by email to me just in case they go out of business or something. I do not believe they will as they have been in business for 30+ years.
The liner brand is a Tara Liner. The attachment is what kind I put on: Key West
Fire away with any questions.
So here it is as promised. I will post a before and after pic of my upgrade to my liner pool. In my previous post last fall I put what all I was going to replace and do and below is listed what I actually did and then have yet to do. Thought I would share in case others would want advice or ideas for their pool renovation. So here it goes:
1. Replaced the liner
2. Found out the bottom had no cracks but just an extremely bad trowel job on vermiculite so fixed the bad areas by chipping down the high areas and vacuming up the whole thing.
3. Replaced what I first thought was a metal line to find out that the line was not metal at all. The previous owners had used a metal screw in bushing with a reducer to direct the flow of the rather rather than to purchase a PVC ball joint which what he should of done. In that process it had rusted really bad to make it look like it. We did dig a small patch out behind the metal wall of my pool to find all this out. We found out that this 70's era pool was actually done right and had steel walls with proper cement supports, but the bottom was a concrete pad at the bottom with vermiculite all around. It was patched completely over by the previous pool owner who had the correct intentions but did not have the patience to do it properly. Took time, but the smoothing out of what we could actually looked very good. The pool professionals really did a good job of helping me in this process and said considering the age of the pool, it was really in good shape considering the weather we usually get up here.
4. The coping was left alone as I was able to fix it mostly using self leveling epoxy and then caulking where the cracks are located. All that is left is to repaint the whole patio area once the newly poured patio gets 30 days to dry out which is mid July.
5. Replaced the patio in front of the pool with new concrete. That ended up having to jack hammer it all out and replace with new which was graded properly away from the house. Very happy on how that turned out with no further issues of water running toward the house due to the drop in the old concrete. The concrete contractor put a laser on it and did everything right. We did find a void under the stairs where the two concrete pads joined up. Found out that when I used self leveling caulk , I stopped the issue, but the previous owners already created that void because of the water getting in between the joints. To solve it we packed it full of sand. That worked out very well and now I don't hear an echo when I stand on the stairs going into the pool. Those stairs are steel which I was really glad to see that they had footers poured and supported properly onto beams coming from the stairs.
6. Front flower garden was removed and replaced with a very nice remodel. That was a mess too and found a concrete pad poured under that mess which was putting pressure on my concrete block basement wall. Once we removed it and replaced it properly with weather proofing material, the pressure was released from the wall. That turned out great as well.
7. Sand was replaced in filter with brand new laterals. 7 years old was the old sand and we did find that it did need it. I also put in a brand new pool pump as the old one was shot at the end of last season. That I did completely on my own and the pool guys were impressed as I had that all hooked up and ready to go.
8. The last thing left to do is to pay the bills, see what is left in my budget, and hope that the fire pit area can also be replaced with a paver system so that we have another seating area to enjoy the evenings. Waiting for the bills yet on above projects, but from my analysis, I should be on budget with everything. Some of this was due to helping out myself and doing what I could prior to each contractor arriving and also helping out with the pool liner installation. That saved them time which will result in less labor cost.
Below is the before picture with the bottom area completely white where the owner before us had screwed up and bleached the liner by not mixing chemicals in a bucket first before putting into the pool. This year the bottom was completely white on the whole area which did still give us 14 years on this liner. Rule of thumb is to take care of things and it would likely last much longer. 2nd picture is once liner was removed. 3rd picture is the result of it all including the water cleanup which only took 8 hours to fill as pool guys had 12000 gallons in a bladder system scattered above the pool during this process. I then filled the remaining 10000 gallons using 3 hoses.
All in all it turned out better than I was thinking it would and am really happy now because the liner fit like a glove and now the pool professionals have all the measurements of my liner for the next time I replace it. I do plan on asking them to send those demensions by email to me just in case they go out of business or something. I do not believe they will as they have been in business for 30+ years.
The liner brand is a Tara Liner. The attachment is what kind I put on: Key West
Fire away with any questions.