Intex 18x9x52 in AZ - Newbie Install Questions

sh9730

0
Apr 17, 2016
78
Casa Grande, AZ
Hello All,

So much already learned here - Thanks!

Awaiting arrival of our Intex 18'x9'x52". Gathering materials (and motivation!) to start the ground clearing and leveling process. To be honest - not looking forward to it, but have noted all the tricks here (and the Above Ground Pros free videos offer a lot of information - though they aren't going to get 59.00 from me).

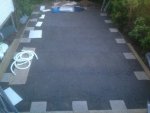
So our current yard is pretty good size for AZ. Plus no neighbors behind or on one side of us, so an AGP works fine. The pic only shows a small portion of the total back/side yards (BTW this pic is in the dead of winter so everything is looking pretty dreary - its nice and colorful now!). But it is better suited for a rectangle. The pool will basically sit on the right side of the picture all the way back against the "L" shape between the butterfly to the left and the curbing along the right side. This puts it close to power which is off to the right of photo, and will allow for a small stair deck next to the paver patio. The length between the pavers and the curb by the butterfly is about 24'. It is about 10' width along the curbing that you can see towards the wall.

My questions are:

1. - I have irrigation in controlled in three "zones" by the controller. Thankfully all of the sprinkler heads along where the pool will be are all together in a single zone so I can just turn off that zone. Is the best thing to do just to remove the sprinkler heads completely when preparing the ground and cap them? Any other suggestions?

2. - There is one set of sprinklers that runs through the middle of the lawn now - basically from where the pillar is in the foreground all the way to the solar light near the wall. The problem is this line of sprinklers is only 10' from the right side curbing where I plan to seat the pool. I Hoping to be able to continue to use those sprinklers, but changing the heads so they would only sprinkle away from the pool. I really would hate to not be able to keep those sprinklers running to keep the remainder of the yard irrigated. But I see all of the suggestions to have AT LEAST 1' around the entire pool prepped. Can I cheat on this and be ok? Either by just having 6" or so on each side, or by placing it right up against the curbing on the right side (which would give me close to a foot on the side out in the middle of the lawn? Otherwise it is going to be a pain to keep the remainder of the lawn watered. Since part of the reason we are going AGP is to see how much use we get, I am trying to minimize damage to the landscaping as much as possible.

3. GFCI Power - Does the equipment need to be plugged into an actual GFCI outlet (with the reset button), or as long as the outlet is connected to a GFCI breaker am I OK? My house is fairly new so if the GFCI is tripped several outlets connected are down until reset.

4. For the area I am talking about clearing/leveling (10'x24' basically) is it worth renting a sod puller or mini bobcat for $75.00-$100.00 or should I just grin and bear it with some help and do by hand?

5. Finally, there isn't a lot of information I have found about how the water temp will do here during our long stretch of 100+ degree days. Do these pool coolers Pool Cooler | Pool Cooler Creates Refreshing Feeling In Hot Summer Days work at all? Suggestions?

Thanks in advance!! I will try not to ask too many dumb questions without researching first....
 
I'm sure you'll receive some replies. A lot of people are scrambling in some parts due to bad weather. We can't all be in the Valley of the Sun. :) Since you will probably have lots of kids and foot traffic around the pool, I would recommend capping-off those sprinkler heads before one gets stepped-on and snaps. As you may have seen from other examples, your pool pad/support areas are going to extend a good 1-2 ft beyond the actual pool. Some may depend on the specific model of your pool and what you chose to do around the pool for aesthetics. That will probably influence your sprinkler head adjustments. GFCI is a requirement. I'm not an electrician, but if memory serves me right, certainly a GFCI 20 amp dedicated circuit is a must. Pool pump cords are limited to 3' in length which means you need to have a GFCI protected outlet nearby. But there's a distance requirement on that outlet by the pool as well - 6' perhaps? Someone here will confirm. Removing sod/grass is not as easy as it looks. I know that from my first pool. Any equipment assist you can get - take it. The mist cooling apparatus is nice, but many folks also create their own out of PVC. Helps to cool the water a bit, provide aeration to raise pH (if needed) and makes it fun for the kids.

Hope this helps get your thread started.
 
1. - I have irrigation in controlled in three "zones" by the controller. Thankfully all of the sprinkler heads along where the pool will be are all together in a single zone so I can just turn off that zone. Is the best thing to do just to remove the sprinkler heads completely when preparing the ground and cap them? Any other suggestions? I pulled my sprinkler and capped off the 1/2 pipe and filled with dirt so that that the irrigation riser was well below the surface as to not stick up on the pool bottom

2. - There is one set of sprinklers that runs through the middle of the lawn now - basically from where the pillar is in the foreground all the way to the solar light near the wall. The problem is this line of sprinklers is only 10' from the right side curbing where I plan to seat the pool. I Hoping to be able to continue to use those sprinklers, but changing the heads so they would only sprinkle away from the pool. I really would hate to not be able to keep those sprinklers running to keep the remainder of the yard irrigated. But I see all of the suggestions to have AT LEAST 1' around the entire pool prepped. Can I cheat on this and be ok? Either by just having 6" or so on each side, or by placing it right up against the curbing on the right side (which would give me close to a foot on the side out in the middle of the lawn? Otherwise it is going to be a pain to keep the remainder of the lawn watered. Since part of the reason we are going AGP is to see how much use we get, I am trying to minimize damage to the landscaping as much as possible. My sprinkler are close to the pool, I have rain bird pop ups, I changed the heads to 1/2 pattern and my yard is still good.

3. GFCI Power - Does the equipment need to be plugged into an actual GFCI outlet (with the reset button), or as long as the outlet is connected to a GFCI breaker am I OK? My house is fairly new so if the GFCI is tripped several outlets connected are down until reset. I am not an electrical expert but I would check with a local electrician so that you follow code in your area

4. For the area I am talking about clearing/leveling (10'x24' basically) is it worth renting a sod puller or mini bobcat for $75.00-$100.00 or should I just grin and bear it with some help and do by hand? I rented a sod cutter, the rest I did by hand, it all depends on the quantity of blisters you are comfortable with or how many friends you can convince to help you

5. Finally, there isn't a lot of information I have found about how the water temp will do here during our long stretch of 100+ degree days. Do these pool coolers Pool Cooler | Pool Cooler Creates Refreshing Feeling In Hot Summer Days work at all? Suggestions? Couldn't tell you as I have no experience so hopefully so one will chime in ...


Click image for larger version. Name: Backyard Lawn 2-8-15.jpg Views: 30 Size: 90.8 KB ID: 46679
 
OK - SUPER TIRED after Day One!!

I am doing everything manually - from sod removal (today's chore) to tamping and leveling. Not so much because I am cheap - but because the Home Depot in my town is not a tool rental one and nobody else in town rents a sod cutter - Bobcat you say? At $400-$500 a day - NO THANKS! So back breaking day it was - and I have NO IDEA what I am going to do with all the sod!!! LOL

Anyway - here is a pic of where I am - remember I am a TOTAL NEWBIE - and not all that Handy in the first place (though I survive without calling someone for every little thing - but I rarely take on a project this size myself). So any and all suggestions are welcome.

View attachment 46892

This cleared area is 24'x10' and as you recall my pool (which is still not here) will be 18x9. So, the plan is to place the pool about a foot from the curbing in the foreground (where the yellow plant is) and then leave about 5' or so near the paver patio to build a simple stairway entrance deck for now (eventually if we like it we will build a fancier deck) - so plenty of working room on the length. BUT, right now I only have the width cleared at 10'. Again, the reason I am TRYING to get away with that small of width is to save the sprinklers that basically follow the line of my flags in the picture.

Questions:

1. - I plan to use 12"x12" pavers under each of the supports (I think there are 12 total) - so my question (and I asked this in my original post) - can I get away with only clearing 10'? Or do I have to clear another foot? If I MUST clear another 1', can i work around the sprinkler heads? You may be able to tell right now I have zig-zagged around them.

2. - My plan tomorrow is to level/tamp (again all manual with 2x4 and level on top, hand held tamper). Must I level/tamp the entire 24x10, or just the 18x9 pool size. I know its not too much more to do entire thing, but time is extremely valuable to me if there is no significant benefit. Also, I totally understand the idea of leveling is to ensure water will not stress the frame/liner on either end, so along those lines it is no good to have a "mound" in the middle as the same principles come into play correct? In other words the dirt and sand afterwards need to be level all the way from one end to another, correct? Finally, since I will be putting a sand layer on top of this base, is it critical that the DIRT portion be completely smoothed out? Or will the sand (which is MUCH easier to work with) fill in the imperfections and then just make sure the SAND is super smooth for a nice feel to the floor bottom and easier vaccuming?

3. - Speaking of sand - it will also be delivered tomorrow - I hope I calculated correctly!! I ve watched the videos etc. for this and feel pretty comfortable. My only question here is - the pool itself will not be delivered until next week, and we have too small dogs. I would LIKE to have everything ready to do the pool set up when it gets here - but there will be no way to keep the dogs off the sand. Will it be a complete waste of time to do it early and then touch it up right before the install? Or can I do that?

Thats it for now! Thanks for any input....honestly. Cost may prohibit some suggestions (I wish I could do a foam bottom also but just can't) - but any I can incorporate I will!!
 
The footprint of the 18x9 is actually 19'10" x 10'10". Add 6" on each side for the half of the paver sticking out and you need to clear at least 20'10" x 11'10". Whether you can keep the sprinklers depends if you're lucky and they end up between pavers. I would move them out a foot or so.
 
footprint for the intex 18x9 is 10'10"x19'10" footprint for 18x9 intex ultra frame pool
you will need a little more than that for the pavers. Sand is not recommended for intex pools as it will wash out from under it. That being said, I used sand (and had some washout issues) and needed to devise a way to keep the sand where it was supposed to be. (as well as releveling posts, etc.).
The intex pumps come with very long power cords (maybe around 20') with built in GFCI breakers.

You might need to use 2 12x12 pavers for each U support leg as I think they are wider than 12 inches.
 

Enjoying this content?

Support TFP with a donation.

Give Support
I have to agree wholeheartedly with Mickelin regarding tamping and leveling the pavers. Make sure there's a solid tamped base of sand or other base product below the pavers. Last summer I installed a 12x24 Intex Ultra Frame. I took the time to make sure everything was level, but I rushed a bit and didn't put enough of well tamped base material below the pavers. As I filled the pool with water I would hear an occasional bang/pop and simply assumed it was the pool settling. It was actually pavers breaking where the Ultra Frame legs rested. Lost about half the pavers. The pool is level corner to corner but dips wherever a paver broke. Take your time, level the ground, add good base Material under the pavers and tamp them well......
 
Thanks all!! Didnt even think to search for the footprint size - (are there ANY questions that haven't been asked anymore!??). As for the sand - I am just putting a thin layer for a smoother bottom. The dirt will be tamped and solid underneath to act as the actual base. Actually it looks like I am going to get pretty lucky - it is pretty level at this stage now - just some cleanup to get it even better.

Any thoughts on doing the sand a few days early? Or should I just put it in the center and wait for the pool arrival?
 
OK - Good news update - the pool arrived early!! That makes the sand question moot and - unless I hear major objections here - which I will listen to (you guys are the experts) - I am going to cut out only the extra foot of sod at the areas wheere the footers come out. As someone mentioned - hopefully we will get lucky and the footers will miss the one sprinkler that is an issue! The other ones are on the very end of the length so I dont think they will be an issue.

Project schedule expedited! Here we go....hopefully by tomorrow afternoon we will be swimming!
 
UPDATE! See below:

View attachment 47043

99% done! Not as pretty as many I have seen here - but given my complete lack of experience in this everything has ended up pretty well. I could have been a little more careful with the tarp etc. But I am pretty confident in the solidness of the foundation. The pool filled up exactly as expected, I of course was worried about the "bowing" effect - but all the comments here proved exactly right - in the final foot everything straightened right out, the "corners" came free and are moving, and everything looks good.

I can't believe it but even though I had to stop filling at dark today as of the final 4" (see pic) I honestly think I am within a quarter inch of level all the way around. SOOO glad that part worked out. While filling there was no significant settling or anything - the pavers held up fine and now in the morning I will complete the fill and test the pump.

View attachment 47044

So here are my next questions (hopefully some day I will be able to answer someone else's!):

1. Regarding the pump - I have the SF90110T - I know - many will suggest an upgrade - but I am trying to keep budget under control so if it works well enough I will keep it for awhile. BUT, I cannot find any video's on installation if this exact model and the instructions suck. I was surprised they provided regular old hose clamps (seems a little risky even with the plastic end protectors provided), but whatever. Anyway, I watched other sand pump videos and am pretty comfortable with the process with the exception of the backwash. My pump has no little clear attachment to check the water clarity during the backwash - can I just eyeball it? Also, as you can see I am pretty close to the house - I guess I really should go get a long hose before back washing huh since my understanding is I could lose 50 gallons or so in that process? Plus I worry about erosion under the pool. Even using one of the other hoses for the back wash they are still pretty short.

2. So far I have just put a half bag of shock in until my TF-100 arrives in a few days - will that be ok? Unlikely we will get to swim in the next few days anyway - a rare windy/cool streak (in the 70s!) for AZ is coming through this week. Do I need to do anything else before I start testing etc.?

3. I will be getting a hang on the side sifter (no way am I comfortable enough cutting into the side of this thing like some of you!), a vacuum, a net, etc. - anything I MUST have other than these to get started and learn what my personal experiences will be?

4. I guess my hopeful delay for building the deck/perimeter fencing will be sooner than I originally thought. I had hoped to just build some simple stairs right away and see how much usage we really get before going into anything fancier - but my wife says "it's great - but ugly!" - not sure what she expected as she saw about a thousand pictures of it. SO, I plan to just do a VERY simple 16" deck made out of 1"x8" treated boards and a bunch of 1"x8" boards all around the sides, and some stairs. Sound OK? I ll paint it some earth tone color close to the house color. THEN, if after a season she still loves it I ll do something fancier - will have to be a lower level deck itself as at pool height we would still well above our wall for all to see.

ANYWAY - thanks so much for all the help. I hope it looks ok to you guys for a newbie!! Open to all suggestions.
 
Alright! Looks good! Congrats!

Are you adding dichlor? That is fine, just keep track of how much you add so you know how much CYA you have added. Use Poolmath toward the bottom, Effects of adding chemicals to tell you how much CYA your doses have added. You are going to want your CYA at 50-60 ppm for that AZ sun.

On your deck, use solid stain, not paint. It looks like paint but holds up a ton better and doesn't peel or flake so you can recoat easily when it starts to fade in a few years. It is available fro Lowes/HD in all colors.

Have you done some reading here? Pool School - ABCs of Pool Water Chemistry

Add your pool info to your sig! More here, Pool School - Read This Before You Post
 
Hi PoolDV,

Thanks! I have glanced at Pool School and the Chemistry etc. BUT - given my newbie-ness, I didn't want to overload - so I was studying each step at a time - a la my pump questions above . After I get that initial pump start up done, THEN I will make learning the chemistry my next priority.

I could never have even imagined how I would have done without finding this forum. I laughed at the DVD instructions when I finally watched them!

But, I am absolutely sure I will have more questions!
 
Great work, congratulations!
On the backwash question, just look at the water coming out of the hose. When it is clear, you are done.
By next summer, you will have mustered the courage to bring out the razor and install a through-the-wall skimmer. I did yesterday and it was a piece of cake.
 

Enjoying this content?

Support TFP with a donation.

Give Support
Thread Status
Hello , This thread has been inactive for over 60 days. New postings here are unlikely to be seen or responded to by other members. For better visibility, consider Starting A New Thread.