Pentair Multiport Problems

Thinkly

Well-known member
Oct 12, 2009
326
Overland Park, KS
I have a Pentair multiport that has a handle that is hard to turn and the handle doesn't spring back into position after turning and releasing it. In other words it seems "limp" It is also very rusty probably do to some years when the water wasn't handled properly. I replaced the spider gasket. So my question is: is this thing salvageable?

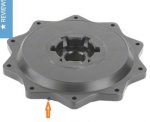
Can I rebuild it successfully? The top of the gray mechanism where the handle rests almost looks like part of the top of it is broken off. Please see pic. EDIT: I just googled the valve diverter and it appears they are all made that way on top so it is OK. Also the little white washer is cracked that sits under the handle. My valve says: Valve model: SM20-2 and Valve Assembly model:SM2-pp2.

I also noticed that there was no washer between the spring and the bottom side of the multiport top. When operating the lever it always made a screaching noise when turning. I wonder if this is why?

Pic_Collage.jpg


Here is a video of the symptom
. YouTube
 
The parts seem like they have been exposed to very high chlorine and/or very low pH. I would suspect that there is a tab feeder nearby that allowed chlorine to get in the valve. Probably time to replace the valve.
 
Thinkly

I recently had similar issues with my 3-year old Multiport Valve. I have the same model valve as your's.

My main valve issue was with the valve rotation, noisy, friction moving positions, etc. I didn't have the issue with the handle being loose (tension was ok, no issue with the spring).

I wasn't experiencing any of the usual leakby/sealing issues associated with a worn or damaged Diverter Seal (knwn as the "Spider" Gasket) P/N 271148 , so I left the original gasket installed at that time. I ended up replacing it later as a preventative action.

I tried the following things in this order:

- Inspected the Diffuser (grey cone-shaped part, P/N 271168) shaft and O-ring channels.

Both areas looked ok but I replaced the 2 O-rings P/N 191479 since I had the top valve assembly disassembled.

- Inspected the Spring. Since I wasn't experiencing the usual symptoms associated with a weak Spring, I didn't replace it.

- Inspected the Handle Washer P/N 271157 and the Spring Washer P/N 271160 . Both looked ok, didn't replace either Washer.

- Inspected the inner sealing surface of the Top Valve Cover P/N 271169 . I noticed some wear markings on the inner circumference where the Diffuser Shaft O-rings seal against the Valve Cover:
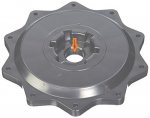
Pentair 271169.jpg

This is the part, along with the 2 shaft O-rings, that can produce the rotation/noise issues when moving the Valve Handle. It's also the area which will cause a water leak underneath the Handle when the valve is reassembled and installed.

- Lubricated the Diffuser Shaft, O-rings, and Top Valve Cover inner circumference surface with standard pool silicone gasket lube.

After I reinstalled the Top Assembly P/N 270067, I noticed that most of the same issues related to valve rotation were still present, although the rotation movement was smoother than previously experienced, due to the new O-rings and lubrication.

However, I still had the "noise" issue when rotating the handle. Also, after a few rotations to give the valve a small workout, a small leak developed under the handle.

I suspected the Top Valve Cover since the inner sealing surface displayed wear indications.

- Replaced the Top Valve Cover.

That fixed all valve issues: no rotation noise, rotation is smooth, no handle leak.

I have since ordered and received a new spare Top Assembly so I can swap that assembly fast for future valve maintenance.

I ended up replacing the "Spider" Gasket a few weeks later as a preventative measure since the Gasket was worn and was getting near its end of life cycle.

That Gasket replacement activity was no fun :) but it was the first time I had done it. The hard part for me was in removing the originally-glued in Gasket from the gasket channels while minimizing channel area damage/scarring.

After talking with my pool tech guy about this, he told me "It's a 'bear' of a job, depending on how the original gasket is glued into the valve." That made me feel better about the time it took me to get that job done. I ended up using a small Utility Blade Knife to remove the old Gasket material which was a lot easier than using a small slot screwdriver.

The pool guy also said that subsequent Gasket replacements should go a lot smoother since often the new Multiport Valves have glued gaskets completely covering all of the channel surfaces.

I used the "spot" glue approach when installing the new Gasket, not covering the entire channel surfaces.

I used Permatex Blue RTV Gasket Maker P/N 80022 for my Gasket glue after consulting various 'net sites and my local pool guy.
 
  • Like
Reactions: Fpppool and JibJab
Thanks for the great reply scoop. So you just replaced the top cover, not the whole "top assembly" including diverter, spring etc.? When I disassembled mine I noticed that there is no spring washer present. I don't know where it went, but I wonder if that was part of the problem. My primary problem is that the handle always seems a bit limp with no water present. Is this normal?

I of course do have the screeching noises while turning but I've had those for years, and there were no leak issues as of closing last fall. (pool is currently closed) I also did replace the spider gasket last fall upon closing. I agree that it was a hassle but mainly just a job that required a lot of elbow grease. I think I am going to start by ordering a new spring, spring washer and handle washer, since the spring is very rusted, the spring washer is gone and the handle washer is broken.

When reassembling everything is there a certain position the diverter needs to be in?
 
oh5x53.jpg


I ended up replacing the Top Valve Cover and the 2 Diverter Shaft O-Rings.

Regarding the missing Spring Washer missing, that's mainly used to protect the underside surface of the Top Valve Cover from scarring, etc, as that's one of the surfaces where the Spring is being compressed when the Handle is lifted to rotate the valve position.

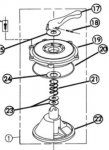
The Washer is item # 24 in this diagram:

Valve.JPG

It may have contributed to the "noise" issue but it's not the main component that's in play when rotating the valve.

Handle limp: That may be normal as the Handle always has some play on it. If the Spring were losing its compression tension, I'd expect to see the typical Multiport Valve leakby symptoms, ie water exiting the "Waste" line when the Valve position is in "Filter" position, etc.

Noise issue: I had the same issue for about a year or so before deciding to pull the Top Assembly. The reason I did that a couple months ago was the Handle was developing more resistance when rotating the Valve positions. I suspected lubricant was needed as well as excessive debris buildup being present in the Top Plate, Shaft and O-Ring areas causing friction during rotation.

Parts replacement: You may want to consider purchasing a complete Top Assembly vs individual parts since the cost is less expensive. I looked at some prices last November when I was doing the maintenance on my Top Assembly. Here's a part of my Pool parts list spreadsheet indicating some cost comparisons between Amazon and "Sunplay", a site that I use a lot for pool parts.

These prices were current last November.

Valve Price List.jpg

The price for a Top Assembly, ready to install on the Valve Body, was $109.95 at Sunplay.com .

The total price for the individual parts was $169.24 at the same store site.

I decided to get a spare Top Assembly for fast change-out maintenance in the future but I also bought a couple of spare parts, the Spring, and the Shaft O-Rings along with the Top Plate O-Ring.

Top Assembly orientation when re-assembling:

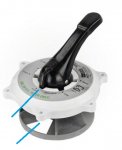
When you're reassembling it, make sure to align the orientation of the Diverter opening with the Handle position in the "Filter" position, as shown here:

Valve.JPG

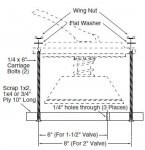
There are several ways to compress the Spring when the Top Assembly is on a workbench for maintenance. I decided to build this rig that I found in another brand's Multiport Valve Maintenance Manual. It works good for me, using a couple of carriage bolts, wing nuts, and a piece of scrap particle board (or plywood, etc).

Compress Rig.JPG
 
Perfect. Just what I was looking for. Thanks again for your very thorough well thought out post. I may regret not just buying the whole new top assembly buy it's always hard for me to pass up a chance to save money. The spring and the 2 washers cost me just under $50. Hopefully that does the trick.

Here is a video of the valve in operation. Does this appear normal? I thought it had too much play but maybe this is how they all are? https://www.youtube.com/watch?v=2FVFndLHMPQ
 
2lxcxfb.jpg


I wasn't able to view your YT video. It's giving me the "This video is private" message.

If you're not seeing the leakby issue with the valve, the Handle play probably isn't an issue. If the Spring is worn (weak compression), that will manifest itself with leakby problems.

I'll check my Handle play/amount and see if I can either post a picture or measure the amount of play on my valve.
 
I had the situation arise today where the piece that the handle and pin attach to broke. On the diagram above, it looks like #22? I'm a Newby, so please forgive my ignorance, but this is part of the top assembly, right? Given the lack of care our pool was given by its previous owners, I'm thinking starting fresh might not be a bad idea, rather than having to come back and fix other things.

7178e69684f4d3791f4901f723f09586.jpg
 
Izzyc123

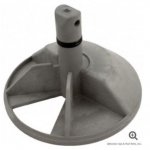
Yes, that part, the Diffuser P/N 271168, is included in the Top Assembly 270067 .

Diffuser.JPG

For cost and ease of replacement reasons, I'd purchase a new Top Assembly. Once you install the new assembly, you can rebuild the old assembly with spare parts at some point in the future. Then you'd have a ready spare Top Assembly when it's needed down the road.
 
Great! Thank you. This forum definitely makes pool ownership much easier. I've learned a lot and everyone is so patient with those of us who are in the early stages of learning. Thank you.


28k gal rectangular I ground vinyl pool, Pentair IntelliChlor C40 SWG, Pentair SandDollar filter, Pentair 1.5hp pump with a Pentair 3/4hp booster pump for the KreepyKrauly. Using Taylor K2005 test kit with additional Taylor FAS/DPD kit and following the TFP maintenance method.
 

Enjoying this content?

Support TFP with a donation.

Give Support
UPDATE: I got the parts. Unfortunately they sent me an o-ring instead of the spring. I went ahead and cleaned it up, reused the old spring and installed the new washers. The noise problem was created by the spring washer being gone. It turns quietly and smoothly now. It still has slight play in the handle but i finally figured out it is just in the handle not the diverted mech.
 
Thinkly

Thanks for the update into. That's interesting about the Washers affecting the noise during valve rotation. I hadn't seen that symptom with my valve but I learned something with your info.

Izzyc123

There's an alignment tab that's located on the Top Plate. It's purpose is to mate up with the same alignment tab located on the Multiport Valve body base.

When you rebuild your Top Assembly, orient the Diffuser and Handle position in conjunction with the alignment tab position.

aaa.JPG

Regarding your post, "learning a lot from this forum",
6gfuwz.jpg


I recall when I first arrived here, I was a "bleach" skeptic. I had listened to the "pool store" crowd for a long time and had asked about using Bleach to dose pools and had received a lot of "terrible idea, Bleach burns off the surface of the water", etc.

Well, they were wrong
287ncjn.jpg


Since switching to the Bleach & FC/CYA ratio method, it's been smooth sailing with my pool water maintenance.
 
Thinkly

Izzyc123

There's an alignment tab that's located on the Top Plate. It's purpose is to mate up with the same alignment tab located on the Multiport Valve body base.

When you rebuild your Top Assembly, orient the Diffuser and Handle position in conjunction with the alignment tab position.

View attachment 45779


Scoop, I'm confused by this statement. I thought the opening in the diffuser was supposed to be aligned with the filter position? Is this still correct? That is how I reassembled mine.
 
Yes, that's correct about the Filter position and the Diffuser opening.

The Alignment Tab purpose is to mate up the Top Assembly to the Valve Body. If I recall, the Valve Body is pinned so that the Top Assembly will align properly to the Valve Body.

I think the idea of the Alignment Tab is to insure that the Top Assembly will be properly oriented with respect to the Filter Tank, ie, Filter and Backwash positions in their correct positions, depending on D.E. (Filter position 180° away from the Filter Tank) or Sand Filter pools (Filter position pointing towards the Filter Tank).

I think that's the orientation difference with the D.E. and Sand Filter Multiport Valve's.
 
I opened the pool the other day and the multi port handle operates much more smoothly however I still have the issue with water dripping out the waste line.

In addition when I shut off the pump it eventually loses prime. I can hear a sucking noise at the multi port with the pump off as if it is sucking air.

I am thinking I should have replaced the o-ring in the multi port as well? I've always heard that air leaks have to be on the suction side but it definitely sounds like it is sucking air either via a bad o-ring/gasket or via the waste line.
 
The waste line can allow air into the system when the system is off because the pressure in the filter is negative (vacuum) because the water is higher than the pool. It's a bad multiport gasket.
 
Thinkly

You may have a weak Spring that's causing the leakby past the Spider Gasket. I'm putting that one out there since you'd previously replaced the Spider Gasket although that is usually the first part that causes leakby as JamesW mentioned here.

Perhaps the new Spider Gasket has debris stuck on the sealing surface or was slightly damaged at install or has partially dislodged from the gasket channel.

Another possibility is the Diffuser Seal surface (P/N 271168) . There may be a scar or something on that surface that's not allowing the Spider Gasket to properly seal from a leakby issue.

If it were my call, I'd try the Spring, assuming that you don't see any issue present with the Spider Gasket/channel/debris.

However, that call is based on my difficulty in replacing my original Spider Gasket. It wasn't fun :) but I've read that subsequent Gasket replacement's go smoother than removing the original Gasket. That makes sense if most Gaskets were completely glued into the channel (100% glued channel surface).

When I replaced mine a while back, I used the "spot" glue method instead of applying the glue in the entire channel bottom surfaces.

I Backwashed my D.E. Filter the other day, first use of the Multiport Valve since replacing the Spider Gasket (using the "spot" glue method). All went well, with multiple "Backwash" / "Rinse" valve position rotation's.
 
Thread Status
Hello , This thread has been inactive for over 60 days. New postings here are unlikely to be seen or responded to by other members. For better visibility, consider Starting A New Thread.