Pool Renovation Project - MA (pics and video)

chinatti

0
LifeTime Supporter
May 7, 2014
155
Massachusetts
Starting up a renovation project on our 2001 ~29K gallon gunite pool.
We've been in the house for ~18 months now - finishing up our second
summer. Been planning / going back and forth with contractors since
the beginning of the year, and finally got things underway on Friday.
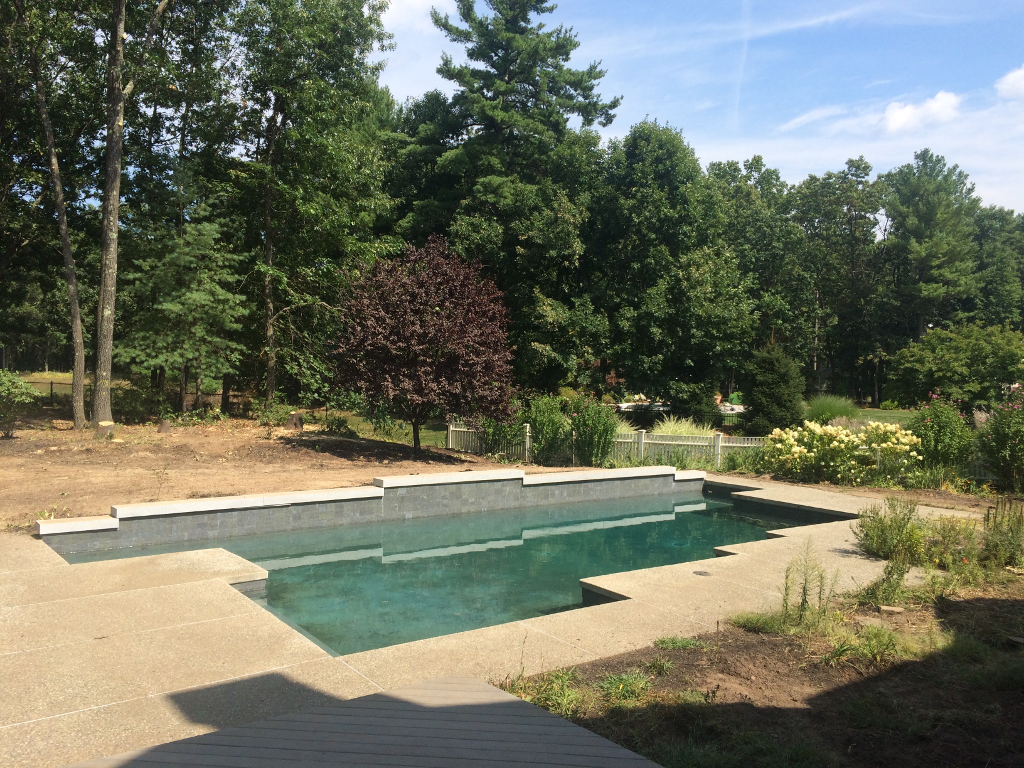
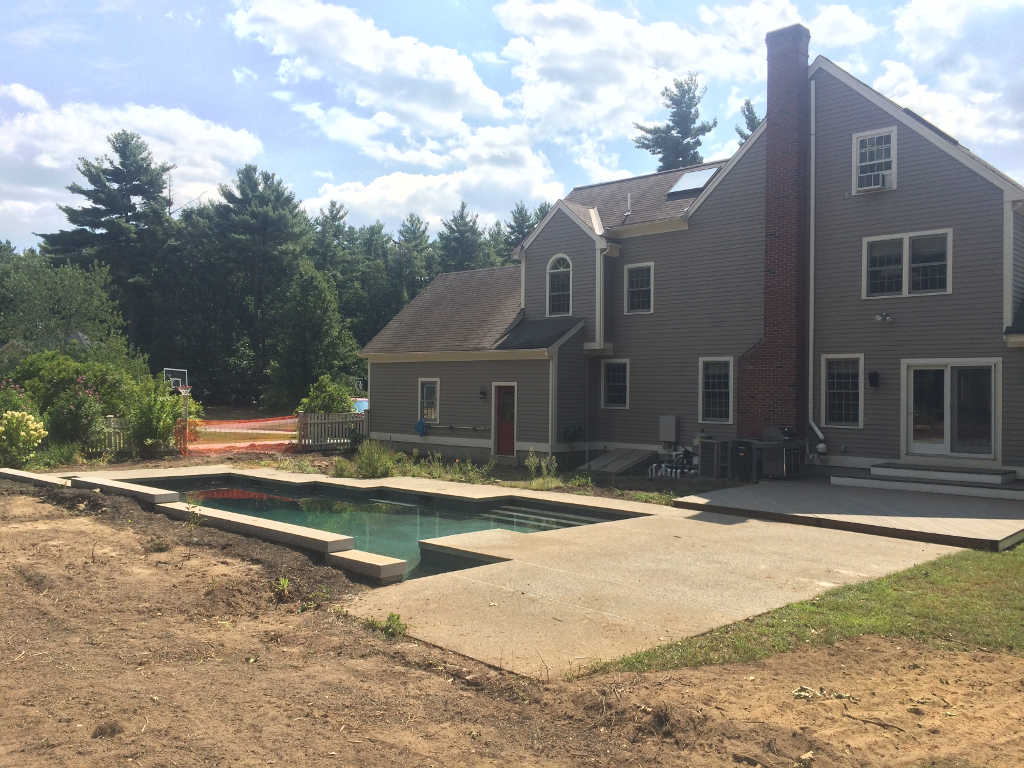
We're about 30 min NW of Boston. Pool is a slightly unusual shape -
lots of right angles, 15 yard lap lane, and a raised wall with thick
granite slabs on top, and 3 waterfalls underneath.

We're doing the renovation partly to freshen up the look, and also to
expand the decking to get some more usable space around the pool.
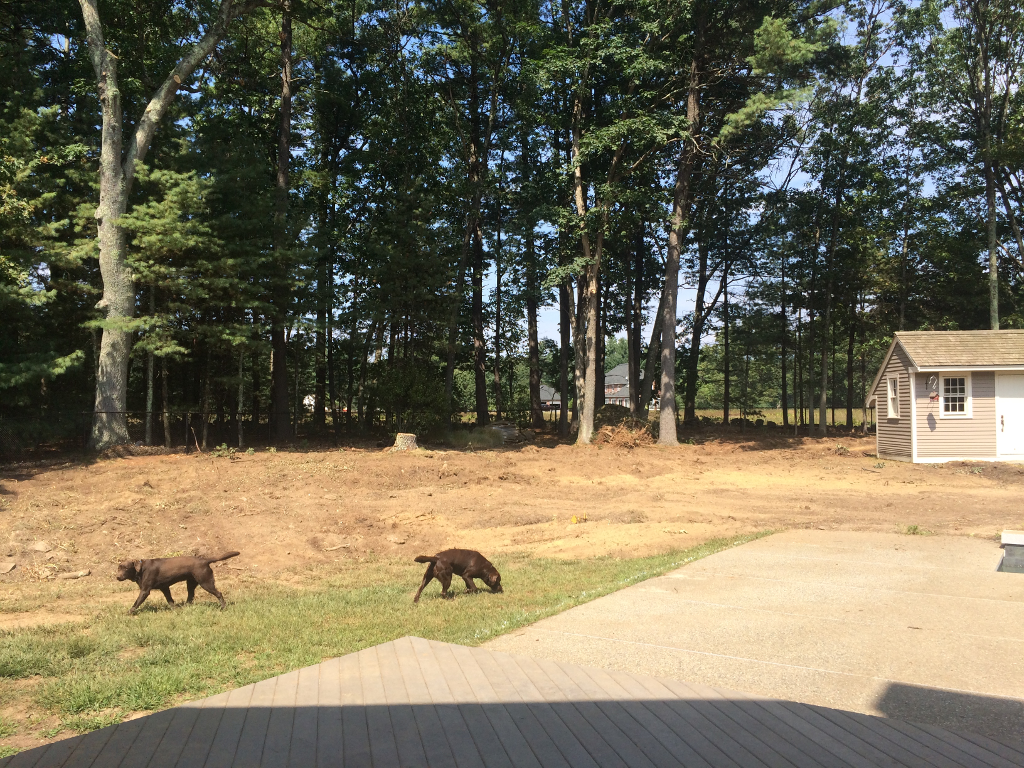
Previous owner was an avid gardener, so we had a HUGE amount of
perennial beds all over the place, and we really don't have the time
(nor interest) to keep up with them. So we also knocked down some
trees and we're also regrading the yard and pushing the lawn back
behind the pool (where there were just beds before) to get more usable
lawn space, and doing some sort of planting near the raised wall.

Here are the basics of what we're doing:
- Remove ~850 sq ft of aggregate concrete decking
- Install ~1050 sq ft of new 24"x36" granite paver decking
- Install granite coping (thermal face with relief on the edge)
- Install techo-bloc 6" Blu60 Onyx Black accent strip between
decking and coping, and also around outer edge of deck
- Resurface interior with PebbleSheen (Aqua Blue is the
current choice subject to seeing it on an existing pool),
plus Gemz highlight diamond accents on steps / seat
- Install new 6' diving board
- Install custom built natural gas firepit on granite deck
- Install buried concrete strip behind raised wall for LoopLoc
anchors (previously we drove tubes into the mulch for the
anchors and they never held up very well)
- Remove trees, regrade / expand lawn, sod, irrigation

Last minute potential additions:
- Replace 2x incandescent pool lights with LED ColorLogics
- Install ColorLogic 320 accent lights under waterfalls
(I have an OmniLogic panel that I installed this spring that
doesn't yet support the ColorLogic network controls, but
will soon according to Hayward)
- Sonance SR1 speaker array to hook up to our Sonos system

Phase II (maybe spring?):
- landscape accent lighting
- replace wood decking
- install permanent outdoor kitchen on wood deck

Landscaper started on Friday - took a bunch of trees down and leveled
most of the "landscape" to clear a path for the deck guys who are
starting on Monday. I'll post a few pics and hopefully a youtube
video of the tree / yard work on Friday - it's fun to watch it all
happen in time-lapse!

- - - Updated - - -

Here are some pics of the pool / yard after the first day of tree / yard work:


- - - Updated - - -

Time lapse video of the yard / tree work:

 
Re: Pool Renovation Project - MA

Here's my rough sketchup drawing that shows the basic layout (not quite perfect - tiles shown are 2'x2' from when we were originally looking at that size and not the 2'x3' we're going with now, and the 6" accent strip isn't shown at all...)

 
Re: Pool Renovation Project - MA

You've got an awesome base to start with for the pool and yard. I'm the avid gardener whose beds you are pulling out. I get the time commitment thing! Especially if it's not your stress reliever. Can't wait to see it progress.
 
Plenty of gardens still left in the front yard (and side yard) ... believe me! Yeah, not a very good stress reliever when you go out into the back yard and the weeds have overtaken everything - kinda has the opposite effect...

Definite difference with the trees gone. The tree part of the landscape work actually seemed surprisingly cheap to me. Maybe it's just that everything else has added up so much that I'm numb to these things now. We bought the house mainly because we wanted a pool. We couldn't put one in at our last house due to setback requirements, and then we figured we were saving money anyway by buying a house with one already in. After this renovation I'm not so sure any more :) .....
 
Oh but you are saving a LOT of stress in not building. Just hop over to the build part and pick just about any build. You will find stress even on the "good" builds!

I meant to say pretty dogs! I bet they are living in the pool!

Kim
 
A busy day 2. Top of existing pool beam / tile is out of level across the pool, so that's tomorrow's topic of discussion with the PB. Was hoping we could save the waterline tile, but looking more like that may not happen... Will probably need to retile to bring the edge back closer to level for the new coping. But a productive day, concrete deck is gone, pool emptied. Pics and a video below...


Don't worry - we're going to have tile, it's just a matter of whether we can save the existing tile or need to re-tile around the edge. PB had always said there was a risk of damaging the tile when the deck was removed, and they did a pretty good job of keeping the tile there. But I think with the elevation / leveling issues we'll probably end up needing to redo it...
 

Enjoying this content?

Support TFP with a donation.

Give Support
I am impressed with how modern your pool is and that it needs renovation. Usually pools that are getting renovated look like they were built some time ago. Your pool actually looks like it could have been designed yesterday. Whomever originally designed it really had an eye for design.
 
"Need" is a very subjective word ... :)

Main reason for the renovation was to expand the usable yard area a lot - including the pool decking, and we needed to resurface due to plaster wear. And we obviously decided to throw a few more things into the mix while we were doing it.

Catching up on updates here, Day 3 was excavation, and trenching / natural gas line install. Some pics and a video of the days work below...

Compacted some crushed stone for a lower base layer here in these pics:


And here's the trench with the gas line for the fire pit ready for inspection:


And lastly here's a time-lapse of the work day:

 
Day 4 update (still behind, trying to catch up when I can):
- Due to a >2 inch elevation difference across the pool beam height across various points along the edge we've decided to remove and redo the waterline tile. That way the tile can be redone to be level across the top below the coping, and we won't have any ridiculously large gaps between tile/coping. The crew removed all the existing tile (except for the raised wall) and chipped away a few inches of plaster below the raised-wall tile.
- We decided to add the 3 ColorLogic 320 lights below the 3 waterfalls. The holes were bored through the pool wall for these (maybe 2 inch holes I think?). One concern was the three returns in the rear wall (you can see one of them below the hole in one of the pictures below) - the plumbing for the wall returns was apparently run inside the wall (which our renovation PB said isn't really how it should have been done), so there was a question as to whether they would hit those return lines when they cut the new holes in for the lights. But we got lucky - no plumbing got in the way....
- The old pool lights were removed from the niches - ready to be replaced as well.

Pics of the holes for the new lights:


Here's the one with the return that was a little too-close-for-comfort:


Some overall shots after the days work:


And of course a time-lapse of the days work...

 
More catching up. Day 5 update:
- Masons were out, and did some prep work. They laid some material across the top of the beam to get it close to level - I believe they said it was the normal mud that they use to set the coping, plus an additional bonding agent? The plan is to start beginning of next week (Tue after labor day) to do the actual coping installation.
- The niches for the 3 new small ColorLogic lights were installed. These were, I believe, just 2" PVC pipe terminated on the back side into 1" grey electrical PVC conduit. The niches were secured with hydraulic cement and conduit was extended out the back a few feet to go beyond the strip of concrete we are installing behind the raised wall for our pool anchors.
- Pavers and Coping material has arrived!
- Gas line for firepit passed trench inspection - filled up the hole, ready for the top layer of crushed stone to go in there.

Here's the wall leveling that the masons did:


Here's the truck with the coping / decking pulling up:


And the pallets of deck pavers:


Here's the stack of coping:


And here is the 24" x 36" granite pavers we're using for the decking (with a dark accent strip to break up the color a bit):


And as usual a video of the days work:

 
How does the granite feel? It looks so smooth and "cool" looking as in it looks like it will really be cool temp. wise on your feet. What will the darker strip be made of?

It looks like they are working long and hard each day! So glad things are moving along!

Do they know you have a camera filming them? That is so neat to see the "fast" work!

Kim
 
The granite is thermal faced - so it's actually pretty rough (not as rough as "rock face", but not slippery at all - a good surface for a pool deck). Temp-wise it's pretty cool compared to some of the other natural stone products (like bluestone for instance which gets very hot). If you've seen any granite steps, then this would be similar to that as far as finish. They actually made the coping out of 12" rock faced step stock (2.5" thick or so). The supplier took that material, cut off the rock face, did a thermal finish, and did a little relief on the edge (so it wouldn't be as sharp of a corner), and we ended up with ~11.5" deep coping material that was much more cost-effective than getting something custom-fabricated.

We had some samples out on our deck for a while, and when it's really hot and in full sun then they do get a bit hot, but not as hot as some of the other samples we had.

The accent strip is TechoBloc Blu60 Smooth 6"x13" in Onyx Black (their darkest color), arranged so there will be a 6" wide strip between coping and decking, and then along the outer edge of the decking. It's a dry-cast concrete paver product. We tried hard to find a granite option that would have worked for the accent strip, but there was nothing we found that was dark enough to give enough contrast color-wise. (other than special order granite, but that got pricey and had very long lead times). The Blu60 is a thicker paver than the granite, so the deck guys will have to adjust the base around the accent strip, but they said that wasn't a huge deal.

Here's a link to the product:

BLU 60 mm Collection | Landscaping Products Supplier | Techo-Bloc

I have the Blu60 pavers on a pallet too - I'll pull a few out and take a pic next to the granite paver when I get back home, that should give a better idea of what that will look like...

And I can't remember if I mentioned the camera or not - but you can see it up there pretty easily. I was going to put together a more edited time-lapse video for the pool builder later once everything is done so he can use it if he wants - it's definitely cool to watch them buzz through.

Another day or two and I think we'll be to the point where things are starting to be built up instead of being torn down. These guys move pretty fast (only about 1 week in now) - I guess it helps a lot to be working with an existing pool - hole is dug, plumbing and electrical done, gunite in place, etc. etc. Still plenty to do, but no where near as much as a new build!
 
For the tile we are using "Rodio" from Classic Pool and Tile, I believe you can see it here:

Classic Pool Tile 6x6

It's nothing fancy, chose it because it was a close match to the existing tile on the raised wall which we are not redoing. The raised wall tile has a little more green in it, but shouldn't be noticeable once it's done.

Interior will be Pebble Sheen Aqua Blue - one of the lighter blue shades. Considering adding some "shimmering sea" for a little extra sparkle but haven't talked to PB about that yet.


Sent from my iPhone using Tapatalk
 

Enjoying this content?

Support TFP with a donation.

Give Support
Thread Status
Hello , This thread has been inactive for over 60 days. New postings here are unlikely to be seen or responded to by other members. For better visibility, consider Starting A New Thread.