Pentair Whisperflow seal replacement How-to (w/ photos)

TFPJules111

0
LifeTime Supporter
Aug 16, 2007
49
Denton, TX
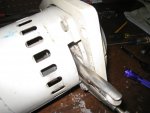
It's been a little over a year since my last post to the forums. I recently replaced the seals in my Whisperflow pump and took a bunch of photos to do a pictorial "how-to" of the process - my way of giving back to a great site that's saved me lots of $$$. Hope this is useful. I'll have to do it across a few posts, since you can't add more than 3 photos to each.

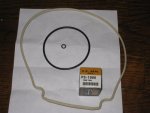
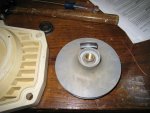
Step 1 - buy a seal kit. This one was $26.50 shipped from an E-bay seller. It includes the diffuser O-ring, impeller lock screw o-ring, seal plate gasket and the motor shaft seal. Make sure you get the right kit for your pump. Older models use a large O-ring on the seal plate instead of the gasket shown here.

[attachment=2:3ke4ro3a]01.JPG[/attachment:3ke4ro3a]

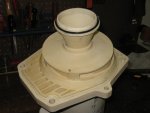
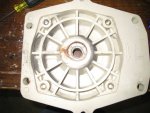
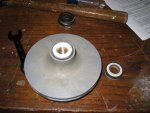
Step 2 - (no photo) remove the 6 bolts that hold the seal plate/motor assembly to the pump body/volute. I also disconnected the electrical connections to the pump (AFTER shutting off the breaker), so that I could move the whole assembly to the workbench and work on it comfortably in a clean area. Here you can see the diffuser & o-ring and the grey impeller inside.

[attachment=1:3ke4ro3a]02.JPG[/attachment:3ke4ro3a]

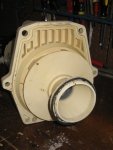
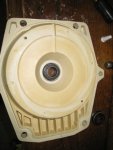
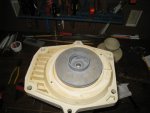
Step 3 - Remove the two small allen screws holding the diffuser to expose the impeller. Hold the impeller and unscrew the impeller lock screw (CLOCKWISE!!!).

[attachment=0:3ke4ro3a]03.JPG[/attachment:3ke4ro3a]
 

Attachments

  • 01.JPG
    01.JPG
    39.8 KB · Views: 3,088
  • 02.JPG
    02.JPG
    31 KB · Views: 2,904
  • 03.JPG
    03.JPG
    56.2 KB · Views: 2,898
Step 4 - Hold the motor shaft with vise-grips to prevent it from moving while you unscrew the impeller (counterclockwise).

[attachment=2:26wnnf5w]04.JPG[/attachment:26wnnf5w]

Step 5 - With the impeller removed, you can see the shaft seal.

[attachment=1:26wnnf5w]05.JPG[/attachment:26wnnf5w]

Step 6 - Remove the 4 bolts that hold the motor to the seal plate.

[attachment=0:26wnnf5w]06.JPG[/attachment:26wnnf5w]
 

Attachments

  • 04.JPG
    04.JPG
    46.9 KB · Views: 2,890
  • 05.JPG
    05.JPG
    28.9 KB · Views: 2,874
  • 06.JPG
    06.JPG
    50.8 KB · Views: 2,868
Step 7 - Place the seal plate impeller side down and GENTLY tap out the old seal with a screwdriver. Work around the perimeter and take your time. You don't want to damage the seal plate. Gently clean the hole where the seal was installed. I used 400 grit wet-dry sandpaper, then wiped it down with a wet cloth.

[attachment=2:3bv6rahy]07.JPG[/attachment:3bv6rahy]

Step 8 - Put a VERY thin bead of silicone sealant under the lip of the new seal and CAREFULLY press it into place. Make sure not to get ANY sealant on the black face of the new seal. I used my thumbs to put it in as far as I could, then a small dowel to work around it and get it fully seated. Take your time and make sure it's going in squarely.

[attachment=1:3bv6rahy]08.JPG[/attachment:3bv6rahy]

Step 9 - Bolt the motor back onto the seal plate.

[attachment=0:3bv6rahy]09.JPG[/attachment:3bv6rahy]
 

Attachments

  • 07.JPG
    07.JPG
    59.3 KB · Views: 2,886
  • 08.JPG
    08.JPG
    31.1 KB · Views: 2,894
  • 09.JPG
    09.JPG
    49.3 KB · Views: 2,870
Step 10 - Remove the old ceramic seal from the impeller and clean the impeller.

[attachment=2:23yfgkzz]10.JPG[/attachment:23yfgkzz]

Step 11 - WASH YOUR HANDS! Make absolutely sure there's no silicone, lube, etc. on them then wet the new seal with a little water and gently press it into place.

[attachment=1:23yfgkzz]11.JPG[/attachment:23yfgkzz]

Step 12 - Re-install the impeller, using the vise-grip trick as before. It only needs to be hand tight, don't crank it down too much. Lube the impeller lock screw o-ring with some teflon grease, slip it over the screw and re-install the screw (COUNTERCLOCKWISE!!!)

[attachment=0:23yfgkzz]12.JPG[/attachment:23yfgkzz]
 

Attachments

  • 10.JPG
    10.JPG
    63 KB · Views: 2,871
  • 11.JPG
    11.JPG
    63.5 KB · Views: 2,872
  • 12.JPG
    12.JPG
    45.8 KB · Views: 2,859
Step 13 - Re-install the diffuser with the allen screws. Grease the seal plate gasket with teflon lube, then press it into place (flat side down) on the seal plate. Take your time and make sure the gasket is fully seated all the way around. I had to use a screwdriver (GENTLY) in some spots to help work the gasket into the groove. Lube the diffuser o-ring and you're ready to re-install the motor.

[attachment=0:pyyq8jca]13.JPG[/attachment:pyyq8jca]

Step 14 - (no photo) Re-install the motor assembly with the 6 bolts you removed before. Tighten each bolt hand tight first, then work your way around, tightening each bolt down just a few turns before moving on to the next. The goal is to evenly apply pressure as the bolts are tightened so you don't deform the seal. Once everything is snug, reconnect the electrical supply.

Step 15 - (no photo) Turn on pump. Grab favorite beverage and enjoy! :-D
 

Attachments

  • 13.JPG
    13.JPG
    37.6 KB · Views: 2,851
This is a great example since it's about as complicated a seal change as there is. The AS-1000, reverse threaded shaft screw, and tiny hex keyed diffuser screws can give some headaches. Thanks for 'putting that together' for everyone.
 
Okay, I found your post after I and a friend (who supposedly had done this before) helped me change the motor on my Whisperflo.

Well, we got it back together, but did not have the replacement kit for the o-rings, etc.

I will be getting them tomorrow ... the guy in the pool place thought I would be okay without them ... he also didn't have the part ... I should have waited.

Anyway, the thing whines once it get to full speed.

I'm hoping your directions will solve the problem. The pool pump is OFF now, I'm at least assuming it should have been lubricated, but wasn't.

Thanks for your post though, I'm sure it will help.
 
Welcome to TFP!!

Thank you for taking the time to search before asking a question! :bowdown: Because you did, you found the most comprehensive post I've ever seen ( & with pictures 8) ) for changing the seal on a Whisperflow :goodjob:

Also, thank you for 'bumping' this great thread :party:

I hope you get the motor properly fixed soon - if it gives you any trouble (or if anything else with the pool gives you trouble) - please don't hesitate to ask us questions :-D
 
This is awesome! I'm changing my seals and seal plate this week...this is really helpful. Just a fyi for everyone, I think Pentair has changed their seal plate and/or seals since I got my pump in '06, so I'm going back by the PB today to see why my seals won't fit into the seal plate (hole in the seal plate is too small).
Thanks again!
 

Enjoying this content?

Support TFP with a donation.

Give Support
In the photo for the seal with the ceramic insert (photo # 11) I can't tell if the ceramic part that is exposed goes against the impeller or out from the impeller. Can you help? The instructions that came with it are worthless. Thanks for the great detail in this post, it really helps.
 
I recall that the WhisperFlo pumps have two seal options. Is determining which seal is required an easy task?

I needed to replace the plate seal on our pump but did not have a new diffuser o-ring. The old o-ring fit loosely on the diffuser. How does the new o-ring fit? Seems to be working fine.

Thanks for the tutorial! Saved it so I won't have to search when the time comes.
 
I am new to this site and am looking for some help to a leaking problem. I just installed a new motor onto my whisperflo pump. The steps I took were similar to the above instructions. After everything was done and bolted back together I began adding water into the strainer basket prior to turning the pump on. However, at a very fast rate the water was leaking down and out of the bottom part of the motor (the basket drains within 20 seconds). The water is getting past the shaft seal. I dis-assembled and re-assembled several times trying to find the problem, but with the same leaking results. I noticed a small o-ring in the picture above, does that get used in these instructions? I did not get one in my kit. If anyone has any suggestion I could really use it.
 
sandhappens said:
I am new to this site and am looking for some help to a leaking problem. I just installed a new motor onto my whisperflo pump. The steps I took were similar to the above instructions. After everything was done and bolted back together I began adding water into the strainer basket prior to turning the pump on. However, at a very fast rate the water was leaking down and out of the bottom part of the motor (the basket drains within 20 seconds). The water is getting past the shaft seal. I dis-assembled and re-assembled several times trying to find the problem, but with the same leaking results. I noticed a small o-ring in the picture above, does that get used in these instructions? I did not get one in my kit. If anyone has any suggestion I could really use it.

Welcome to both you and Super !!

Did you get a new shaft seal assembly? While you can sometimes reuse the old one, usually they won't properly seal if they have been removed :( Also, the seal assembly has to be installed properly (as per Bama's advice above :cool: )

Are we dealing with the Whisperflow that is addressed in this thread, or another pump?

Sometimes it takes a couple follow up questions (and pics) to enable us to truly help someone with their particular problem :oops:

Please give us as much info as you can about your pump/ situation and we will figure out what's going on with your pump :-D
 

Enjoying this content?

Support TFP with a donation.

Give Support
Thread Status
Hello , This thread has been inactive for over 60 days. New postings here are unlikely to be seen or responded to by other members. For better visibility, consider Starting A New Thread.