Bayside Build

I was able to get started on the stucco this weekend. I was planning to do it Saturday and got up and started looking at it. Having never done stucco before I was looking forward to getting it on but afraid I would mess it up and not get a smooth finish so I kept delaying. Thought I had better get all the leaves up before putting on the stucco so they would not blow onto it and stick messing up the finish. Since I would have to get the lawn equipment out decided to cut the grass then blow all the leaves from the patio. Put off doing the stucco more by deciding I should get the flower beds planted for the year so off to Lowes for plants and mulch. Ended up spending the day getting all the lawn work done and worrying about the best way to get the stucco on and a nice finish.

After fearing it as long as I could I got up Sunday morning with the idea that this would be the day to get some stucco on the island. Spent most of the morning doing the prep work of removing all the doors, grill, burners, outlet covers etc. Then moved on to taping the underside of the granite to get a nice smooth line and not get it all over the underside of the granite. Taped paper down on the pavers to keep the stucco off of them and to make clean up easier. Gathered everything I thought I might need. Trowels wooden and metal, Sponges, bucket of clean water, putty knife and drill with mixing paddle, paint pan and paint roller for concrete adhesive.

I debated whether to start in the front and have to deal with all the cutouts or start on the back where the pieces would be solid. My fear of startng on the back was not getting a smooth finish and getting it to thick is spots creating waves in the stucco. In the end I decided to start on the front as it would give me a chance to work with the material and the smaller sections would not be noticable if there were waves in it since the cutouts and doors would probably hide anything like that. I also was starting to run out of time so I figured if I could get the front done then when it dried I could mount the doors permanently and put all the components back in even if the back was not completed.

Time to start. Began by rolling on the concrete glue. While waiting for it to get tacky I opened the permixed and tinted 5 gallon bucket of stucco and used the paddle bit and drill to mix it one last time. When the glue was tacky I got the trowel and started applying it. I tried both the metal and wooden trowel as they each produce a different finish. The metal trowel draws more water to the surface giving a smoother finish. The wooden on produced a rougher more traditional stucco finish so that is the one I used. Worked the material on the cement board and after a few minutes really got the hang of it. I found it easier to start from the bottom and work up rather than from the top and work down. Being worried about thickness and trowel lines in the finish I had my wife look over me and point out and thin spots or bumps in the finish. This worked very well to have a second set of eyes looking after me. Once I was ready to move down a little I would use the putty knife to run across the edges of the cutouts to clean them up and provide a straight smooth finish for the edge.

After getting the hang of it it went pretty fast. I took my time and did not get in a hurry and was able to get the front done with all the cut outs in about an hour. Unfortunatley I had to stop with just the front done as we had plans for the late afternoon so I cleaned the trowels and other tools and left the stucco to dry.

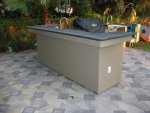
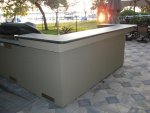
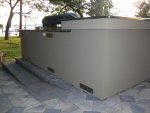
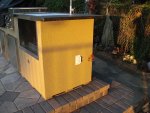
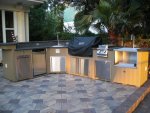
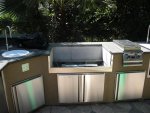
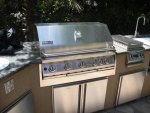
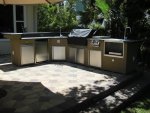
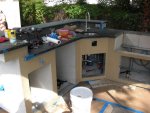
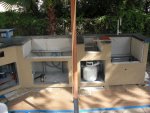
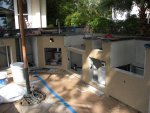
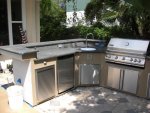
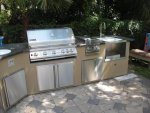
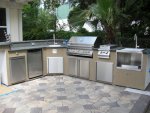
Here are some shots once I finished applying the stucco. It was still wet in these pictures so it looked a little more yellow and once it dried the color came out as expected and a little darker. It was called country tan and when dry is not yellow but rather tan.

[attachment=2:ndh8z8h2]CIMG1152 (2).JPG[/attachment:ndh8z8h2]

[attachment=1:ndh8z8h2]CIMG1153 (2).JPG[/attachment:ndh8z8h2]

[attachment=0:ndh8z8h2]CIMG1154 (2).JPG[/attachment:ndh8z8h2]

In the end I think I did alot of worrying for nothing. Much easier than I expected and I am very pleased with the finish. The clean up in the front was very easy and the brown paper kept the pavers clean from the mess. The tape did its job as well keeping the granite clean and providing nice straight lines for the edges where needed.

I am hoping that one night this week I can get the back side done and everything reinstaled.

Let me know what you think of the stucco so far and if you have any quesitons.

Brad
 

Attachments

  • CIMG1152 (2).JPG
    CIMG1152 (2).JPG
    92.3 KB · Views: 1,349
  • CIMG1153 (2).JPG
    CIMG1153 (2).JPG
    93.8 KB · Views: 1,332
  • CIMG1154 (2).JPG
    CIMG1154 (2).JPG
    94.4 KB · Views: 1,339
I have already grown tired of having leaves and oak tassles collect in the sink so I devised a solution. I was able to take a square 3/4" peice of starboard and cut it round and slightly larger than the opening of the sink. Then took a router and routed out part of the bottom edge to make a lip in the starboard. This allows it to sit inside the sink a little and not slide around the countertop. Them rounded the top edge with the router to give it a finished look.

Here is a shot of it upside down so you can see the edge of it.

[attachment=1:1i8sp3d6]CIMG1158 (2).JPG[/attachment:1i8sp3d6]

And here it is when sitting on the sink.
[attachment=0:1i8sp3d6]CIMG1157 (2).JPG[/attachment:1i8sp3d6]

The best part is this is the same material used for cutting boards so when not covering the sink I can turn it over use it as a trivet or cutting board. Server 2 purposes.

Brad
 

Attachments

  • CIMG1158 (2).JPG
    CIMG1158 (2).JPG
    85.8 KB · Views: 1,287
  • CIMG1157 (2).JPG
    CIMG1157 (2).JPG
    60.2 KB · Views: 1,283
Very nice and ingenious, Brad! What exactly is Starboard (besides the right side of a boat) anyway? Does it hold up well as a cutting board?

And, BTW, great job on that stucco! I am experiencing the exact same anxiety about doing this myself. My contractor friend that did the masonry work on my build had promised to include the stucco application as part of the job, so I could technically call in that favor, but at the same time, I kind of wouldn't mind attempting it myself, just for the experience...I really don't want to screw it up, though, especially since I want to have a knockdown type of texture on mine, but your post is giving me the confidence to think that I might have a fighting chance. Maybe I'll practice my application technique on a scrap piece of HB or plywood to see if I can achieve the end result that I want. Let's see what transpires...
 
Hey Bernie,

Thanks for the kind words. This is fromt eh starboard website and describes the product well.

King StarBoard® is the original marine-grade polymer and the industry standard. It is the product of a proprietary process called K-Stran,™ the most advanced manufacturing process available for producing consistently flat continuous sheets. King StarBoard is environmentally stabilized to withstand the harshest marine conditions. It will not rot or discolor like teak and other solid woods, and it will not delaminate like wood laminates. King

StarBoard is easy to work with using standard woodworking tools, and design changes are a snap. In addition, the installed cost of King StarBoard is less than teak, other common marine woods, and fiberglass. Plus, our large sheet sizes maximize your yield. Boat buyers appreciate King StarBoard’s low-maintenance finish. Repair and refinishing due to weathering and decay are eliminated, and cleaning is easy. King StarBoard has a handsome matte finish on both sides to hide scuffs and scratches that would show on glossy textured sheets or acrylics

The bait cutting board on our boat is made of this stuff and it hold up very well. It has been on the boat in the marine environment for over 10 years now and still going strong. Starboard is good stuff.

As for the stucco yeah go for it. It is not bad at all. I agree with practicing with the stucco on a scrap peice of hardie board as it will also allow you to verify the color is what you want when dry. I would suggest practicing with the board verticle rather than horizontal because it will be in the vertical position when applying it to the island.

Brad
 
Time for another update. I am getting closer now. I worked last night getting every thing put back in place on the front and mounted permanently. Started with the doors and mounted them with securing them tightly. Set the burners and grill. Put the trash can in and secured it then on to the fridge and trim ring for the fridge. Reinstalled the light face plate and bottle opener. Once I had everything in place and working again to a big step and pulled the white plastic from all the stainless components. It makes a huge differance in the overall appearance to have the plastic removed and all the stainless staring back at you.

Here are some updated pictures with everything mounted.
[attachment=2:2bxz9yo1]CIMG1233 (2).JPG[/attachment:2bxz9yo1]
[attachment=1:2bxz9yo1]CIMG1234 (2).JPG[/attachment:2bxz9yo1]
[attachment=0:2bxz9yo1]CIMG1237 (2).JPG[/attachment:2bxz9yo1]

I am planning to apply the stucco on the sides and back in the morning and will provide updated pictures as well when that is complete.

I am also working with a stainless fabricator to make a custoemr trim tring for around the grill. This will do 2 things. One give it a finished look to match the trim for the other components and two fill the gap beneath the grill. The peice across the bottom of the grill will be made with vents in it to allow even more ventilation and cross ventilation from the front.

I have sent over pictures and a drawing of what I want and he is working up a price now. Hopefully it will not cost a fortune for that piece.

Brad
 

Attachments

  • CIMG1233 (2).JPG
    CIMG1233 (2).JPG
    128.6 KB · Views: 1,237
  • CIMG1234 (2).JPG
    CIMG1234 (2).JPG
    125 KB · Views: 1,240
  • CIMG1237 (2).JPG
    CIMG1237 (2).JPG
    131.2 KB · Views: 1,243
I was also able to get some picutres of the finished stucco along with the vents instaled this evening.

The Bar area from both sides.

[attachment=2:3q8vp4b8]CIMG1238 (2).JPG[/attachment:3q8vp4b8]

[attachment=1:3q8vp4b8]CIMG1239 (2).JPG[/attachment:3q8vp4b8]

The back wall behind the grill area. I did not install an upper vent in the corner where the bar is because the area under the bar is open down to the compartment so it will function as an upper vent. Same is true in the bar area and the front is open around the refridgerator allowing air to blow in from the front and out under the bar. Being on the water we always have a bit of a breeze blowing so it vents the heat from the fridge out of the island well. No combustable gas on that side either.

[attachment=0:3q8vp4b8]CIMG1240 (2).JPG[/attachment:3q8vp4b8]
 

Attachments

  • CIMG1238 (2).JPG
    CIMG1238 (2).JPG
    118.5 KB · Views: 1,176
  • CIMG1239 (2).JPG
    CIMG1239 (2).JPG
    110.3 KB · Views: 1,174
  • CIMG1240 (2).JPG
    CIMG1240 (2).JPG
    100.1 KB · Views: 1,175
And finally the other side. The sun was setting so it really made the stucco color in the picutre very golden.

[attachment=1:1qm5kdjf]CIMG1241 (2).JPG[/attachment:1qm5kdjf]

And a final shot from the front with the side completed.
[attachment=0:1qm5kdjf]CIMG1243 (2).JPG[/attachment:1qm5kdjf]

I think now I can say all the major tasks are complete. I have a few minor things to finsih before I am totally done. The 3 things left to do are
1. Find bar stools. Finding them is the easy part it is paying for them that I am dreading.
2. Figure out what type of grill light I want to install/use.
3. Install a small shelf in the undersink compartment to utilize the space fully.

I will say we have really been enjoying the grill area and been cooking and eating outside 2-3 times per week. I would encourage anyone to take the challenge and design/build their own outdoor kitchen. It is an awesome experience and very rewarding.

I will also try to get a night shot posted with the stucco installed since without the grey hardie background the LEDs look more normal and do not have the blue tint to them.

Brad
 

Attachments

  • CIMG1241 (2).JPG
    CIMG1241 (2).JPG
    133.4 KB · Views: 1,169
  • CIMG1243 (2).JPG
    CIMG1243 (2).JPG
    130.1 KB · Views: 1,164

Enjoying this content?

Support TFP with a donation.

Give Support
With family and rain in town this weekend I did not get a chance to install the new trim ring I had made for around the grill however I did get a chance to break in the recessed burner. We always do a crawfish boil when the family is in town. Having not used the recessed burner to boil a big pot I was nervous about how long it would take to boil the water so I did not go crazy and invite lots of friends this time. I bought 50 lbs of crawfish for the maiden voyage plus all the other fix'ins to go with it like corn, potatoes, mushrooms, garlic, suasage etc. Got ready to start cooking and here comes the rain. Fortunately the rain was not to bad and with the 12' patio umbrella I stayed pretty dry.

Here is a shot of the 100 qt pot with the cooked crawfish. I had already boiled them at this point and was letting them soak a bit to absorb more of the spices.

[attachment=0:3pc4zapp]CIMG1245 (2).JPG[/attachment:3pc4zapp]

They were tasty and all consumed in about an hour.

I thought I would post the picture so folks could get an idea of how I would use and why I incorporated the recessed burner in the build.

The burner did great and had the water boiling in about 15 minutes. Having used in now and seen it in action I know I can comfortably cook the normal 80 to 100 lbs. in two batches. Next time this will be the plan and invite all the regulars over crawfish.

Brad
 

Attachments

  • CIMG1245 (2).JPG
    CIMG1245 (2).JPG
    127.7 KB · Views: 1,040
DrDave said:
Looks delicious!
I'm sure you mentioned it before, but what burner did you use for this?

The recessed drop down burner came from a custom grill/smoker company in Texas named Texas Pitcrafters. http://www.texaspitcrafters.com It was not cheap but it matched the look I was going for and matched well with the other components used in the build. I was afraid the normal side burner would not put out the heat needed to boil large pot in a reasonable time. The 3 sides also work well as a wind block for the windy days that I will be cooking.

It is also 100% 304 stainless including the grate with a lifetime warranty on all components.

Another fun use we have gotten out of it is to adjust the air flow and cut the oxygen way down so it produces a higher yellow flame rather than the normal blue flame used for boiling. At night it provides a yellow glow of a real fire for ambiance and is perfect to let the kids roast marshmellows on. They are loving it for that.

Brad
 
Finally got a minute this morning to install the custom trim ring I had made for the area around the grill. I wanted it to fill the gap below the grill that was a couple inches based on the cutout dimensions in the grill manual. I also thought the edges looked unfinished compared to the rest of the cutouts. When I went back this week to pick it up they told me if I would pay cash they would only charge me 40.00. Handed over the cash and grabed the part. I was pleasantly suprised to find it exactley what I was looking for and the size was perfect. Got up this morning and pulled the grill out to get it installed. I had to add some steel studs accros the bottom for support then mounted the ring.

Here is a pick of it without the grill installed.
[attachment=2:1ttulgj8]CIMG1286 (2).JPG[/attachment:1ttulgj8]

With the grill installed
[attachment=1:1ttulgj8]CIMG1289 (2).JPG[/attachment:1ttulgj8]

And the full island
[attachment=0:1ttulgj8]CIMG1293 (2).JPG[/attachment:1ttulgj8]

I really think it completes the island and finishes the grill cutout nice. The only thing the local fabricator could not do was cut louvers in the bottom section so I left a little space below the grill for airflow but do not need several inches below for it. I guess if I ever have to replace teh grill and can not find the same one again I will have free space below the grill if needed.

Brad
 

Attachments

  • CIMG1286 (2).JPG
    CIMG1286 (2).JPG
    117.7 KB · Views: 962
  • CIMG1289 (2).JPG
    CIMG1289 (2).JPG
    117.8 KB · Views: 965
  • CIMG1293 (2).JPG
    CIMG1293 (2).JPG
    118.3 KB · Views: 961
WOW!! looks beautiful.. Not sure if youve already explained this, and if so im sorry for asking again.
What are all the doors? Im guessing ones a mini fridge... is one a dishwasher lol? again, you did an amazing job! but you knew that already :goodjob:
 
Heckpools said:
WOW!! looks beautiful.. Not sure if youve already explained this, and if so im sorry for asking again.
What are all the doors? Im guessing ones a mini fridge... is one a dishwasher lol? again, you did an amazing job! but you knew that already :goodjob:

Thanks for the kind words. Actually that is a good question that no one else has asked about. I will describe the doors start from left to right.

Rollout Trash Can - This has paid off very well. I debated how usefull it would be during the design phase and now could not imagine not having it.
Refridgerator - Danby Fridge. Decided on this over a cooler as I did not want to haul ice to a cooler all the time.
Under Sink Door - Being in the corner this is a large storage area to access sink plumbing, Electrical Panel, On demand Hot Water Heater, Low voltage lighting transformer, Soap, Towels, Cleaners etc.
Under Grill Door - Storage for larger boiling pot, Grill Utinsels, Grill Cover storage when using grill.
Under side burner door - Storage for LP tank. The grill and side burner are natural gas but the recessed side burner is LP for the additional BTUs that it provides over natural gas.

Hope this helps explain all the doors.

Thanks
Brad
 

Enjoying this content?

Support TFP with a donation.

Give Support
Thread Status
Hello , This thread has been inactive for over 60 days. New postings here are unlikely to be seen or responded to by other members. For better visibility, consider Starting A New Thread.