View attachment 39500Hi all:
I just wanted first to say THANK YOU to all the posters who have shared their builds, their stories, their methods, and their successes. We've been inspired by you all to build our own, after we suffered sticker shock from a local BBQ retail store.
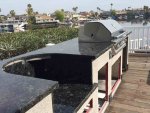
I bought my husband the Lion 75000 grill for Christmas (the head unit only) and we've been planning the build (and buying fixtures) since then. Our plan is a simple 13' island that will include our XL Big Green Egg, the Lion 75000 grill, an UL-approved outdoor fridge, and several doors and drawers.
DH wanted the frame to be made of aluminum; our local retail store only wanted to work with us if we were using a steel frame construction. They we also quoting $3500 for the raw island - frame and Hardibacker alone. So we decided we could do better.
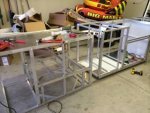
We contacted Fireside Outdoor Kitchens in Georgia, and began working with them, when it was clear they'd make the aluminum frame we wanted, and ship it (in two pieces) for less than the retail store wanted for delivery. So we gave them a drawing, they converted it to a CAD/CAM drawing, and off they went.
We got the frame delivered several weeks ago. It was very much what we wanted, with two big boo-boos. 1) They did NOT install the floor they'd promised, and 2) they'd cut the opening for the two drawers under the grill to the wrong width (and off center!). We have contacted them about the error, but have had no response just yet. I will be following up. In the meantime, we need to get this project DONE, because we're hosting a family reunion at the end of this month.
DH cut the frame and re-welded the drawer openings to the correct width, and centered appropriately. He also bought sheet aluminum and has bolted/riveted into place as a floor. He also built a divider between the grill compartment and the fridge section.
The island frame is now up on the deck. The basic electric wiring has been done; switches and transformers and wiring have been mounted. He is now starting the cutting of the Wonderboard to attach to the frame.
We'll be finishing the exterior with Dryvit Acrylic Stucco (sprayed on) and we'll have a granite top. Other additions will be LED lights, and downlights too. More soon!


