Search results
-
O
Outdoor Kitchen Build Updated!
Re: About to start my Outdoor Kitchen! Looking for advice The backyard looks great, and love all the stone. What does something like that cost? 75-100K?- Orogrande
- Post #4
- Forum: The Coffee Bar
-
O
Couple questions on build and design.
Regarding your first question: I used Trex decking boards to keep the steel studs off the cement so the studs wouldn't be sitting in water and rusting. I also used Trex boards to allow for gaps under the grill to allow water to flow under the grill.- Orogrande
- Post #2
- Forum: The Coffee Bar
-
O
planning for my outdoor kitchen which screws for studs?
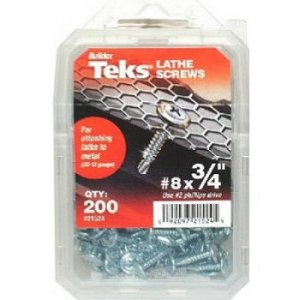
You want to use Teks lath screws. They're self tapping for the steel studs. You can get them in boxes of 200 for about 6 bucks. They're at lowes or Home Depot.- Orogrande
- Post #2
- Forum: The Coffee Bar
-
O
Let the build begin!!!
Thank you. Sorry, no plans. Did it all in my head. I attached the footrest by screwing the footrest frame to the island frame. There are a lot of great videos on YouTube that show you how to make an island and countertop. Good luck to you.- Orogrande
- Post #54
- Forum: The Coffee Bar
-
O
Let the build begin!!!
I didn't use any additives for my concrete counter. I only used the quikrete countertop mix. Had to special order from lowes.- Orogrande
- Post #49
- Forum: The Coffee Bar
-
O
Let the build begin!!!
I didn't cut the hardi under the counter. The stone I installed covered the hardi. No reason to cut it out since the stone covered it.- Orogrande
- Post #45
- Forum: The Coffee Bar
-
O
Let the build begin!!!
You can't reuse the Z counterforms. Once you snap off the edge they're done. The stain I got at my local concrete shop. It's a brand called proline. Its a waterbased stain and the color was pinto. My wife did the great job of staing the concrete using a sponge. We then added a "wet look"...- Orogrande
- Post #42
- Forum: The Coffee Bar
-
O
Let the build begin!!!
I put hardi under the overhang. I thought like you did and thought no one would see it, but decided on attaching the hardi and glad I did. Many people will look under the counter just to see how you built it or if sitting in a chair you will be able to see it. Leaving just the studs showing...- Orogrande
- Post #41
- Forum: The Coffee Bar
-
O
Rivet question re grab size and question for those who didn't use rivets...
I used screws just because I didn't want to drill all the rivet holes. I used about 1000 screws and glad I didn't have to drill 1000 rivet holes. Screws will be easier and just as strong.- Orogrande
- Post #6
- Forum: The Coffee Bar
-
O
Let the build begin!!!
- Orogrande
- Post #34
- Forum: The Coffee Bar
-
O
Let the build begin!!!
The support brackets I bought from lowes. They were L shape 12"x12".- Orogrande
- Post #33
- Forum: The Coffee Bar
-
O
Let the build begin!!!
Just finished pouring quikrete countertop mix with Z counterforms. The forms worked well,but left a couple outside in the sun and they warped so bad that I couldn't use them.- Orogrande
- Post #30
- Forum: The Coffee Bar
-
O
Let the build begin!!!
- Orogrande
- Post #27
- Forum: The Coffee Bar
-
O
Let the build begin!!!
I put 1/2" hardiboard on the bottom of the frame. Helps to keep items dry and the critters out. I also put Trex board on the bottom to raise it off the ground. I'm starting on my concrete countertop. I'm using z counterform for the edging and quikrete countertop mix. Hoping to start pouring...- Orogrande
- Post #26
- Forum: The Coffee Bar
-
O
Let the build begin!!!
Thanks Chris. I look forward to seeing your build.- Orogrande
- Post #23
- Forum: The Coffee Bar
-
O
Let the build begin!!!
Thanks Dchamber. Do you think you really need the red gard? I'm thinking of not even using it. When I got my stacked veneer stone, they told me that I need to mix the veneer mortar with regular S type mortar, because the veneer mortar is too strong. Didn't know why you wouldn't want the...- Orogrande
- Post #20
- Forum: The Coffee Bar
-
O
Let the build begin!!!
I think I'm going to use red gard for water barrier, but I'm worried the veneer stone mortar won't stick well on the red gard. So not sure yet. Durock was an option I thought about but was told the hardibacker is the same thing and easier to cut. The Trex was installed every few feet to...- Orogrande
- Post #18
- Forum: The Coffee Bar
-
O
Let the build begin!!!
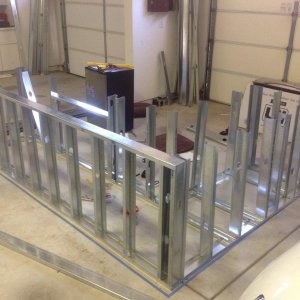
I built my frame in the garage because I have a swamp cooler in it and I wanted to stay out of the sun. I then moved it outside because it would of been to heavy to move after I put on the Trex and hardibacker. I heard it can take years outside in the weather to rust. A few months should be ok.- Orogrande
- Post #15
- Forum: The Coffee Bar
-
O
Let the build begin!!!
Finished the Backerboard this weekend!!! Next up is the concrete countertops and veneer stone on the sides. I'm thinking of using red gard for water barrier, but not sure if I really need it???- Orogrande
- Post #13
- Forum: The Coffee Bar
-
O
New build. Advice?
I'm using your build as a model for mine and I was laying my Trex board like yours and about to lay the hardibacker board to cover the bottom of the island, then realized I could just cover the entire bottom with Trex with only 6 more pieces and there would be no need to cover bottom with cement...- Orogrande
- Post #45
- Forum: The Coffee Bar
-
O
Let the build begin!!!
Great idea with the computer fans for venting, but to avoid having to hook them up to electric, I'm going to install 2 vents on the end next to grill and one inside the fridge compartment at other end of grill. Going to use hardibacker and veneer stone. Does anyone know if I need to use a...- Orogrande
- Post #12
- Forum: The Coffee Bar
-
O
Let the build begin!!!
Finished installing electrical. 3 outlets. For fridge, rotisserie, and installing LED light string under overhang. I also decided on a foot rest to wrap around. Then on to hardiboard.- Orogrande
- Post #10
- Forum: The Coffee Bar
-
O
Documenting My Build
You can insert the URL from photobucket to show the images on your thread instead of showing a link.- Orogrande
- Post #10
- Forum: The Coffee Bar
-
O
Documenting My Build
Go to photobucket.com and upload your images.- Orogrande
- Post #4
- Forum: The Coffee Bar
-
O
Let the build begin!!!
Just finished the 12" overhang. 12" on center with support brackets on each one.- Orogrande
- Post #9
- Forum: The Coffee Bar
-
O
Outdoor Kitchen Build - Kansas
I looks like you had the blue plastic outlet boxes then changes to metal? I'm curious why you changed? I was going to use the blue outlet boxes on my island too.- Orogrande
- Post #18
- Forum: The Coffee Bar