Search results
-
M
Outdoor Kitchen Planning
It's an EdgeStar indoor fridge. It struggles to keep drinks cool (<40 degrees) in the summer, but still very happy with it. Had it 4 years now.- mweisz
- Post #14
- Forum: The Coffee Bar
-
M
Outdoor Kitchen Planning
Hello, since my island was built on sloped concrete. I used like 6 or 7 concrete anchors to hold the island down. I didn't want to take the risk of it ever moving off of the plastic shims. Mark- mweisz
- Post #12
- Forum: The Coffee Bar
-
M
.
Hey Austin, The four things I still really like about our BBQ island are; 1.) the additional storage drawers and access door on the backside of the island (see photos), 2.) the removal umbrella for shade on those hot & sunny days, 3.) the 120V light for cooking in the dark, and 4.) the...- mweisz
- Post #8
- Forum: The Coffee Bar
-
M
New member, and my newly built outdoor kitchen/bar
Very nice project and thanks for sharing all of the progress photos. Enjoy that new space!- mweisz
- Post #9
- Forum: The Coffee Bar
-
M
planning for my outdoor kitchen which screws for studs?
I agree that those screws you listed would be fine. I used the same #8 Tek zinc screws mentioned previously.- mweisz
- Post #6
- Forum: The Coffee Bar
-
M
Outdoor Kitchen Question
I will tackle #1 & #2.... 1. Is Aluminum 1.5" x 1.5" tubing strong enough. I would suspect the aluminum tube is plenty strong enough, but it's really a function of what center spacings they will be on and how much load you want to place on them. That shape is fairly rigid compared to steel...- mweisz
- Post #3
- Forum: The Coffee Bar
-
M
Outdoor Beverage Cooler
In Aug. 2013, I bought an indoor beverage cooler for use in our outdoor BBQ island. It is an EdgeStar Model #CBR1501SG 148 Can Stainless Steel Beverage Cooler and it struggled on the hot days (90 degrees & up) even though it was in complete shade all day. I think I paid $500 for it. If you...- mweisz
- Post #10
- Forum: The Coffee Bar
-
M
Pellet Grills - anyone have one of these?
We bought a Traeger a few years ago & love it. It still gets used 2-3 times a week. Planning on cooking the Thanksgiving turkey in it.- mweisz
- Post #3
- Forum: The Coffee Bar
-
M
Marine Head Unit and Power Source Confirmation
Zach, On our outdoor BBQ island's side wall, I permanently mounted a marine grade head unit very similar to what you described. It is subject to all weather conditions (hot, cold, & rain) and it has worked very well. I purchased a Jensen JHD40BRT for the Bluetooth & IPod connectivity. The...- mweisz
- Post #5
- Forum: The Coffee Bar
-
M
BBQ Island Build - 99% Complete
It was called "Choctaw Brown". Even though I bought the stone from a store here in California, it came from a quarry in Arkansas.- mweisz
- Post #34
- Forum: The Coffee Bar
-
M
BBQ Island Build - 99% Complete
The bronze step light was purchased at store called Horizon. Horizon is a specialty landscaping store. These low-voltage lights are made by Unique. They aren't cheap, but you can feel the quality compared to the typical home improvement box store lights they sell.- mweisz
- Post #32
- Forum: The Coffee Bar
-
M
BBQ Island Build - 99% Complete
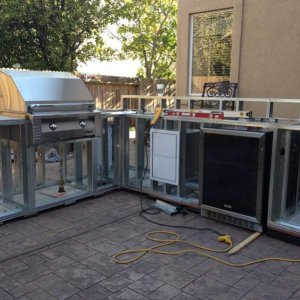
edlouie, Good question....those black pieces are UHMW (really hard plastic). Yes, they were used as shims to level out my island. In this area of my patio, I have a bunch of different slopes going on for water drainage. Because the UHMW is so hard, it is actually very slippery on the...- mweisz
- Post #30
- Forum: The Coffee Bar
-
M
BBQ Island Build - 99% Complete
To All, here are a bunch of photos....http://s1282.photobucket.com/user/mweisz1/library/- mweisz
- Post #26
- Forum: The Coffee Bar
-
M
BBQ Island Build - 99% Complete
I keep exceeding my allowable bandwidth, so I'll dump all my pictures into photobucket. Give me a couple of days to organize this.- mweisz
- Post #25
- Forum: The Coffee Bar
-
M
BBQ Island Build - 99% Complete
rodog123, Thanks! I hired the granite installation out to a local shop. The granite without any cutting or installation was $11 per sqft. Sorry, I don't have a comprehensive list of material costs. The real money costs are in the gas grill, granite, stainless steel doors & drawers, stone...- mweisz
- Post #22
- Forum: The Coffee Bar
-
M
BBQ Island Build - 99% Complete
Re: BBQ Island Build - Complete whesser, Yes, I used 4 brackets to the support the granite countertop. The granite is 3cm thick x 20" deep x 9.5ft long. The countertop overhangs about 13" or so. The supports are screwed into the studs. All gas & wiring was run in a 24" deep trench (per my...- mweisz
- Post #20
- Forum: The Coffee Bar
-
M
BBQ Island Build - 99% Complete
Caliking, The studs were 25 gauge steel studs from Home Depot. I pre-cut the studs on a steel band saw since it would be much quieter than a chop saw. I used screws from Hope Depot as well. The screws were Teks #8 x 3/4 in. Zinc Plated Steel Truss-Head Phillips Self Drilling Sharp Point...- mweisz
- Post #18
- Forum: The Coffee Bar
-
M
BBQ Island Build - 99% Complete
Sorry, we didn't have any plans. Sort of sketched it out and made it work. Scoured the internet for ideas and then went for it.- mweisz
- Post #16
- Forum: The Coffee Bar
-
M
BBQ Island Build - 99% Complete
DaSarge, We did hire a landscape architect to help us some general layout concepts and with plants. Other than that we picked all of the materials and colors from the stamped concrete to the stone veneer. We spent a lot of time researching on the internet and going to home shows to get ideas...- mweisz
- Post #14
- Forum: The Coffee Bar
-
M
BBQ Island Build - 99% Complete
Thank you. I've been trying to upload a larger photo, but have apparently max'ed out on my upload "quota limit". If anyone knows a better way to get some more photos uploaded, I'd be happy to try that. Mark- mweisz
- Post #11
- Forum: The Coffee Bar
-
M
BBQ Island Build - 99% Complete
This BBQ Island project is done. Wrapped up the backsplash over the weekend. The photo shows the final product. - - - Updated - - - Sorry..Here's the photo..- mweisz
- Post #7
- Forum: The Coffee Bar
-
M
BBQ Island Build - 99% Complete
Vegas Kid, That's a good question. I'm guessing I saved $1,500-$2,000 on the labor by doing it myself. I did all of the design, material runs, framing, cement board and the 12V & 110V wiring. By doing it yourself, the change orders to the project don't hurt the wallet as if you had a...- mweisz
- Post #6
- Forum: The Coffee Bar
-
M
BBQ Island Build - 99% Complete
Hello, This is my first post in the forum. Since I gained knowledge from this forum on a variety of topics. I thought I should pass along any lessons I learned with our DIY custom BBQ Island. I will try to answer any questions that other DIYs might have on the process I faced from beginning...- mweisz
- Thread
- Replies: 34
- Forum: The Coffee Bar