Both return and suction side leak

tagteamcomputing

Gold Supporter
Feb 7, 2017
292
Tulsa, OK
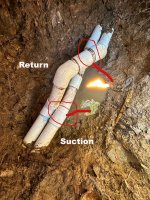
I have a leak in both the return and suction side.
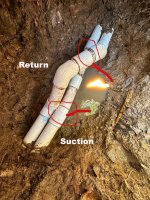
ReturnAndSuctionLeaksmall.jpg

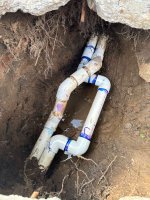
I bought the house with the pool so I have no idea what happened here to necessitate this repair and they the lines are crossed like this. However, as you can see their repair has failed on both the suction AND the return side.

My plan is to cut at the junctions for both pipes and redo it all but I have a couple of questions.
1. Should I use 90deree or 45 degree corners?
2. Should I uset this flex type of pipe again or regular pipe?

Plan.jpg

Thanks for any help, I need to get his fixed before it gets hot.
 
TTC,

In my opinion, the sad original repair is why you are having to do it again... :cry:

I would not use flex.. ever!!!

I'd use the off-set fix like in your pic...

I doubt that it will make much difference if you use 90's or 45's..

Thanks,

Jim R.
 
Thanks Jim. I was just wondering if maybe a 90 once seated around with dirt and rock would be less likely to flex a bit and come loose again. However, It seems that water would flow a bit easier with a 45 but maybe not much easier.

Also, they had this hole filled with old concrete chunks , old pieces of pipe etc. Obviously, so they had some fill stuff and didn't have to cart it out.
Would it be better to fill it in with some gravel or sand around the pipes and then some topsoil and then some more gravel right under the concrete when I repour it?
Thanks
 
Last edited:
I have to repair a repair of a straight pipe. The last guys used 45 degree joins and flex pipe. I am going to use 90 and regular 2" pipe. Like the image below

Plan.jpg

however, I am not sure how you get a good secure seating with a twist doing this. There will not be long enough pipe length for a 2" pipe to flex a bit to get the 90 degree elbow over the edge and fully seated.

What is the recommended way of doing this? do I build out the entire half square and then try to get a little flex and seat both ends at once
 
I have to repair a repair of a straight pipe. The last guys used 45 degree joins and flex pipe. I am going to use 90 and regular 2" pipe. Like the image below

View attachment 566262

however, I am not sure how you get a good secure seating with a twist doing this. There will not be long enough pipe length for a 2" pipe to flex a bit to get the 90 degree elbow over the edge and fully seated.

What is the recommended way of doing this? do I build out the entire half square and then try to get a little flex and seat both ends at once
Yep, the twist is a good idea when possible but not a deal breaker. If this is going to get buried, dont use flex pipe or unions. Your future self will thank me later. 😉
 
Last edited:
I have to repair a repair of a straight pipe.

What type of problem do you have? If suitable, I'd highly recommend Plast-aid. It yields much better results than epoxy. I used it to repair my cracked SWG. It bonds extremely well with PVC, and it's unbelievably strong.

Waterproof Plastic Repair Kits Fixes cracked ABS PVC Acrylic Wood More

6oz_400x.jpg
 
This is the problem, I had posted about it in another thread. I don't know if I want to patch a leaky joint only to have to dig it out again in a few years.
View attachment 566306
Curses to the person who did that! (Unless it was you then i take it back partly).

I’d do it with 2 90’s pointing straight up on the existing ends of the line. Then create a “U” of the right length so you can connect/glue both ends at once. Have a friend there to help hold one of the joints tight while you hold the other. Trying to hold both can be tricky.
 

Enjoying this content?

Support TFP with a donation.

Give Support
No, I did not do it, so you don't have to take it back.
Ok, so I will cut it back to rigid, put the 90's on each end then make my U and have a friend help me and we can get it in fully seated then and the only thing we dont get is the twist, which should be ok as long as I get good primer and glue on it.

I like that plan, I have to be very precise on my cuts to make the U but that does seem to be the best to get it fully seated, which I think is more important that the twist if you could only have one.

Do you have any recommendations on the lenght of the pieces for the U or it doesnt matter?
Also, should I make them at a slight angle so they stay deeper in the ground for freeze concerns.
I dont think it matters, though longer U pieces have a bit more flex than smaller so maybe that can help you or hurt you depending on your perspective. 🤣
 
Hey guys, an update and a question.
I replaced one of my leaking pipe sections. You can see what it looked like before. I have done 90's and was able to fully seat all the pipes.

I am thinking about putting some plumbers putty on each of the joints. It may be overkill but I don't want to have to ever dig this hole out again. Is there any bad site to putting plumbers putty everywhere?

90Degree.jpg
 
Hey guys, an update and a question.
I replaced one of my leaking pipe sections. You can see what it looked like before. I have done 90's and was able to fully seat all the pipes.

I am thinking about putting some plumbers putty on each of the joints. It may be overkill but I don't want to have to ever dig this hole out again. Is there any bad site to putting plumbers putty everywhere?

View attachment 577252
What do you think the putty is going to do? Are these pressure or suction lines?
 
I have not actually been able to determine which is which. I think the one I just fixed is the return.
I was thinking of putty the putty on just in case one of the seals didn't set very well. On one side there was some water dripping out and I am afraid it may not have sealed so great because of that.
So I was thinking if I put some plumbers putty around all the edges it would give me a little more insurance to make sure it doesn't leak.
Plumbers putty wont do anything, especially on a return line. If theres water dripping then it needs to be reglued with new fitting. Dont bury it with a leak. They last decades if glued correctly.

Edit: maybe you meant there was dripping while the glue was setting? That may be ok, do a pressure test before burying it.
 
yes, I meant it was dripping while I was doing the repair. I put a lot of glue on though and they were able to get fully seated and on all of them except the last two I was able to get a good twist to it when putting it on.

How can I do a pressure test? If it turns out to be the suction line I can plug the valve by the pump ( I bought one of those bladders) and then I can screw a home made water pressure tester stick into the skimmer. However, I am not quite sure how to build the water stick ( I have seen a few online but not that would quite fit my needs)

If it turns out it is the return line I guess you have to put plugs in all the returns and you are just testing all the returns and hoping that there are no leaks anywhere else.
 
Last edited:
yes, I meant it was dripping while I was doing the repair. I put a lot of glue on though and they were able to get fully seated and on all of them except the last two I was able to get a good twist to it when putting it on.

How can I do a pressure test? If it turns out to be the suction line I can plug the valve by the pump ( I bought one of those bladders) and then I can screw a home made water pressure tester stick into the skimmer. However, I am not quite sure how to build the water stick ( I have seen a few online but not that would quite fit my needs)

If it turns out it is the return line I guess you have to put plugs in all the returns and you are just testing all the returns and hoping that there are no leaks anywhere else.
Yea. Plug both ends of the pipe and then screw a pressure guage and a ball valve into a fitting in one of the ends and see if it holds 15psi for a day or so.
 
Sorry, I am not well versed in all the terms as I am a computer guy. Let me tell you my plan as I see it from what you have said.
  • I buy a 1.5 inches threaded pvc end piece
  • I glue in a 3foot piece of 1.5 inch PVC pipe to the threaded piece and this will be the bit that will go into the skimmer
  • On the top I glue a T to the 3 foot PVC pipe
  • That T will have a pressure gauge at the top and male / female hose adapter on the side.
  • I screw the bottom into the skimmer
  • I screw the hose into the side
  • I turn on the hose and the pressure gauge at the top will tell me when I hit 15 psi.
  • I then just turn off the hose (leave it connected) and then let everything sit for a while and see if I lose pressure.
Does that seem about right? (I am not sure if the ball valve is needed if I do it this way)

BTW, I was able to figure out which one was the return by shutting the pool return off, turning on the spa and fountain return. Then while holding the pipes I had my wife turn the pool return back on and I was able to feel some slight bubble movement in the one line which I take to be the return line.

Thanks, for the help

The trouble with that is your also testing the hose so if it fails, you dont know if the leak is related to the pool or one of the fittings between the skimmer and the hose bib. Do you have an air compressor? The goal is to put air pressure in the piping and then seal it so it cant get out. If the air pressure starts out at ~15psi and you still have 15psi the next day, theres no leaks.
 

Enjoying this content?

Support TFP with a donation.

Give Support
Thread Status
Hello , This thread has been inactive for over 60 days. New postings here are unlikely to be seen or responded to by other members. For better visibility, consider Starting A New Thread.